Skip to content
Cleaning a juicer might look simple, but doing it right makes a huge difference in taste, hygiene, and the lifespan of your machine. Many people start juicing for health, but they quickly notice that cleaning the juicer becomes a chore.
If you skip proper cleaning, your juicer can collect mold, bacteria, and sticky residue. This affects both your juice and your health. Whether you use your juicer daily or only occasionally, knowing the best way to clean it saves you time and trouble.
In this guide, you’ll learn step-by-step how to clean different types of juicers, what tools to use, common mistakes to avoid, and practical tips for stubborn stains. You’ll also find useful tables comparing cleaning methods, juicer types, and cleaning frequency.
The goal is to make cleaning your juicer easy, efficient, and safe—so you can enjoy fresh juice without worries.
Why Cleaning Your Juicer Matters
Juicers process raw fruits and vegetables, which often contain dirt, pesticides, and natural sugars. These sugars stick to the juicer’s parts, making them hard to remove if left for too long. Residue buildup can lead to:
- Unpleasant odors
- Mold growth
- Bacterial contamination
- Reduced juicer performance
According to the FDA, food equipment with leftover organic material is a leading cause of household foodborne illness. Keeping your juicer clean isn’t just about taste—it’s about safety.
Many juicers have tiny holes or mesh screens that can clog easily. If not cleaned, these block juice flow and make your machine work harder. Over time, this can damage the motor or cause parts to break.
Types Of Juicers And Cleaning Challenges
Juicers come in several designs, each with its own cleaning needs. Knowing your juicer type helps you clean it more effectively.
| Juicer Type | Cleaning Difficulty | Key Parts to Clean | Common Problems |
|---|---|---|---|
| **Centrifugal** | Moderate | Blade, mesh filter, pulp container | Clogged mesh, sticky residue |
| **Masticating (Slow)** | Easy to Moderate | Auger, juicing screen, chute | Stuck pulp, hard-to-reach gaps |
| **Triturating (Twin Gear)** | Hard | Gears, screen, housing | Fiber buildup, small crevices |
| **Citrus Press** | Easy | Reamer, strainer | Sticky juice, seeds stuck |
Centrifugal juicers use fast-spinning blades and are popular for their speed. However, their mesh filters can be tough to clean.
Masticating juicers squeeze produce slowly. They have fewer parts, but pulp can get stuck inside the auger or screen.
Triturating juicers are high-end and use twin gears. They extract more juice but have more parts and tight spaces, making cleaning harder.
Citrus presses are simple, but sticky citrus juice can dry quickly, attracting ants and making stains.
Step-by-step Juicer Cleaning Guide
1. Unplug And Disassemble
Safety comes first. Always unplug your juicer before cleaning. Disassemble all removable parts—usually the lid, pulp container, juice jug, filter, blade, auger, and any screens. Check your juicer manual for exact instructions.
Tip: Lay out parts on a towel to keep track. Beginners often forget small parts, like rubber gaskets, which trap juice and bacteria.
2. Rinse Immediately After Use
Rinse each part under running water as soon as you finish juicing. This prevents pulp and juice from drying and sticking.
- Use warm water for sticky residue.
- Don’t soak electrical parts.
Waiting even 30 minutes can make cleaning much harder.
3. Clean Each Part Thoroughly
Most juicer parts can be washed with mild dish soap and a soft brush or sponge. For best results:
- Use a soft brush for mesh screens.
- Scrub the blade gently to avoid dulling.
- Wipe the base with a damp cloth only.
If your juicer is dishwasher-safe, place parts on the top rack. However, hand washing is usually better for longevity.
4. Handle The Mesh Filter Carefully
Mesh filters are delicate. If they clog:
- Soak in warm soapy water for 10–20 minutes.
- Use a toothbrush or small brush to scrub gently.
- Avoid wire brushes—they can scratch and damage the mesh.
Many beginners miss the mesh filter’s tiny holes, which can hide pulp and bacteria.
5. Remove Stubborn Stains And Odors
For tough stains or bad smells:
- Mix baking soda and water into a paste.
- Apply to stained areas and let sit for 15 minutes.
- Scrub gently and rinse.
For odors, rinse with a vinegar-water solution (1 part vinegar to 3 parts water). This neutralizes smells and kills bacteria.
6. Dry All Parts Completely
Drying is crucial. Water left on parts can cause mold and rust. Use a clean towel or air dry. Reassemble only when parts are fully dry.
Tip: Place parts on a drying rack to avoid water spots.
7. Reassemble And Store Properly
Once dry, reassemble your juicer. Store in a clean, dry place. If you juice daily, keep it assembled. If not, store parts separately to prevent dust and moisture buildup.
Cleaning Frequency: How Often Is Enough?
Your cleaning routine depends on how often you use your juicer. Here’s a simple comparison:
| Usage Frequency | Recommended Cleaning | Deep Clean |
|---|---|---|
| Daily | After each use | Weekly |
| Weekly | After each use | Monthly |
| Occasional | After each use | Before storage |
Deep cleaning means soaking parts, scrubbing with baking soda or vinegar, and checking for hidden residue.
Juicer experts recommend deep cleaning at least once a week if you juice daily. If you use your juicer less, deep clean before long-term storage.

Credit: www.kuvingsusa.com
Tools And Supplies You Need
Cleaning a juicer is easier with the right tools. Here are essentials:
- Soft brush: For mesh screens and small parts.
- Mild dish soap: Avoid harsh cleaners—can damage plastic.
- Toothbrush: For tight spaces and stubborn spots.
- Microfiber towel: For drying and wiping.
- Baking soda and vinegar: For stains and odors.
- Bottle brush: Useful for chutes and narrow areas.
Many people miss using a toothbrush or bottle brush, which reach spots regular sponges can’t.
Common Cleaning Mistakes (and How To Avoid Them)
Cleaning a juicer seems simple, but small mistakes can create big problems. Here are common errors and how to avoid them:
- Skipping immediate rinse: Dried pulp is much harder to remove.
- Using abrasive cleaners: Can scratch plastic and metal parts.
- Ignoring the mesh filter: Leads to blockages and reduced juice output.
- Not drying completely: Causes mold and rust.
- Washing electrical parts: Always keep the base dry.
- Storing wet or dirty parts: Attracts bacteria and insects.
Experienced juicer owners often use a dedicated brush for mesh filters and never let parts air dry in humid environments.
Deep Cleaning: Monthly Maintenance
Regular cleaning is enough for daily use, but deep cleaning keeps your juicer in top shape. Here’s how:
1. Soak Removable Parts
Fill a large bowl or sink with warm water and mild dish soap. Soak all removable parts for 30 minutes. This loosens dried pulp and stains.
2. Scrub With Baking Soda
For tough buildup, sprinkle baking soda on a damp sponge or brush. Focus on screens, filters, and blades. Baking soda is gentle but effective.
3. Vinegar Rinse
After scrubbing, rinse parts in a vinegar-water solution. This removes odors and kills germs.
4. Inspect For Wear
Check for cracks, warping, or worn-out gaskets. Replace damaged parts to prevent leaks and contamination.
5. Dry And Reassemble
After deep cleaning, dry parts thoroughly and reassemble. This is a good time to lubricate moving parts if your juicer manual recommends it.
Cleaning Juicer Brands: What’s Different?
Some popular juicer brands have unique parts or cleaning needs. For example:
- Breville: Mesh filter is very fine. Use a soft brush only.
- Omega: Auger and chute can trap pulp. Toothbrush is ideal.
- Hurom: Silicone gaskets must be removed for cleaning.
- Hamilton Beach: Parts are dishwasher-safe but hand-washing extends lifespan.
Always check your brand’s manual for cleaning advice. Some brands offer cleaning kits or special brushes.
Comparing Juicer Cleaning Methods
Let’s look at how different cleaning methods work for various juicer types:
| Method | Juicer Type | Effectiveness | Risk of Damage |
|---|---|---|---|
| Hand Wash | All types | High | Low |
| Dishwasher | Centrifugal, some masticating | Medium | Medium |
| Soak in Vinegar | Masticating, twin gear | High for odor | Low |
| Scrub with Baking Soda | All types | High for stains | Low |
Hand washing is safest and most effective. Dishwashers save time but can warp plastic or dull blades. Soaking in vinegar removes odors and stains, while baking soda is best for sticky buildup.
Tips For Cleaning Hard-to-reach Areas
Juicers have places where pulp and juice hide. Here’s how to clean them:
- Use a pipe cleaner for narrow chutes.
- Twist a damp paper towel and push through small gaps.
- Use a spray bottle with vinegar to reach deep crevices.
- For twin-gear juicers, rotate gears while brushing to clean all sides.
Many beginners miss cleaning the chute or inside the auger, which can cause smells and reduce performance.
Preventing Residue And Odors
Keeping your juicer clean starts before you juice. Here’s how to prevent problems:
- Peel fruits and veggies: Reduces sticky residue.
- Remove seeds and pits: Prevents blockages.
- Juice softer produce first: Hard produce can scratch parts.
- Clean immediately after juicing: Stops stains from forming.
Experienced users often add a drop of lemon juice to their cleaning water to keep odors away.
How To Clean A Juicer When Traveling
If you take your juicer on trips, cleaning can be tricky. Here’s a quick routine:
- Rinse parts immediately with bottled water.
- Use a travel-sized brush or toothbrush.
- Dry with paper towels.
- Avoid storing wet parts in luggage—use a zip-top bag.
Traveling with a juicer is popular for health-conscious people, but many forget proper cleaning. Always clean before packing.
Eco-friendly Cleaning Choices
You can clean your juicer without harsh chemicals. Try these eco-friendly options:
- Baking soda: Safe, cheap, and effective for stains.
- White vinegar: Kills germs and removes odors.
- Lemon juice: Cuts grease and leaves a fresh scent.
- Reusable microfiber cloths: Reduce waste.
Avoid bleach or strong detergents—they can leave residue and harm plastic parts.
When To Replace Juicer Parts
Even with great cleaning, juicer parts wear out. Replace parts if you notice:
- Cracks or chips in plastic or glass
- Warped mesh filters (juice flow is slower)
- Loose gaskets (causes leaks)
- Rust spots on metal parts
Regular cleaning helps parts last longer, but replacing damaged parts is important for safety.
Credit: blog.squaretrade.com
Juicer Cleaning For Large Families
If your household uses the juicer often, cleaning becomes more important. Here are tips:
- Set up a cleaning station near your sink.
- Assign cleaning duties to different family members.
- Keep extra brushes and towels handy.
- Deep clean twice a week if juicing multiple times daily.
Some families buy a second mesh filter to rotate for faster cleaning.
Juicer Cleaning Myths
You might hear advice that sounds helpful but is actually wrong. Here are some juicer cleaning myths:
- “Dishwashers clean juicers perfectly”—not always true, may damage parts.
- “Hot water alone is enough”—soap is needed for grease and bacteria.
- “You don’t need to clean every day”—even a single use leaves sticky residue.
Trust proven cleaning methods, not shortcuts.
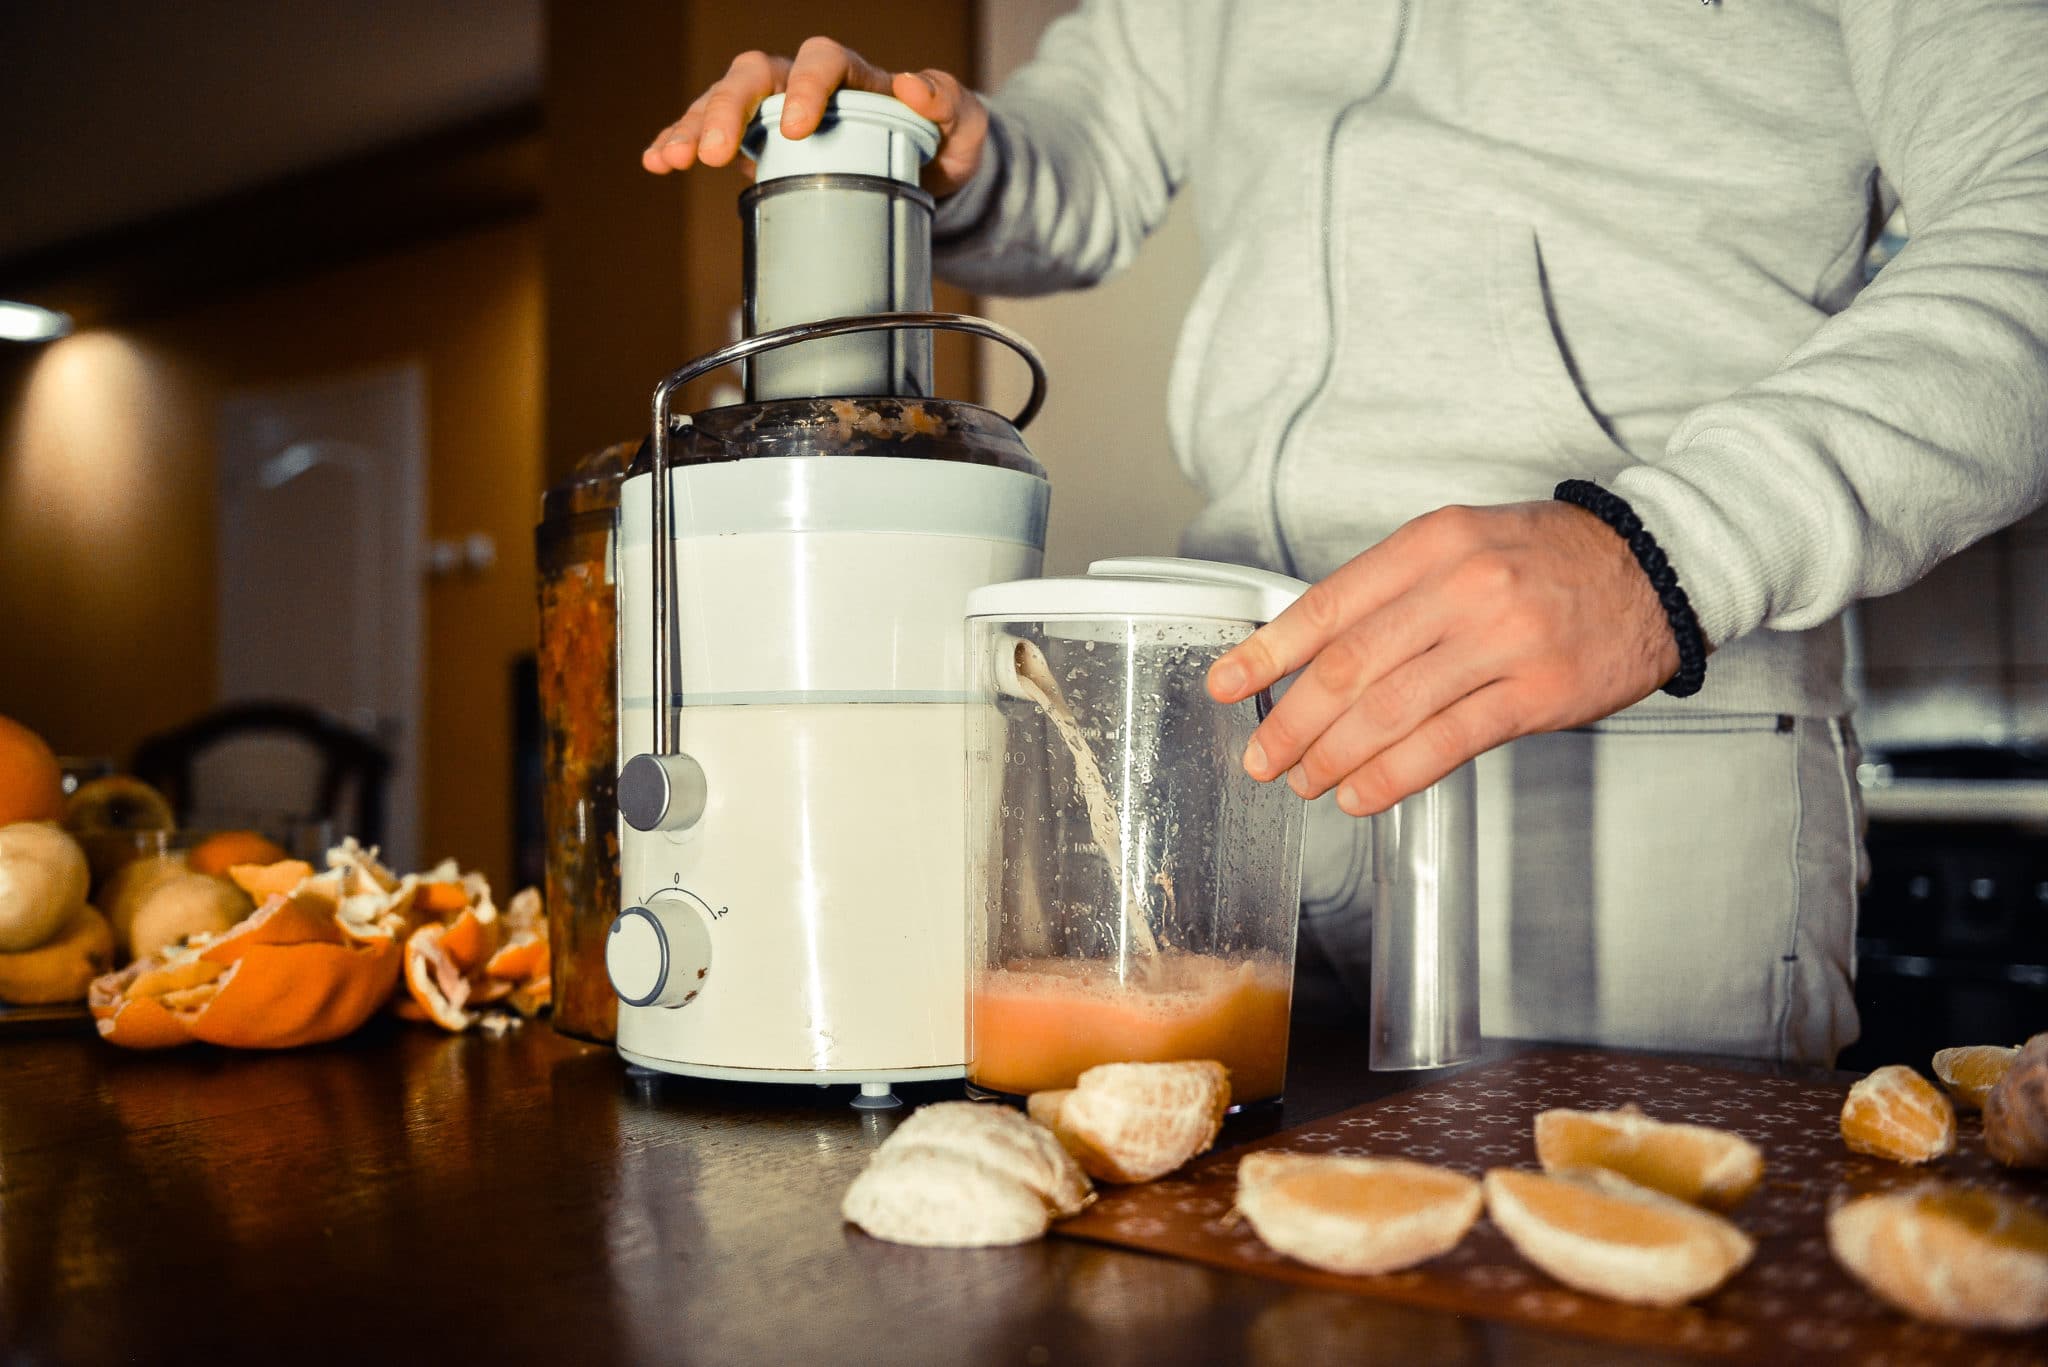
Real-world Example: Cleaning A Centrifugal Juicer
Let’s walk through cleaning a Breville centrifugal juicer:
- Unplug and disassemble all parts.
- Rinse each part under warm water.
- Scrub the mesh filter with a soft brush.
- Soak the filter for 10 minutes in soapy water.
- Clean the blade carefully.
- Wipe the base with a damp cloth.
- Dry all parts and reassemble.
This routine takes about 10–15 minutes. Skipping steps leads to stains and odors.
Data: Juicer Cleaning And Health
A survey by the NSF found that kitchen appliances like juicers and blenders are among the top sources of hidden bacteria. Cleaning your juicer reduces risk of illness and improves juice quality.
The CDC recommends cleaning kitchen appliances after each use, especially when processing raw produce. Proper cleaning reduces risk by over 80%.

Credit: www.youtube.com
Advanced Tips: Making Cleaning Faster
Want to save time? Try these tips:
- Use a juicer cleaning kit (many brands sell these).
- Keep a small bowl of soapy water next to your juicer while juicing.
- Rinse parts immediately as you remove them.
- Set a timer for deep cleaning once a week.
Many experienced juicers spend less than 10 minutes cleaning daily by following these steps.
Juicer Maintenance: Beyond Cleaning
Cleaning is just one part of maintenance. For best results:
- Lubricate moving parts (check manual).
- Tighten loose screws or bolts.
- Store in a dry, dust-free area.
- Clean the exterior monthly.
Proper maintenance keeps your juicer running smoothly for years.
Comparing Juicer Cleaning Times
Here’s a quick data table showing average cleaning times:
| Juicer Type | Daily Cleaning (min) | Deep Cleaning (min) |
|---|---|---|
| Centrifugal | 10 | 25 |
| Masticating | 7 | 20 |
| Twin Gear | 15 | 30 |
| Citrus Press | 5 | 15 |
Centrifugal and twin-gear juicers take longer due to more parts and tight spaces.
What To Do If Your Juicer Smells Bad
If your juicer has a bad smell, try these steps:
- Soak parts in vinegar overnight.
- Scrub with baking soda.
- Rinse and air dry.
- If smell persists, check for hidden pulp or mold.
Persistent odors usually mean hidden residue or mold. If you can’t solve it, contact your juicer manufacturer.
Useful External Resource
For detailed tips on juicer cleaning and maintenance, visit the Wikipedia Juicer page. It covers juicer types, history, and safety tips.
Frequently Asked Questions
How Often Should I Clean My Juicer?
You should clean your juicer after every use. Deep clean once a week if you use it daily, or before storage if you use it occasionally.
Can I Put Juicer Parts In The Dishwasher?
Many juicer parts are dishwasher-safe, but hand washing is safer and extends their lifespan. Always check your manual before using a dishwasher.
What Should I Do If My Juicer’s Mesh Filter Is Clogged?
Soak the filter in warm soapy water for 20 minutes. Use a soft brush or toothbrush to gently remove pulp. Avoid wire brushes.
How Can I Prevent Stains And Odors In My Juicer?
Rinse parts immediately after juicing. Use baking soda for stains and vinegar for odors. Dry parts completely before storage.
Is It Safe To Use Bleach Or Strong Chemicals To Clean A Juicer?
No. Bleach and strong chemicals can leave residue and damage parts. Use mild dish soap, baking soda, and vinegar for safe cleaning.
Keeping your juicer clean improves taste, health, and machine life. With these steps, tools, and tips, you can make cleaning quick and easy—so you spend more time enjoying your juice and less time worrying about your equipment.