Getting your air fryer to cook food just right can sometimes feel tricky, especially for folks just starting out. A common question is about how evenly your air fryer heats up. This is where the Air fryer water test for checking heat distribution comes into play.
It might sound a bit puzzling at first, but it’s actually a super simple way to see if your air fryer is heating evenly. We’ll walk you through it step-by-step so you can get perfect results every time. Let’s see how to do it and what it tells you about your air fryer.
Key Takeaways
- You can easily check your air fryer’s heating with a simple water test.
- This test shows if your air fryer cooks food evenly.
- Understanding heat distribution helps prevent burned or undercooked spots.
- The water test is quick and uses common kitchen items.
- You will learn how to spot and fix uneven heating issues in your air fryer.
- This method is great for beginners wanting consistent cooking.
Checking Air Fryer Heat Distribution
Why an Air Fryer Water Test Matters
An air fryer works by circulating hot air around your food. For your meals to cook evenly, this hot air needs to reach every part of the food the same way. If some areas get hotter than others, you might end up with food that is burnt on one side and still uncooked on the other.
This is a common challenge, especially with newer air fryers or when you’re trying out new recipes. Knowing how well your air fryer distributes heat helps you avoid these frustrating cooking mishaps. The Air fryer water test for checking heat distribution is a practical way to see this in action.
It’s a simple yet effective method to ensure your air fryer is working its best for you.
The Science Behind Even Cooking
Air fryers mimic convection ovens but on a smaller scale. They use a heating element, usually at the top, and a powerful fan to push hot air downwards and around the basket. This constant movement of air is what cooks and crisps your food.
The effectiveness of this process depends heavily on how uniformly the hot air moves. If the fan or heating element isn’t working perfectly, or if the basket design creates dead zones, heat won’t be distributed evenly. This leads to uneven cooking results.
Imagine trying to paint a wall with a brush that only has bristles on one side. You’d get patches that are painted and patches that are missed. Similarly, uneven heat distribution in an air fryer means some parts of your food will cook faster and get browner, while other parts will remain pale and undercooked.
This is why checking for even heat is so important for getting that perfect crispy texture we all love.
Common Air Fryer Heating Issues
Several factors can cause uneven heating in an air fryer. One common issue is a problem with the fan motor or its placement, which can create areas where air doesn’t circulate well. The design of the air fryer basket itself can also play a role.
If there are not enough vents or if the vents are blocked by food, the hot air can’t move freely. Overcrowding the basket is another major culprit. When the basket is too full, food items block the airflow to each other, creating shadows of cooler air.
Sometimes, the heating element itself might have hot spots. This is less common with newer appliances but can happen due to manufacturing defects or wear and tear over time. Even the way you place food in the basket can make a difference.
For example, if you pile fries high, the ones at the bottom might not get as much direct hot air as the ones on top. Recognizing these potential problems helps you understand why a heat distribution test is valuable.
Why Beginners Find It Challenging
For those new to air frying, the idea of heat distribution might sound technical and complicated. You might wonder if your air fryer is performing as it should, or if the food’s appearance is just due to the recipe. It’s hard to tell just by looking at the food sometimes, especially if you’re expecting a uniform golden-brown color.
Beginners might also worry about damaging their appliance by trying to test it in unusual ways. They want simple, safe, and reliable methods to improve their cooking.
This is why a straightforward test like the water test is so helpful. It uses common items, is safe to perform, and gives a clear visual indication of how the heat is moving. It removes the guesswork and provides actionable information.
This makes mastering your air fryer much easier and more enjoyable.
The Simple Air Fryer Water Test Explained
What You Will Need
The beauty of the Air fryer water test for checking heat distribution is its simplicity. You only need a few common household items. First, you’ll need your air fryer, of course.
Next, grab a small, oven-safe bowl or ramekin that fits comfortably inside your air fryer basket without touching the sides too much. A standard heatproof mug or a small glass bowl works well. You will also need some water, enough to fill the bowl about halfway.
Finally, a timer is helpful, though you can just watch the water.
Make sure the bowl is stable and won’t tip over easily inside the air fryer. If you’re using a glass bowl, ensure it’s designed to withstand temperature changes. The goal is to create a small, contained water reservoir that will show the effects of the air fryer’s heat circulation.
This setup allows us to observe how the air currents interact with the water.
Step-by-Step Guide to Performing the Test
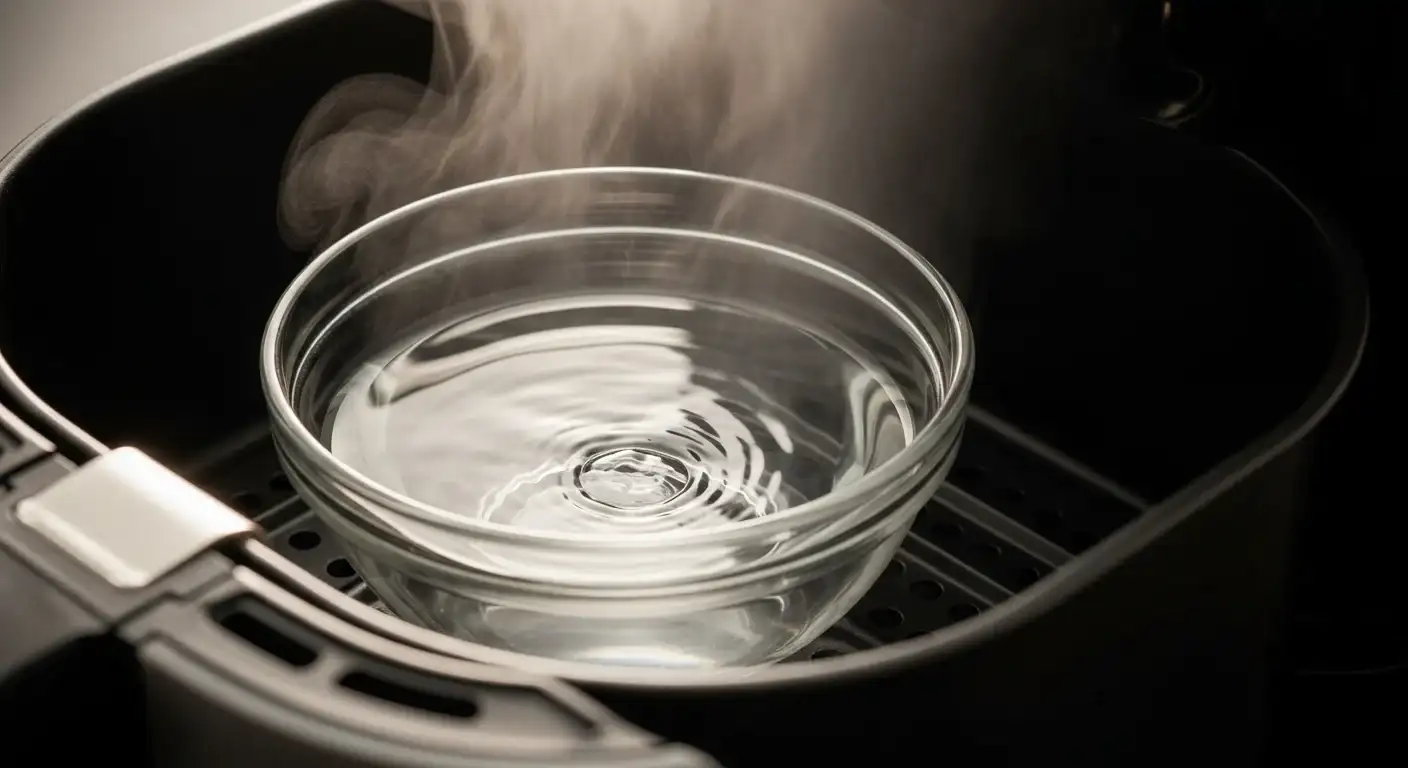
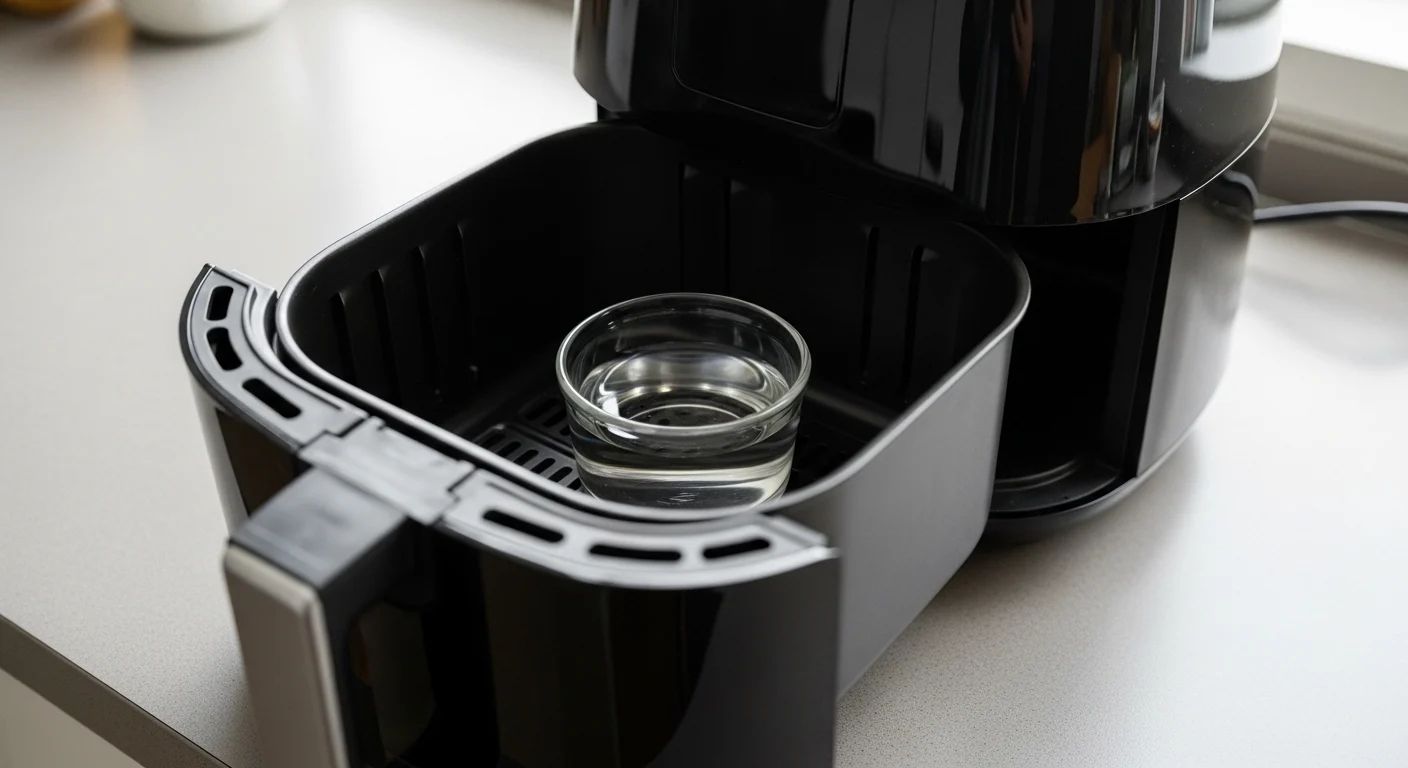
Performing the Air fryer water test for checking heat distribution is easy and takes only a few minutes. Start by placing the empty, oven-safe bowl or ramekin inside your air fryer basket. Then, carefully pour about half a cup of water into the bowl.
Be sure not to overfill it, as you don’t want the water to spill out when you move the basket.
Close the air fryer basket and set the temperature to a common cooking setting, usually around 375°F (190°C). Set the timer for 10 to 15 minutes. This duration is usually enough to see a significant change in the water.
While the air fryer is running, you can observe through the window if your model has one. After the time is up, carefully remove the basket and the bowl of water.
Observing the Results
Once the test is complete, it’s time to look at the water. You are looking for signs of how the heat has affected it. If your air fryer is heating evenly, the water should show signs of gentle, consistent evaporation across the surface.
You might see small, uniform ripples or a slight steaminess if you look closely. The water level should have decreased slightly due to evaporation.
However, if the heat distribution is uneven, you might notice more distinct patterns. For instance, if there’s a strong hot spot, the water in that area might be bubbling more vigorously or evaporating faster, creating a noticeable difference on the water’s surface. You might see swirling patterns in the water from the air currents.
Sometimes, one side of the bowl might appear drier or show more evaporation than the other. These visual cues tell you a lot about where the heat is strongest and weakest in your air fryer.
Interpreting Your Air Fryer Water Test Results
What Even Evaporation Looks Like
When the Air fryer water test for checking heat distribution shows even evaporation, it’s a great sign for your air fryer. This means the hot air is circulating consistently throughout the basket. You’ll notice that the water level has decreased a bit, and the surface of the water appears uniformly moist or slightly rippled.
There shouldn’t be any areas that are significantly more steamy or dry than others.
This evenness indicates that your air fryer is likely to cook food uniformly. You can expect your fries to be crispy all around, chicken wings to have a consistent crunch, and baked goods to cook evenly without dark edges or pale centers. This is the ideal scenario for optimal cooking performance.
It suggests the fan is working well and the heating element is distributing heat effectively across the entire cooking chamber.
Signs of Uneven Heating
Uneven heating can manifest in a few ways during the water test. If you see one side of the water in the bowl evaporating much faster than the other, it points to a significant hot spot. You might observe more steam rising from one area, or the water might even be bubbling slightly in that spot.
Another sign is swirling patterns in the water that are very pronounced, suggesting strong, directed air currents that don’t spread out well.
You might also notice that when you take the bowl out, one side of the bowl is noticeably warmer to the touch than the other, or that the water on one side has almost completely evaporated while the other side still has a good amount. These are clear indicators that your air fryer has areas of intense heat and areas that are cooler. This unevenness will translate to your food, leading to parts being overcooked and parts undercooked.
Troubleshooting Common Hot Spots
If your water test reveals hot spots, don’t worry. There are simple ways to manage this. The most effective method is to stir or flip your food halfway through the cooking process.
This simple action ensures that all sides of the food get exposed to the heat more evenly. For items like fries, shaking the basket is essential. For larger items like chicken breasts, flipping them over is key.
Another tip is to avoid overcrowding the air fryer basket. Giving food plenty of space allows the hot air to circulate freely around each piece. If you cook a lot of food, consider doing it in batches.
This might take a little longer, but the results will be much better and more consistent. Sometimes, rearranging the food in the basket can also help create better airflow.
Improving Your Air Fryer’s Performance
The Role of Basket Design
The design of your air fryer’s basket plays a significant role in how well heat is distributed. Most baskets have holes or vents to allow hot air to circulate not just from the top and sides, but also from the bottom. If these vents are too small, too few, or get easily blocked by food, heat circulation can be compromised.
A well-designed basket allows air to flow freely from all angles, ensuring more uniform cooking.
For instance, some baskets have a perforated surface, meaning they are covered in small holes. This allows air to pass through easily. Others might have raised surfaces or specific patterns that help lift food slightly, creating space for air to move underneath.
When choosing an air fryer or accessories, consider how the basket design might affect airflow and heat distribution. A basket that promotes good airflow will lead to better, more consistent results.
Tips for Even Cooking
Beyond the water test, several practical tips can help you achieve even cooking in your air fryer. Always preheat your air fryer. Just like an oven, preheating ensures that the air inside is already at the desired temperature when you add your food.
This helps start the cooking process immediately and evenly.
When cooking, try to arrange food in a single layer as much as possible. This maximizes the surface area exposed to the hot air. If you are cooking smaller items like chopped vegetables or shrimp, give the basket a good shake every 5-7 minutes.
For larger items, flip them halfway through the cooking time. These simple actions ensure that every piece of food gets adequate exposure to the circulating hot air.
Using the right amount of oil is also important. A little bit of oil can help food crisp up better and conduct heat more effectively. However, too much oil can make food greasy.
The amount needed often depends on the type of food you are cooking. For instance, items like potatoes or chicken may benefit from a light coating of oil, while already fatty foods might not need any.
When to Consider a New Air Fryer
If you consistently perform the Air fryer water test for checking heat distribution and your results always show significant unevenness, even after trying different troubleshooting methods, it might be time to consider a new air fryer. Persistent hot spots or poor air circulation that can’t be fixed by user adjustments could indicate a problem with the appliance’s internal mechanics. This could be a failing fan, an unevenly heating element, or a poorly designed air circulation system.
A good indicator is if your food frequently comes out burnt on one side and pale on the other, regardless of how you arrange or move it. If you notice strange noises from the fan, or if the appliance takes an unusually long time to heat up, these could also be signs of wear and tear. While air fryers are generally reliable, they do have a lifespan.
If yours is several years old and its performance has noticeably declined, the investment in a new one might be worthwhile for consistently great results.
Advanced Techniques and Accessories
Using an Air Fryer Thermometer
While the water test gives you a visual cue for air circulation, an air fryer thermometer can provide more precise temperature data. You can place an oven-safe thermometer inside the air fryer basket alongside the water bowl during the test. This thermometer will give you direct readings of the temperature in different parts of the basket over time.
If the water test shows even evaporation, but the thermometer shows wildly different temperatures in different areas, it suggests that while the air is circulating, the heating element might be uneven. Conversely, if the thermometer shows relatively consistent temperatures but the water test shows uneven evaporation, it points more to an issue with air circulation. Combining these methods gives you a more complete picture of your air fryer’s performance.
Accessories for Better Airflow
There are accessories designed to help improve airflow and heat distribution in air fryers. Some people use perforated parchment paper liners specifically designed for air fryers. These liners have holes that allow hot air to pass through, preventing the bottom of your food from steaming and ensuring it crisps up.
Another accessory is an air fryer rack or extra basket. These can be useful if you often cook large quantities of food. A rack can help elevate food, allowing hot air to circulate underneath.
An extra basket might allow you to cook in two layers, though care must be taken to ensure air can still flow freely between layers. Always ensure any accessory fits your air fryer well and doesn’t impede the fan’s ability to circulate air.
Understanding Your Air Fryer’s Specifics
Every air fryer model is a little different. Some have more powerful fans, some have heating elements in different positions, and basket designs vary. Your air fryer’s user manual is a great resource for understanding its specific features and recommended cooking practices.
It might offer tips on how to best arrange food or how to clean the appliance to maintain optimal performance.
Pay attention to how your particular air fryer behaves. Does it heat up quickly? Does the fan seem strong?
Does the basket feel sturdy and well-ventilated? The more familiar you become with your appliance, the better you’ll be able to interpret the results of the Air fryer water test for checking heat distribution and adjust your cooking accordingly. Building this familiarity is key to unlocking its full potential for delicious, evenly cooked meals.
Frequently Asked Questions
Question: How often should I do the air fryer water test?
Answer: You don’t need to do the air fryer water test every time you cook. It’s best to perform it when you first get your air fryer to understand its heating pattern, or if you notice your food is consistently cooking unevenly. Doing it once every few months or if you suspect an issue is usually sufficient.
Question: Can I use a different liquid for the test?
Answer: Water is ideal because it evaporates cleanly and predictably with heat. Using other liquids might leave residue or burn, which could interfere with the results or damage your air fryer. Stick to plain water for the most accurate assessment.
Question: Does the size of the bowl matter for the air fryer water test?
Answer: The size of the bowl is less important than its stability and heat resistance. A small to medium-sized bowl that fits easily inside the basket without touching the sides is best. It should be large enough to show clear signs of evaporation but not so large that it blocks too much airflow.
Question: What if my air fryer doesn’t have a window?
Answer: If your air fryer lacks a window, you can still perform the test. You’ll simply need to rely on the timer and then carefully open the basket to observe the water’s evaporation. The main goal is to see the difference in moisture or water level after the heating period.
Question: Can the water test help identify if my air fryer is broken?
Answer: Yes, the water test can be an indicator of a problem. If you consistently see extreme differences in evaporation or bubbling from one spot, and you’ve ruled out overcrowding or incorrect placement, it might suggest an issue with the heating element or fan. This could mean your air fryer isn’t working as efficiently as it should.
Wrap Up
You’ve learned a simple way to check your air fryer’s heat. The Air fryer water test for checking heat distribution shows you how your appliance cooks. You can now see if it heats evenly.
If not, you know how to fix it by stirring or flipping food. This test helps you get better results every time. Happy air frying!

Hi, I’m Raju Dey — a food lover with a degree in Culinary Arts from El Centro College. I’ve spent 4+ years testing air fryers, blenders, and other kitchen tools in real home kitchens. At KitchenWink.com, I share honest tips and reviews to help you cook smarter. My goal is to give you advice you can trust — based on hands-on experience, not hype.