Keeping your ice maker clean is not just about taste—it’s about health, safety, and making sure your machine lasts for years. Many people notice cloudy ice cubes, strange tastes, or even a slow-down in ice production and blame the water.
But often, the problem is a dirty ice maker. Cleaning your ice maker may sound difficult, but with the right steps and a little patience, you can do it yourself. In this article, you’ll learn everything you need to know, from what supplies to use, to step-by-step cleaning instructions for different types of ice makers, and even mistakes to avoid.
Whether you have a portable unit, a built-in refrigerator ice maker, or a commercial system, you’ll find practical advice here. Let’s get started and keep your ice fresh and safe.
Why Cleaning Your Ice Maker Matters
Your ice maker does more than freeze water. It touches every ice cube you put in your drink. Over time, mineral deposits, mold, and even bacteria can grow inside. This not only changes the taste and smell of your ice, but can also make it unsafe to consume. According to the U.S. Food and Drug Administration, contaminated ice has been linked to foodborne illnesses. In restaurants, dirty ice makers are a common source of violations during health inspections.
A clean ice maker also runs more efficiently. Dirt and buildup make the machine work harder, which can shorten its life. Regular cleaning helps avoid repairs and keeps your energy costs lower.
How Often Should You Clean Your Ice Maker?
The frequency depends on how often you use the machine and your water quality. As a general guide:
- Home ice makers: Every 3 to 6 months
- Commercial ice makers: Every 1 to 2 months
- If you notice cloudy, smelly, or bad-tasting ice: Clean immediately
- After long periods without use: Always clean before starting again
If you have hard water (high in minerals), you may need to clean more often to remove scale buildup.
Supplies You Will Need
Gathering the right tools makes the process easier and safer. Here’s a list of what you’ll likely need:
- Soft cloths or sponges (avoid abrasive pads)
- Warm water
- Mild dish soap
- White vinegar or ice maker cleaner
- Toothbrush or small brush for scrubbing tight spots
- Bucket or large bowl
- Towel
- Gloves (optional, for sensitive skin)
- Screwdriver (if your ice maker has panels that need removal)
- Measuring cup (for mixing cleaning solution)
Avoid bleach unless the manufacturer recommends it. Some ice makers can be damaged by harsh chemicals.
Understanding Different Types Of Ice Makers
Not all ice makers are built the same. Understanding your machine helps you clean it properly.
| Type | Location | Cleaning Complexity | Typical Capacity |
|---|---|---|---|
| Refrigerator Ice Maker | Inside fridge/freezer | Easy to Moderate | 2-5 lbs/day |
| Portable Ice Maker | Countertop | Easy | 20-40 lbs/day |
| Undercounter/Built-in | Kitchen/Bar area | Moderate to Hard | 50-100+ lbs/day |
| Commercial Ice Maker | Restaurant/Cafe | Hard | 100-500+ lbs/day |
Credit: www.reddit.com
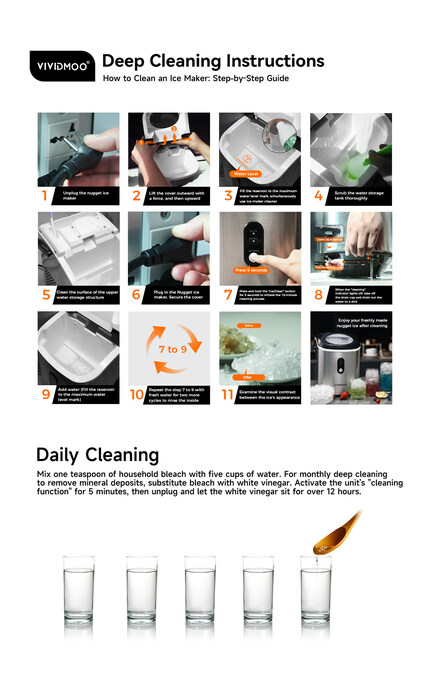
Step-by-step: How To Clean A Refrigerator Ice Maker
Most home freezers have a built-in ice maker. Here’s a step-by-step guide to clean it.
1. Turn Off And Unplug
Safety first. Switch off the ice maker. If possible, unplug the refrigerator or turn off the circuit breaker. This prevents any chance of electric shock or the machine running during cleaning.
2. Remove The Ice Bin
Take out the ice bin (the storage bucket). Throw away any ice. If there’s ice stuck to the bin, let it melt or run warm water over it.
3. Wash The Ice Bin
Wash the bin with warm water and mild dish soap. Use a soft sponge to scrub away residue. Rinse well to remove soap. Dry with a clean towel or let air dry.
4. Clean The Ice Maker Components
If your ice maker has removable parts (like a tray or arm), take them out. Wash with warm, soapy water. Use a small brush to scrub any crevices.
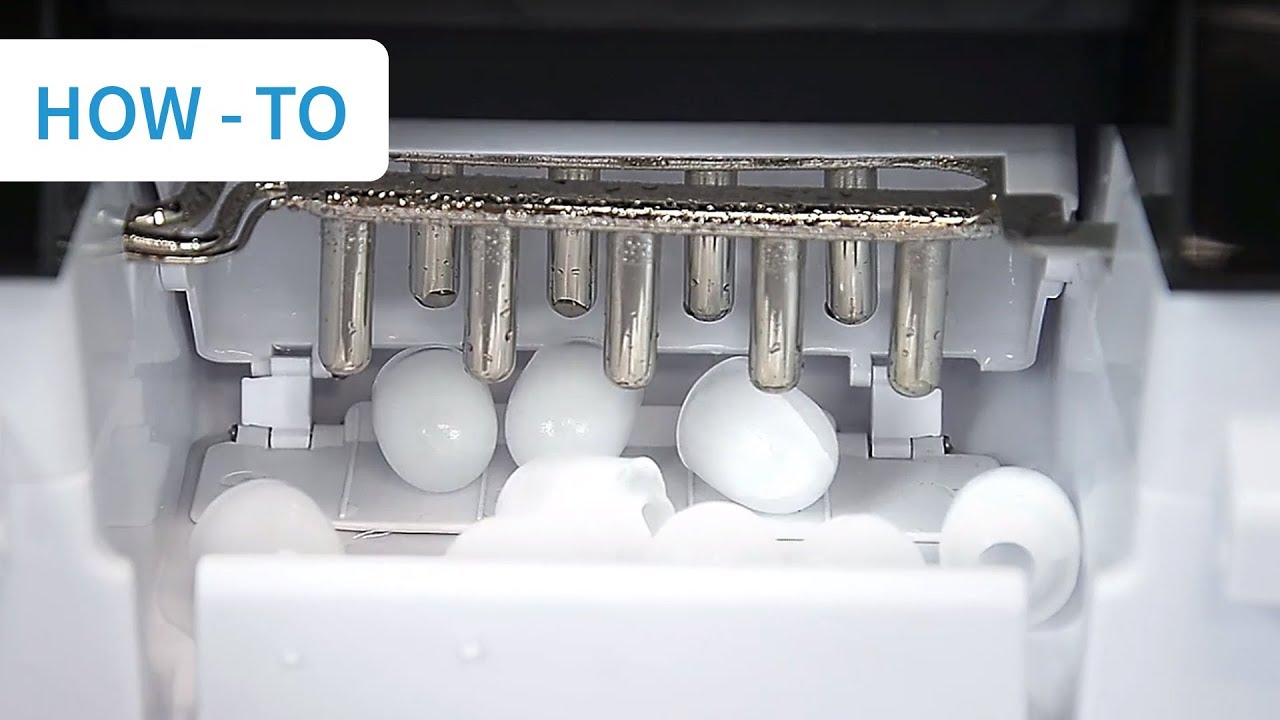
5. Wipe Inside The Freezer And Ice Maker
Mix equal parts white vinegar and warm water. Dip a cloth in the solution and wipe the ice maker, including the area where the ice drops. Clean any mold, scale, or debris. For stubborn buildup, let the vinegar solution sit for a few minutes before wiping.
6. Clean The Water Line (if Possible)
If you’re comfortable, disconnect the water line and flush it with vinegar and water. This helps remove mineral deposits. If you’re unsure, skip this step or call a professional.
7. Reassemble Everything
Once all parts are dry, put them back. Plug in the refrigerator and turn the ice maker on.
8. Discard The First Batch Of Ice
The first few batches may have vinegar or cleaning solution residue. Throw them away to ensure your ice is pure.
Step-by-step: Cleaning A Portable Countertop Ice Maker
Portable ice makers are popular for parties and small spaces. They’re easy to clean, but often forgotten.
1. Unplug And Drain
Turn off and unplug the unit. Remove any ice and drain any remaining water using the drain plug.
2. Clean The Water Reservoir
Fill the reservoir with a mix of equal parts vinegar and water. Let it sit for 10-15 minutes to loosen scale.
3. Run A Cleaning Cycle
Some machines have a “clean” button. If yours does, use it. If not, start a normal ice-making cycle but without adding ice. Let it run for 5-10 minutes, then drain.
4. Scrub The Inside
Use a soft brush or cloth to clean all surfaces inside the reservoir and ice basket. Pay extra attention to corners where mold can hide.
5. Rinse Thoroughly
Fill with clean water and run another cycle to rinse. Drain again and dry with a towel.
6. Wipe The Exterior
Don’t forget the outside! Wipe with a damp cloth to remove fingerprints and dust.
Credit: www.prnewswire.com
Step-by-step: How To Clean A Built-in Or Undercounter Ice Maker
These machines are larger and need more attention.
1. Turn Off And Unplug
Always start by disconnecting power.
2. Empty The Ice Storage
Remove and discard all ice. Take out the storage bin and wash it with warm, soapy water.
3. Remove Internal Parts
Check your manual. Many undercounter ice makers have removable parts, including the ice scoop, tray, and sometimes water filter.
4. Clean With Ice Maker Cleaner
Use a cleaner made for ice machines (usually citric acid-based). Mix as directed, fill the water reservoir, and run a cleaning cycle. If your machine doesn’t have this option, pour the solution into the water line and let it soak.
5. Scrub The Interior
Use a brush to clean the walls, corners, and any visible parts inside. Mold and scale can hide in seams.
6. Rinse Well
Run several cycles with clean water to flush out the cleaner. This step is critical—any leftover cleaner can affect taste and safety.
7. Reassemble And Restart
Dry all parts, put them back, and restart the machine. Discard the first few batches of ice.
Step-by-step: Cleaning A Commercial Ice Maker
Commercial ice makers are found in restaurants, hotels, and bars. They’re powerful, but also vulnerable to mold and bacteria. Cleaning them is a bit more technical.
1. Turn Off Power And Water
Switch off both to avoid accidents and leaks.
2. Remove All Ice And Bins
Empty everything. Commercial bins are large, so you may need extra buckets.
3. Disassemble Key Components
Take out parts as per the manufacturer’s guide. Usually, this includes the scoop, water curtain, and sometimes the evaporator plate.
4. Clean With Commercial Ice Machine Cleaner
Use a cleaner formulated for commercial units. Never use bleach unless the manufacturer says it’s safe. Mix the solution as directed and run it through the machine’s cleaning cycle.
5. Manually Scrub Surfaces
Use brushes and cloths to scrub all surfaces, especially hard-to-reach areas. Don’t forget the door seals and drains.
6. Sanitize
After cleaning, use a food-safe sanitizer. This kills any remaining germs.
7. Flush Thoroughly
Run cycles with clean water to remove all cleaning and sanitizing chemicals.
8. Reassemble And Resume Use
Put everything back. Restart the machine and throw away the first two batches of ice.
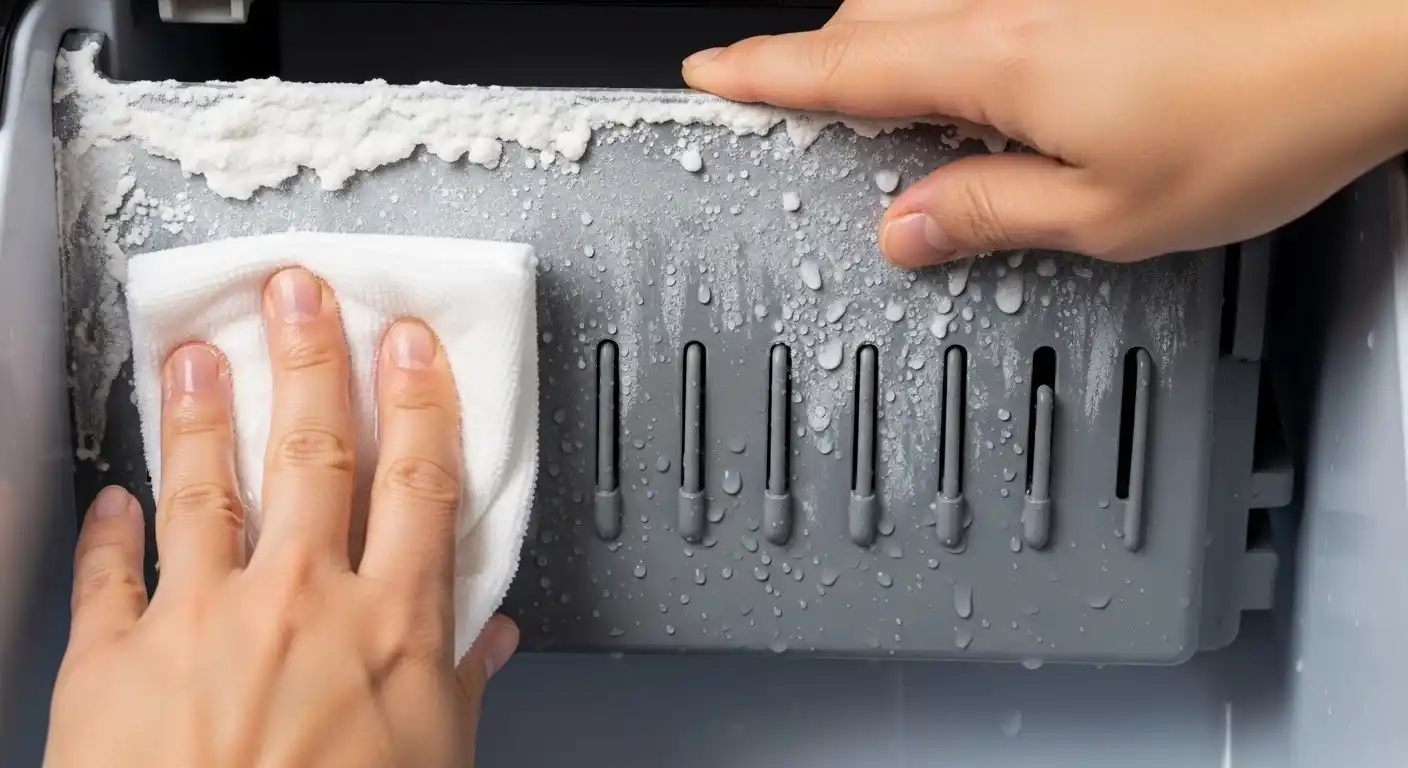
How To Remove Stubborn Mineral Deposits
If you have hard water, you’ll notice white chalky buildup (scale) inside your ice maker. This can block water flow and damage the machine.
Removing Scale
- Mix a solution of half white vinegar and half water.
- Soak a cloth or sponge and press it against the buildup for 10-15 minutes.
- Scrub gently with a brush.
- Rinse thoroughly to remove all vinegar.
For severe scale, commercial ice machine descalers work faster. Follow the manufacturer’s instructions, and always rinse afterward.
Dealing With Mold And Bacteria
A musty smell or black spots mean mold or bacteria have grown inside. This is common in machines left unused or in humid environments.
- Wipe all surfaces with vinegar and water.
- Let the solution sit for 5-10 minutes.
- Scrub, then rinse well.
- For built-in and commercial machines, use a food-safe sanitizer as a final step.
Tip: Always dry the machine completely before turning it off for storage. Mold loves moisture.
Credit: www.youtube.com
Cleaning The Water Filter
Many ice makers have a water filter. It blocks minerals and impurities, but if left unchanged, it can clog and breed bacteria.
- Replace the filter every 6 months, or as recommended.
- Flush the new filter with water before using.
- If unsure how to replace it, check the manual or look for a sticker near the filter.
A dirty filter is a hidden cause of bad-tasting ice.
Cleaning The Ice Scoop
The ice scoop is often overlooked but can be a source of germs.
- Wash with soap and water after each use.
- Dry before storing.
- Avoid leaving the scoop inside the ice bin, as it can pick up bacteria.
Comparing Cleaning Solutions
Choosing the right cleaner matters for safety and effectiveness. Here’s a comparison of popular options:
| Cleaner Type | Strengths | Weaknesses | Best For |
|---|---|---|---|
| White Vinegar | Natural, cheap, safe | May not remove heavy scale | Light cleaning, home use |
| Ice Maker Cleaner (Citric Acid) | Strong on scale, easy rinse | More expensive, chemical scent | Moderate/heavy buildup |
| Bleach Solution | Kills bacteria and mold | Corrosive, strong smell, not always recommended | Sanitizing, only if approved |
| Baking Soda | Deodorizes, gentle scrub | Less effective for scale | Odor removal, mild stains |
Always check your ice maker’s manual before using new cleaners.
Practical Tips For Keeping Your Ice Maker Clean Longer
A little prevention saves a lot of cleaning time. Here’s how to keep your machine fresh:
- Use filtered water. This reduces mineral deposits and keeps ice clear.
- Keep the lid closed. Open bins let in dust and bacteria.
- Dry after cleaning. Moisture is the enemy—mold and bacteria love wet places.
- Clean up spills quickly. Sugary drinks or food near the ice maker can attract pests.
- Set reminders. Mark your calendar to clean every few months.
- Don’t ignore signs. If ice looks or smells odd, clean immediately.
Common Mistakes To Avoid
Even with the best intentions, some mistakes can ruin your cleaning efforts:
- Skipping the rinse step. Leftover cleaner can make ice taste bad or even be unsafe.
- Using the wrong cleaner. Bleach or harsh chemicals can damage parts.
- Forgetting the water line. Scale and mold often start here.
- Cleaning while the machine is on. This is unsafe and can break parts.
- Not drying parts before reassembling. Moisture leads to mold.
Many beginners forget to discard the first batch of ice after cleaning—this is a key step.
When To Call A Professional
While most cleaning can be done at home, some problems need expert help:
- Strange noises or leaks after cleaning
- Persistent bad taste or odor, even after deep cleaning
- Slow ice production that doesn’t improve
- Visible black mold in hard-to-reach places
A professional can safely clean, sanitize, and repair your machine. This is especially important for commercial ice makers, which must meet health standards.
How Clean Is Your Ice Maker? Signs To Watch For
It’s not always obvious when your ice maker needs a deep clean. Here are signs you shouldn’t ignore:
- Cloudy or white ice cubes
- Ice smells or tastes strange
- Ice cubes are smaller or misshapen
- Visible slime, mold, or scale
- Ice sticks together
- Machine is louder than usual
- Ice production is slow or stops
Regular cleaning prevents these issues and keeps your ice tasting fresh.
Environmental And Health Benefits Of Regular Cleaning
A clean ice maker doesn’t just make better ice—it’s good for you and the planet. Mold and bacteria in ice can cause stomach upsets, especially in children and older adults. Clean machines use less energy, reducing your electricity bill and environmental impact.
Plus, you’ll avoid having to replace parts or the entire machine early.
Resources And Further Reading
For more advice, the U.S. Centers for Disease Control and Prevention (CDC) offers guidelines on food safety and ice machines. If you want to learn about water quality and filters, check out this EPA resource.
Frequently Asked Questions
How Do I Know If My Ice Maker Is Dirty?
Common signs are cloudy ice, a musty smell, or ice that tastes odd. If you see black spots, slime, or your ice cubes are smaller than usual, it’s time to clean.
Can I Use Bleach To Clean My Ice Maker?
Only use bleach if your manufacturer allows it. Bleach kills bacteria but can damage some machines or leave strong odors. Always rinse thoroughly if you use it.
How Do I Clean The Water Line In My Ice Maker?
Disconnect the line if you can, and flush it with vinegar and water. If you’re not comfortable, hire a professional. Water lines often collect scale and mold.
Is It Safe To Use My Ice Maker Right After Cleaning?
No. After cleaning, discard the first 2-3 batches of ice. This ensures any cleaner or loose debris is gone before you use the ice.
What Is The Best Way To Prevent Mold In My Ice Maker?
Keep the machine dry when not in use, clean regularly, and always use filtered water. Mold loves moisture, so drying is key.
Keeping your ice maker clean doesn’t have to be hard. With regular care and the steps above, you’ll enjoy safe, clear, and great-tasting ice every day. Your drinks—and your health—will thank you.