Grinding nuts can seem tricky if you’ve never done it before. Many people wonder how to grind nuts in a blender without turning them into paste or dust. It’s a common question for home cooks wanting to make their own nut flours or toppings.
Don’t worry, it’s easier than you think! We’ll show you a simple way to get perfect results every time. Get ready to learn the best method for grinding nuts.
Key Takeaways
- You can easily grind nuts in a blender for recipes.
- Using short pulses is the best way to control nut texture.
- Make sure your blender is dry before you start grinding.
- Avoid over-grinding to prevent a paste-like consistency.
- Different nuts might need slightly different pulse times.
- This method works for many common nuts like almonds and walnuts.
Grinding Nuts In A Blender
Why Use A Blender For Nuts
Blenders are kitchen workhorses. Many home cooks already have one. This makes a blender a convenient tool for grinding nuts when you don’t have a food processor.
You might need finely ground nuts for baking, like almond flour for gluten-free cakes. Or maybe you want chopped nuts for a crunchy salad topping. Knowing how to grind nuts in a blender saves you a trip to the store.
It also lets you control the freshness and type of nuts you use.
Choosing The Right Nuts
Most nuts work well in a blender. Some popular choices include almonds, walnuts, pecans, cashews, and hazelnuts. Softer nuts like pecans might grind a bit faster than harder nuts like almonds.
Peanuts can also be ground, but be careful as they can become very oily quickly. It is a good idea to start with a common nut like walnuts or almonds when you are learning how to grind nuts in a blender for the first time.
Preparation Is Key
Before you start, make sure your blender jar is completely clean and dry. Any moisture can make the nuts clump together. If your nuts are roasted, let them cool down completely.
Warm nuts can melt any oils and create a gummy texture. For raw nuts, you usually do not need to do anything special. Some people like to toast their nuts first for extra flavor, but this is optional for grinding.
The Simple Step-By-Step Guide
Here is a straightforward way to grind nuts in a blender. This method helps you get the texture you want, from coarse chops to fine flour.
Step 1 Gather Your Supplies
You will need your blender, your chosen nuts, and a way to measure them. A dry blender jar is essential. Ensure the lid fits snugly.
Have a spatula or spoon ready to scrape down the sides if needed.
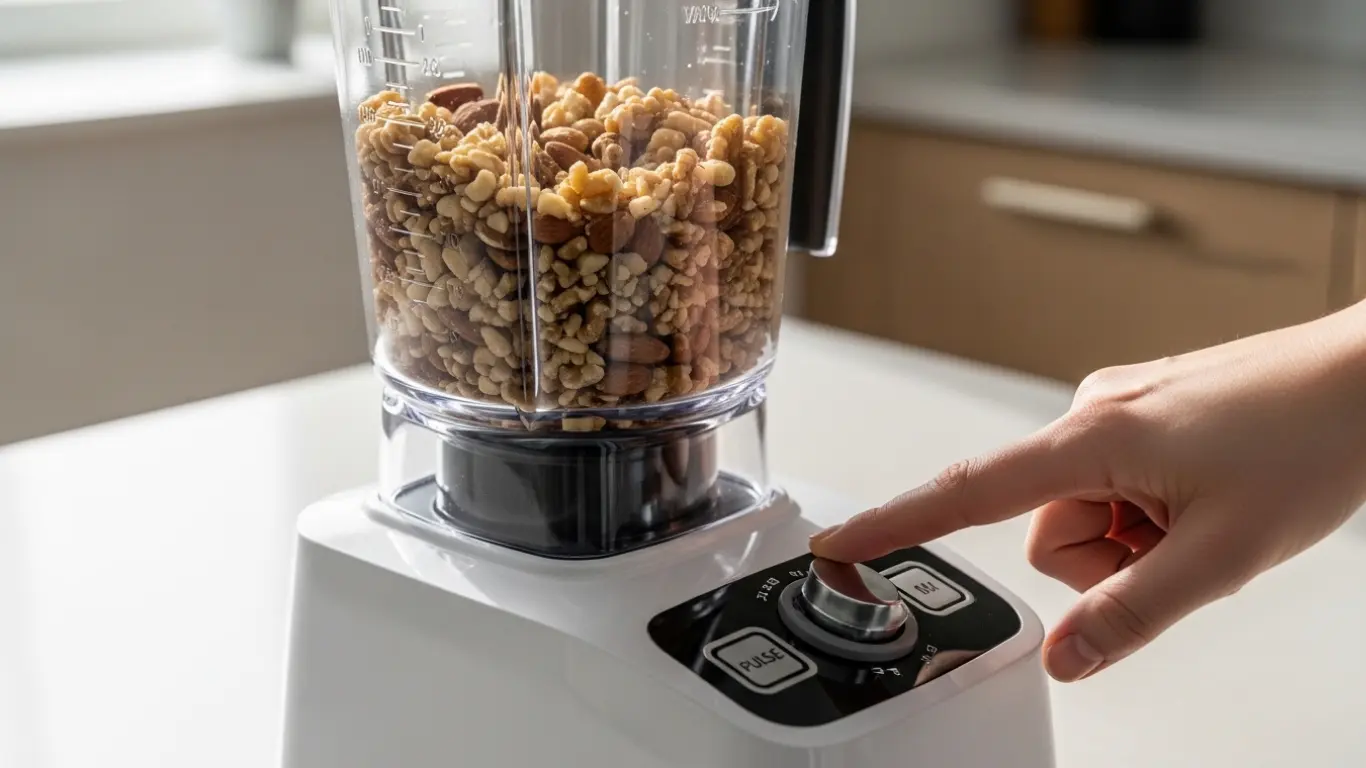
Step 2 Add The Nuts
Do not fill the blender jar more than halfway full. Overcrowding the blender makes it hard for the blades to move freely. This can lead to uneven grinding.
It is better to grind nuts in smaller batches. This ensures you have more control over the final consistency and helps you learn how to grind nuts in a blender effectively.
Step 3 Start With Short Pulses
This is the most important part. Instead of letting the blender run continuously, use the pulse function. Press the pulse button in short bursts, usually for just 1-2 seconds at a time.
After each pulse, check the nuts. This lets you see how finely they are being ground. You are aiming for control, not speed.
Step 4 Observe And Repeat
Watch the nuts as you pulse. You will see them go from whole to chopped, then to smaller pieces, and finally to a fine powder if you wish. Stop pulsing as soon as you reach your desired texture.
If you want coarse nut pieces, stop earlier. For nut flour, you will pulse more. This step shows you how to grind nuts in a blender to your exact needs.
Step 5 Scrape Down The Sides
Sometimes, some nuts might stick to the sides of the blender jar. If this happens, turn off the blender and use a spatula to scrape them down towards the blades. Then, continue pulsing.
This ensures all the nuts get ground evenly. Do this between pulses if necessary.
Step 6 Check The Consistency
After a few pulses, stop and look. Are the nuts too chunky? Pulse a little more.
Do they look like fine flour? You are done. If you are aiming for a texture between chopped and flour, pay close attention.
The process of learning how to grind nuts in a blender involves knowing when to stop.
Step 7 Empty And Store
Once the nuts are ground to your liking, carefully empty the blender jar. Store your ground nuts in an airtight container. For longer storage, they can be kept in the refrigerator or freezer.
This keeps them fresh and prevents them from going rancid.
Tips For Perfect Nut Grinding
Here are some extra tips to help you master grinding nuts.
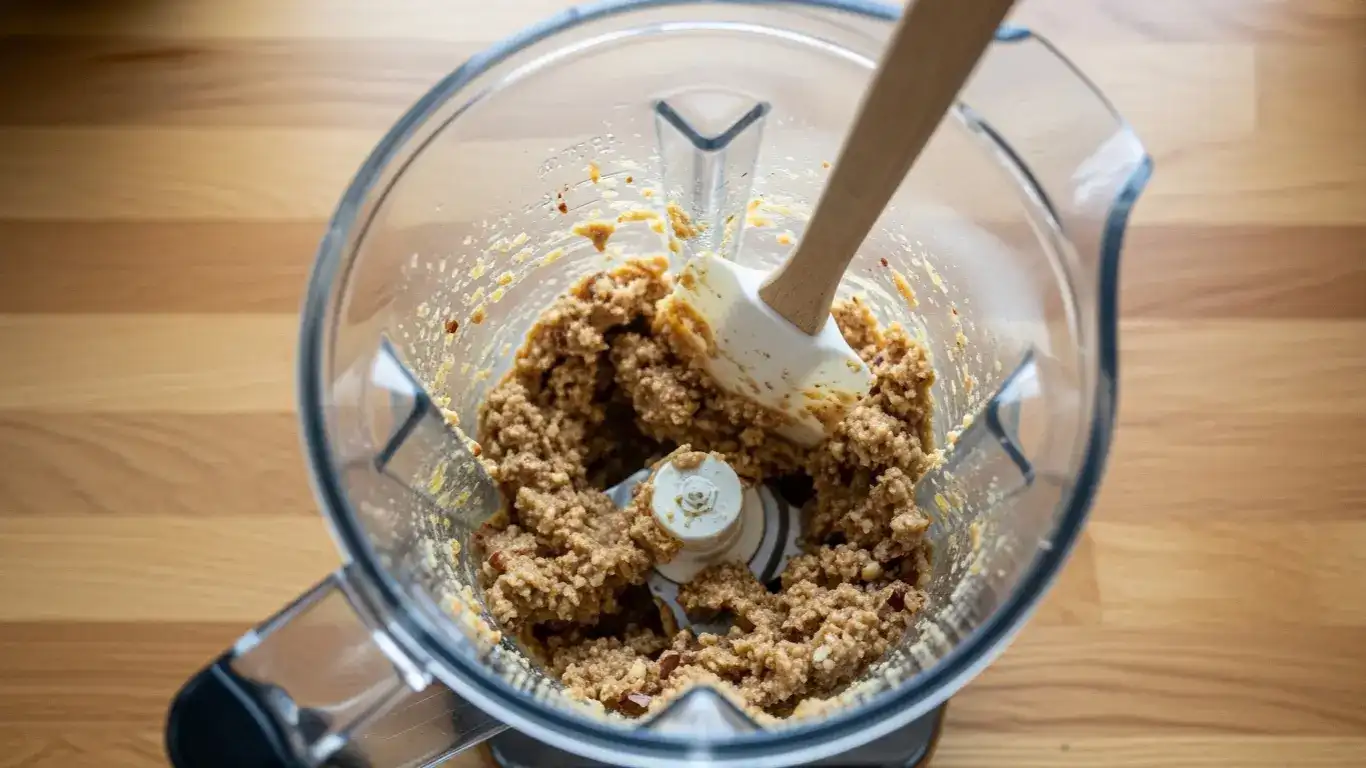
Don’t Over-Process
The biggest mistake people make is over-grinding. If you blend for too long, the oils in the nuts will release, and they will turn into a butter or paste. This is great if you want to make peanut butter, but not if you need ground nuts.
Stop pulsing as soon as you see the texture you want. Learning how to grind nuts in a blender is all about using short, controlled pulses.
Work In Batches
As mentioned earlier, avoid filling the blender too full. Grinding in small batches ensures better results. It’s also safer for your blender motor.
If you need a large amount of ground nuts, simply repeat the process with the remaining nuts.
Consider The Nut Type
Some nuts are more oily than others. For very oily nuts like macadamia nuts or peanuts, you might need even shorter pulses. Watch them closely.
The general rule for how to grind nuts in a blender applies, but pay extra attention to these types.
Cool Roasted Nuts
If you toast your nuts, make sure they are completely cool before grinding. Warm nuts can become clumpy and oily faster. Let them sit on a baking sheet for a while to cool down.
Use A Dry Blender
Moisture is the enemy of dry ingredients in a blender. Ensure the blender jar, blades, and lid are bone dry. Even a tiny bit of water can cause the ground nuts to stick together.
What Kind Of Blender Is Best?
Most blenders can handle grinding nuts. However, blenders with a “pulse” function are ideal. High-powered blenders can also work well, but you still need to use the pulsing technique to avoid over-grinding.
Immersion blenders are generally not suitable for grinding nuts; they are better for pureeing. For learning how to grind nuts in a blender, a standard countertop blender is usually sufficient.
Texture Guide For Ground Nuts
Here’s a general guide for what to aim for:
Coarsely Chopped Nuts
Pulse only 3-5 times. You will see distinct pieces of nuts, like small chunks. This is great for topping desserts or adding crunch to a dish.
Medium Ground Nuts
Pulse about 6-10 times. The pieces will be smaller and more uniform. This is good for adding to muffin batter or cookie dough.
Finely Ground Nuts (Nut Flour)
Pulse 10-15 times or more, checking frequently. The nuts will resemble a coarse flour. This is perfect for baking, especially for recipes that call for almond flour or other nut flours.
Remember, these are just estimates. The exact number of pulses will depend on your blender and how fast it runs. This is why checking after each pulse is key to understanding how to grind nuts in a blender.
Troubleshooting Common Issues
Even with the best instructions, you might run into a problem. Here are solutions.
Nuts Turned Into Paste
You likely pulsed for too long. If you need ground nuts, you will have to start over with new nuts and be more careful. If you actually wanted nut butter, then congratulations, you achieved it!
For learning how to grind nuts in a blender to avoid this, always use short pulses and check often.
Uneven Grinding
This can happen if the blender jar was too full or if you didn’t scrape down the sides. Try to process smaller batches. Ensure the nuts are distributed evenly around the blades before pulsing.
Scraping down the sides after every few pulses helps greatly.
Blender Overheating
If your blender motor feels hot, stop immediately and let it cool down. This usually happens when the blender is working too hard, often because the jar is too full or the nuts are being over-processed. Take breaks between pulsing.
This protects your appliance and is part of responsible knowledge on how to grind nuts in a blender.
Frequently Asked Questions
Question: Can I grind nuts in a blender without a pulse button
Answer: Yes, but it’s much harder to control the texture. You’ll need to turn the blender on and off very quickly in short bursts to mimic pulsing. Be extremely careful not to let it run for too long, or you’ll end up with nut butter.
Question: How many nuts can I grind at once
Answer: It’s best to fill the blender jar no more than halfway. For most standard blenders, this means about 1-2 cups of nuts per batch. Grinding in smaller batches gives you much better control over the final consistency.
Question: Do I need to remove the skins from nuts before grinding
Answer: It depends on the nut and your preference. For almonds, you can buy blanched almonds (skinless) if you want a pure white flour. If you don’t mind brown specks, you can grind almonds with the skin on.
The skins add a bit of fiber and a slightly coarser texture.
Question: How long can I store ground nuts
Answer: Ground nuts can go rancid quickly because their oils are exposed. Store them in an airtight container in the refrigerator for about 1-3 months. For longer storage, up to 6 months or more, keep them in the freezer.
Question: What if my blender blades are not sharp
Answer: Dull blades will struggle to grind nuts effectively, leading to uneven results and potentially overheating the blender. If your blender is old or has seen a lot of use, consider cleaning the blades thoroughly or replacing the blender jar if the blades are integrated and cannot be sharpened or replaced separately.
Final Thoughts
You have learned how to grind nuts in a blender, making your own nut flours and chopped toppings with ease. Remember to use short pulses and check your progress often. This simple technique gives you full control over the texture.
Your blender is now ready to help you create delicious baked goods and dishes. Enjoy experimenting with your freshly ground nuts!

I’m Joshua Miller, a U.S.-based food enthusiast and Co-Founder of KitchenWink.com. With a Bachelor’s degree in Food Science and over five years of hands-on experience testing blenders, coffee makers, and other kitchen tools, I focus on real-world results—not lab theories.
As a home cook, I personally test every product in real kitchens to give you honest, practical advice that makes everyday cooking easier.