Skip to content
Making bread at home can feel magical. The smell of fresh bread, the soft crumb, and the golden crust—these pleasures are easier to achieve with a stand mixer. Many home bakers are surprised to learn that a stand mixer can save time, reduce effort, and help you get more consistent results. But using this powerful kitchen tool for bread is different from making cookies or cake. Understanding the right steps and key tips will help you unlock the full potential of your stand mixer and bake bread that rivals a bakery.
Why Use A Stand Mixer For Bread?
Kneading bread dough by hand takes effort and time. It can be hard to know when you’ve kneaded enough, especially if you’re new to baking. A stand mixer makes this easier. With the right attachment, it mixes and kneads the dough evenly. This means you get better gluten development, a smoother dough, and more predictable loaves.
Using a stand mixer also saves time. What might take 10–15 minutes by hand can be done in 5–7 minutes with the mixer. For people with wrist pain or limited strength, a stand mixer makes bread baking possible and enjoyable.
Choosing The Right Stand Mixer And Attachments
Not every stand mixer is strong enough for bread. Bread dough is heavy and thick compared to cake batter. Always check your mixer’s manual for dough capacity and recommended speed.
Most mixers have a dough hook attachment. This is shaped like a “C” or spiral and is designed to stretch and fold bread dough. The flat beater and whisk are for lighter mixtures; never use them for bread dough.
Here’s a quick comparison of common stand mixer sizes and bread dough capacity:
| Stand Mixer Size | Flour Capacity (Bread Dough) | Typical Loaf Count |
|---|---|---|
| 4.5 qt | 4 cups (about 500g) | 1 loaf |
| 5 qt | 6 cups (about 750g) | 1–2 loaves |
| 6 qt | 8 cups (about 1kg) | 2–3 loaves |
If you plan to bake often or in large batches, a larger mixer is worth the investment. Too much dough in a small bowl can strain the motor and mix unevenly.
Essential Ingredients For Basic Bread
Let’s look at a simple white bread recipe you can try with your stand mixer. Here’s what you’ll need:
- Bread flour: 500g (about 4 cups)
- Water: 325ml (1⅓ cups), room temperature
- Active dry yeast: 2¼ teaspoons (1 packet)
- Salt: 2 teaspoons
- Sugar: 1 tablespoon
- Butter or oil: 2 tablespoons (optional, for softer crumb)
This will make one large loaf or two small loaves.
Step-by-step: Making Bread With A Stand Mixer
Follow these steps for reliable, tasty bread.
1. Proof The Yeast
In the mixer bowl, combine warm water (not hot, about 105–110°F), yeast, and sugar. Stir and let it sit for 5–10 minutes. The mixture should become foamy. This means your yeast is alive and ready.
If nothing happens, your yeast might be dead. Start over with fresh yeast.
2. Mix The Dough
Add bread flour and salt to the bowl. Attach the dough hook. Start the mixer on low speed (usually “2” on KitchenAid models). Mix for about 1 minute, just until the flour is absorbed.
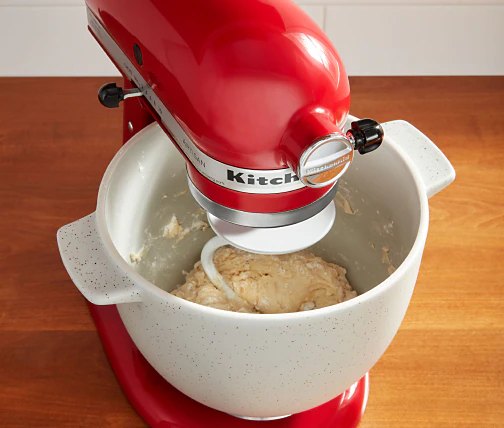
3. Knead With The Mixer
Increase to medium-low speed. Let the mixer knead for 5–7 minutes. The dough should form a ball and clean the sides of the bowl. If it sticks, add a spoonful of flour at a time. If it’s dry or crumbly, add water a teaspoon at a time.
You can check gluten development with the “windowpane test. ” Pinch off a small piece of dough and stretch it thin. If it forms a thin, see-through “window” without tearing, it’s ready.
4. First Rise (bulk Fermentation)
Remove the dough and shape it into a ball. Place it in a lightly oiled bowl, cover with plastic wrap or a towel, and let it rise in a warm spot for 1–2 hours. It should double in size.
5. Shape The Dough
Gently press down (“punch down”) to release gas. Shape into a loaf or rolls. Place in a greased loaf pan or on a baking sheet.
6. Second Rise (proofing)
Cover the shaped dough and let it rise again for about 45–60 minutes. It should puff up but not overflow the pan.
7. Bake
Preheat your oven to 375°F (190°C). Bake for 25–30 minutes. The bread is done when it’s golden brown and sounds hollow when tapped on the bottom. If you have an instant-read thermometer, the center should be 190–200°F.
8. Cool And Enjoy
Remove the bread from the pan and cool on a rack. Wait at least 20 minutes before slicing. This helps the crumb set and makes neater slices.
Tips For Best Results
- Don’t overload the mixer. Too much dough can damage the motor.
- Use bread flour for better gluten and structure.
- Weigh your ingredients for accuracy.
- Watch the dough, not the clock. Humidity, temperature, and flour type change how dough behaves.
- Use room-temperature ingredients for even mixing.
Even experienced bakers sometimes forget to scrape flour from the bottom of the bowl. Always check for dry spots before kneading.
Common Mistakes And How To Avoid Them
- Using high speed for kneading: This can overheat the dough and mixer. Stick to low or medium-low.
- Too much flour: It’s easy to add extra flour if the dough looks sticky. Bread dough should be a bit tacky.
- Cold ingredients: They slow down the yeast.
- Not enough kneading: Poor gluten development means flat, dense bread.
- Ignoring mixer limits: If your mixer struggles or shakes, reduce the batch size.
Many beginners don’t realize that dough can overheat in the mixer if kneaded too long or too fast. Warm dough ferments too quickly and can change texture and flavor. If the bowl feels hot, let the dough rest for 10 minutes before continuing.
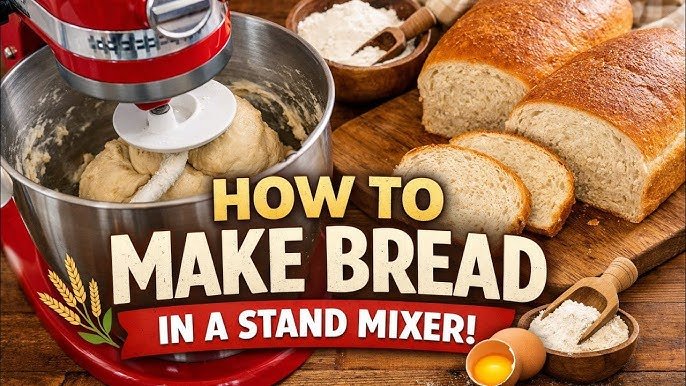
Credit: www.youtube.com
How Stand Mixer Bread Differs From Hand-kneaded Bread
Stand mixers develop gluten faster than hand kneading. This means you can over-knead if you leave the mixer running too long. Over-kneaded dough feels tough and makes bread with a tight crumb.
By hand, it’s harder to over-knead because you feel the dough change. With a machine, check the dough often after 5 minutes.
Here’s a comparison between hand kneading and stand mixer kneading:
| Method | Kneading Time | Effort | Result |
|---|---|---|---|
| Hand Kneading | 10–15 minutes | High | Good, but less even for beginners |
| Stand Mixer | 5–7 minutes | Low | Even, reliable |
Cleaning And Maintenance
After baking, clean the dough hook and bowl with warm soapy water. Some parts are dishwasher-safe, but always check the manual. Wipe down the mixer base with a damp cloth.
If you notice dough climbing the hook or sticking to the sides, stop the mixer and scrape it down. This helps mix all ingredients evenly.
Advanced Tips: Enrich Your Bread
Once you’re comfortable with basic bread, try adding:
- Milk, eggs, or butter for richer dough
- Seeds or nuts for crunch
- Herbs or cheese for flavor
Some additions, like dried fruit, should go in at the end of kneading so they don’t break up. If you add fats (like butter), add them after the dough has come together. This helps gluten form before fats coat the flour.
Troubleshooting: What If Something Goes Wrong?
- Dough isn’t rising: Check yeast freshness and water temperature.
- Bread is dense: Maybe under-kneaded, or the dough was too dry.
- Crust too hard: Try baking with a pan of water in the oven for steam, or brush with butter after baking.
- Bread collapses: Probably over-proofed. Next time, shorten the second rise.
Most beginners don’t realize that the mixer can overwork dough if you’re distracted. Always set a timer and check the dough’s look and feel.

Credit: www.cookwarejunkies.com
Stand Mixer Bread Recipes To Try
Here are three bread styles you can try with your stand mixer:
- Basic White Sandwich Bread: Use the recipe above. Great for beginners.
- Whole Wheat Bread: Swap half the flour for whole wheat. Add 1–2 tablespoons more water.
- Brioche: Enriched with eggs and butter. Mix the dough first, then add softened butter in pieces until fully combined.
Don’t try very stiff doughs (like bagels) in small mixers—they can overload the motor.
Safety Notes
- Never put your hands or utensils in the mixer while it’s running.
- Always unplug before changing attachments.
- Don’t walk away from the mixer, especially with heavy dough.
Comparing Stand Mixer Brands For Bread
Not all stand mixers perform equally well with bread dough. Here’s a look at three popular brands:
| Brand | Motor Power | Bowl Size | Best For |
|---|---|---|---|
| KitchenAid Artisan | 325W | 5 qt | Home bakers, small batches |
| Bosch Universal Plus | 800W | 6.5 qt | Frequent, large batches |
| Kenwood Chef | 750W | 5 qt | Versatile, European recipes |
If you bake often or want to try heavier doughs, a more powerful mixer is a good investment.
Frequently Asked Questions
How Do I Know If My Dough Is Kneaded Enough In A Stand Mixer?
Check with the windowpane test: pinch a small piece of dough and stretch it between your fingers. If it forms a thin, see-through sheet without tearing, it’s ready. Usually, this takes 5–7 minutes in a stand mixer.
Can I Make All Bread Recipes In A Stand Mixer?
Most bread doughs work well, but very stiff doughs (like bagels) or huge batches may strain smaller mixers. Always check your mixer’s manual.
What’s The Best Speed For Kneading Dough?
Use low or medium-low speed (usually “2” on KitchenAid). Higher speeds can overheat the dough and damage the mixer.
Should I Cover The Mixer Bowl During The First Rise?
No. Remove the bowl from the mixer and cover it with plastic wrap or a towel. The mixer bowl is fine for rising, but don’t cover and let it rise while still attached to the mixer.
Where Can I Find More Bread Recipes For Stand Mixers?
The King Arthur Baking Company has many tried-and-true recipes and tips for stand mixer bread baking. See their website for more: King Arthur Baking Company.
Making bread with a stand mixer lets you enjoy home-baked bread with less effort and more consistent results. With practice, you’ll be able to adapt recipes, try new flavors, and impress your friends and family with your baking skills. Happy baking!
Credit: www.kitchenaid.com