Electric lunch boxes are changing the way people eat meals at work, school, or on the go. These handy devices let you warm up food easily without a microwave or stove. With more people looking for convenient ways to eat healthy, electric lunch boxes are becoming popular.
If you’re new to using one, you might wonder how they work, what foods suit them, and how to get the most out of your lunch box. In this guide, you’ll learn everything you need to know to use an electric lunch box safely and effectively, along with practical tips and real-life examples.
What Is An Electric Lunch Box?
An electric lunch box is a portable container with a built-in heating element. It’s designed to warm food using electricity, usually through a wall outlet or car adapter. Unlike traditional lunch boxes, it can heat your meal directly inside the container. Most models are made from food-safe plastic, stainless steel, or a combination of both.
Key features usually include:
- Removable inner containers for easy cleaning
- Separate compartments to keep foods apart
- Temperature control or indicator lights
- Leak-resistant lids
- Carry handles
These lunch boxes are ideal for office workers, students, truck drivers, and anyone with limited access to a kitchen. According to a recent market report, global sales of electric lunch boxes grew by over 20% between 2020 and 2023, showing rising demand for portable heating solutions.
Types Of Electric Lunch Boxes
Understanding the different types helps you pick the right one for your needs. Here are the main categories:
| Type | Power Source | Typical Capacity | Main Use |
|---|---|---|---|
| Plug-in (AC) | Wall outlet (110–240V) | 800–1200 ml | Office, home |
| Car adapter (DC) | 12V car socket | 800–1000 ml | Travel, road trips |
| Dual power | Both AC and DC | 1000–1500 ml | Flexible use |
Some advanced models even offer temperature settings or digital timers, but most entry-level lunch boxes have a simple on/off function.
Choosing The Right Electric Lunch Box
Selecting the best electric lunch box requires thinking about your daily routine and food preferences. Here’s what matters most:
- Capacity: If you eat large meals or want to pack multiple dishes, choose a lunch box with a capacity over 1000 ml. For light lunches, 800 ml is usually enough.
- Material: Stainless steel is durable and easy to clean, but can be heavier. Plastic models are lightweight but may not last as long. Always make sure the material is BPA-free and food safe.
- Power Options: If you travel or work in different places, a lunch box with both AC and DC adapters gives more flexibility.
- Compartments: Multiple compartments help keep rice, vegetables, and proteins separate. This is especially useful for packed lunches with sauces or soups.
- Ease of Cleaning: Removable containers and lids make cleaning simpler. Some models are dishwasher safe, but always check the manufacturer’s instructions.
- Heating Speed: Most electric lunch boxes heat food in 20–45 minutes. If you’re short on time, choose a model with faster heating.
Common mistakes include buying a lunch box without checking the power source compatibility or picking a model that’s too small for your needs. Many beginners also ignore cleaning instructions, leading to unpleasant odors or damage.
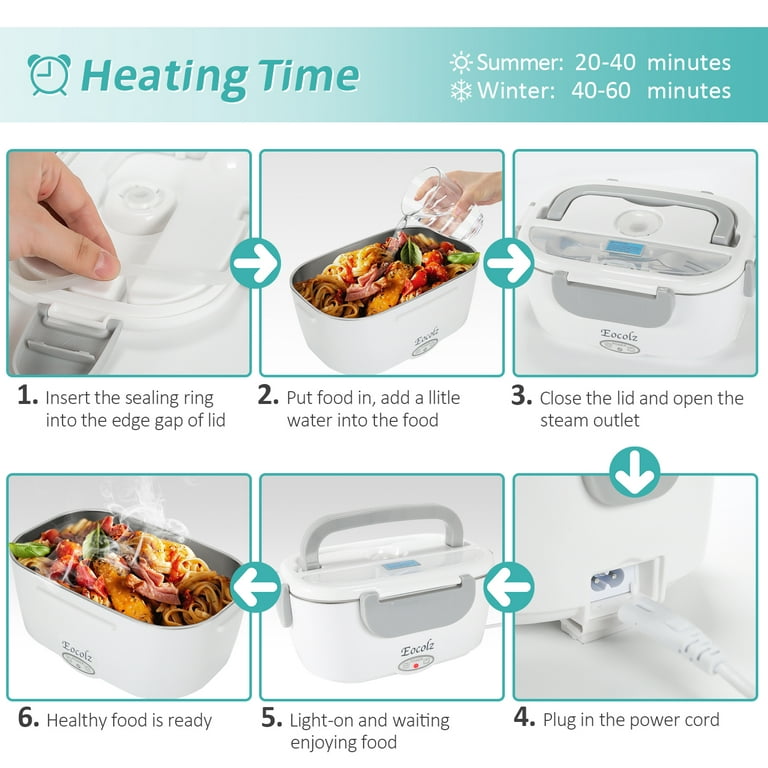
How To Use An Electric Lunch Box: Step-by-step Guide
Using an electric lunch box is simple, but a few careful steps can make your experience better and safer.
Step 1: Prepare Your Food
Pack your lunch in the inner containers. Cut large pieces into smaller chunks for faster heating. Avoid overfilling; leave some space for steam to circulate.
Foods that work well include:
- Cooked rice
- Pasta
- Steamed vegetables
- Chicken, beef, or tofu (pre-cooked)
- Curries and stews
Avoid raw meat or fish unless your lunch box has a cooking function (most models only reheat).
Step 2: Assemble The Lunch Box
Make sure all containers are properly placed and lids are tightly closed. If your lunch box has a vent or steam outlet, leave it open during heating to prevent pressure build-up.
Step 3: Plug In And Heat
Connect the lunch box to the appropriate power source (wall outlet or car adapter). Switch it on. Most boxes have an indicator light showing when heating starts.
Typical heating time:
- Room temperature food: 20–30 minutes
- Refrigerated food: 30–45 minutes
If your box has a timer, set it accordingly. If not, monitor the heating manually.
Step 4: Serve And Enjoy
Once the food is hot, unplug the lunch box and let it cool for a minute. Open the lid carefully to avoid steam burns. Use the included utensils or transfer to a plate.
Step 5: Clean Up
After eating, remove the inner containers and wash them with warm, soapy water. Wipe down the outer shell with a damp cloth. Never immerse the entire lunch box in water—this could damage the electrical parts.
Credit: www.walmart.com
Foods You Can And Cannot Heat
Electric lunch boxes are great for reheating most cooked meals. However, some foods are better suited than others.
| Good Choices | Not Recommended |
|---|---|
| Cooked rice, pasta, grains | Raw eggs, uncooked meat |
| Vegetable stir-fries | Frozen meals (unless thawed first) |
| Curries, soups, stews | Large bread items (may dry out) |
| Roasted potatoes | Leafy salads (may wilt) |
A non-obvious tip: If you want to heat sauces or liquids, place them in a separate compartment. This prevents mixing and keeps your meal fresh.
Safety Tips And Common Mistakes
Electric lunch boxes are safe if used correctly, but mistakes can happen. Here are important safety tips:
- Always check the voltage before plugging in, especially when traveling internationally.
- Do not heat food with the lid completely closed if there’s no vent—steam can cause leaks or even damage.
- Never immerse the lunch box’s electrical base in water.
- Keep the lunch box away from flammable materials while in use.
- Don’t overfill the containers; food expands when heated.
One common mistake is forgetting to open the steam vent, which can lead to dangerous pressure build-up. Another is leaving the lunch box plugged in for too long, which may cause overheating or burn the food.
Cleaning And Maintenance
A well-maintained lunch box lasts longer and keeps your food tasting fresh. Cleaning is easy if done regularly.
Best practices:
- Clean after each use to prevent stains and odors.
- Remove all food residues before storing.
- Avoid harsh chemicals—use mild soap or vinegar for tough spots.
- Dry all parts completely before reassembling.
Some models have removable stainless steel containers that are dishwasher-safe. For others, hand washing is recommended.
A practical tip many beginners miss: Check the heating plate for food spills and wipe gently with a damp cloth. Neglecting this can reduce heating efficiency.
Real-life Examples And User Insights
Electric lunch boxes are used by millions worldwide. Here are some real stories:
- Office worker in New York: Saves $50 a week by bringing homemade lunches. Finds that pasta and rice dishes heat evenly.
- Truck driver in Texas: Uses a car adapter lunch box to warm meals during long drives. Prefers models with sturdy lids to prevent spills.
- Student in California: Likes the dual power feature for both dorm and car use. Packs stir-fried vegetables and chicken for quick heating.
A surprising insight: Many users report improved diet quality by avoiding fast food and eating home-cooked meals more often.

Credit: www.youtube.com
Comparing Electric Lunch Boxes With Other Meal Solutions
How does an electric lunch box stack up against other portable food options? Let’s look at the data:
| Feature | Electric Lunch Box | Microwave | Insulated Food Jar |
|---|---|---|---|
| Portability | High | Low | Medium |
| Heating Time | 20–45 mins | 2–5 mins | None |
| Power Required | Yes | Yes | No |
| Keeps Food Hot | Yes | No | Yes |
| Versatility | Medium | High | Low |
| Average Cost | $25–$45 | $100–$300 | $20–$30 |
Electric lunch boxes offer high portability and keep food hot for hours, but they take longer to heat compared to microwaves. Insulated jars keep food hot but cannot reheat cold meals.
Practical Tips To Improve Your Electric Lunch Box Experience
- Pre-heat your lunch box for 5 minutes before adding food for faster heating.
- Use silicone or heat-safe plastic containers inside the main compartment for easy removal.
- Add a splash of water to dry foods before heating—this improves moisture and prevents burning.
- Pack meals the night before and refrigerate; just reheat in the morning.
- Experiment with different cuisines—Asian rice bowls, Mediterranean salads (without leafy greens), or Mexican burritos heat well.
Many users miss the advantage of pre-heating. This simple step can cut heating time by up to 10 minutes.

Credit: forabest.com
Frequently Asked Questions
Can I Cook Raw Food In An Electric Lunch Box?
Most electric lunch boxes are made for reheating, not cooking raw food. Always use pre-cooked ingredients. Some advanced models may offer cooking functions, but check the specifications.
How Long Does It Take To Heat Food?
Heating time depends on the quantity and temperature of the food. Typically, it takes 20–45 minutes for most meals. Foods straight from the fridge may take longer.
Is It Safe To Leave My Lunch Box Plugged In?
No. Always unplug after heating. Leaving it plugged in can cause overheating and may damage the lunch box or your food.
What Foods Should I Avoid Heating?
Avoid raw meats, uncooked eggs, frozen meals (unless thawed), and leafy salads. These either won’t heat properly or may lose texture.
Where Can I Find More Information About Electric Lunch Boxes?
For detailed product reviews and safety standards, visit Wikipedia.
Using an electric lunch box can make your daily meals easier, healthier, and more enjoyable. With the right model and some practical habits, you’ll never worry about cold lunches again. Try different foods, follow safety tips, and enjoy the convenience of warm, home-cooked meals wherever you are.