Skip to content
If you’ve ever struggled to cut vegetables cleanly or slice meat smoothly, chances are your knife needs sharpening. A dull knife not only makes cooking harder, but it’s also dangerous—blunt blades slip easily and can cause accidents. Sharpening your knife with a whetstone is one of the best ways to restore its cutting power.
This guide shows you exactly how to use a whetstone safely, step-by-step. Whether you’re a kitchen beginner or a home chef, you’ll learn how to master this useful skill, avoid common mistakes, and keep your knives sharper for longer.
What Is A Whetstone And Why Use One?
A whetstone is a rectangular block made from natural or synthetic materials. Its rough surface grinds away metal from the knife’s edge, making it sharp again. Whetstones come in different grits—think of grit as the level of roughness. Lower grit (like 400) removes more metal and is good for repairing very dull knives. Higher grit (like 1000 or 3000) is used for finishing and polishing.
Why use a whetstone instead of other sharpening tools? Unlike electric sharpeners or rods, whetstones let you control the sharpening angle and pressure. This helps protect your knife’s shape and extends its life. Most professional chefs prefer whetstones for their precision.
Choosing The Right Whetstone
Picking the right whetstone is important. Here’s how to compare them:
| Grit Size | Best For | Typical Use |
|---|---|---|
| 400–600 | Very dull knives | Repairing chips, heavy sharpening |
| 1000–1500 | Regular sharpening | Restoring edge |
| 3000–8000 | Polishing | Smoothing, finishing edge |
Most home cooks only need a medium grit (1000–1500) and a fine grit (3000–8000) whetstone. If your knife is badly damaged, start with a coarse grit. For regular maintenance, stick with medium and fine.
Non-obvious tip: Many beginners think more grit means sharper knives, but using only high grits on a very dull blade won’t work. You need to start coarse, then move finer.
:max_bytes(150000):strip_icc()/how-to-sharpen-knife-with-whetstone-995817_FINAL-5c3facdec9e77c00019976bf.png)
Credit: www.thespruceeats.com
Preparing Your Knife And Whetstone
Before sharpening, take time to set up:
- Soak the whetstone: Most stones need soaking in water for 10–15 minutes. If bubbles stop rising, it’s ready. Some stones are “oil stones” and need oil instead—check the instructions.
- Clean your knife: Wash and dry your blade to remove dirt, which can scratch the stone.
- Set up your workspace: Place a towel under the whetstone to keep it steady and catch water.
Insight: A slippery stone can ruin your sharpening. Make sure your workspace is stable.
Understanding The Sharpening Angle
One of the most important parts of sharpening is holding the knife at the right angle. Most kitchen knives are sharpened at a 15–20 degree angle. Japanese knives often use 12–15 degrees, while Western knives use 20 degrees.
How can you find this angle? Imagine stacking two coins under the blade, near the edge—that’s close to 15 degrees.
| Knife Type | Sharpening Angle | Use Case |
|---|---|---|
| Japanese (Santoku, Gyuto) | 12–15° | Precision slicing |
| Western (Chef’s, Utility) | 18–20° | General chopping |
| Outdoor (Hunting, Survival) | 22–25° | Heavy-duty tasks |
Beginner mistake: Changing the angle during sharpening creates a dull edge. Practice keeping your hand steady.
Step-by-step Sharpening Process
Let’s go through the sharpening process:
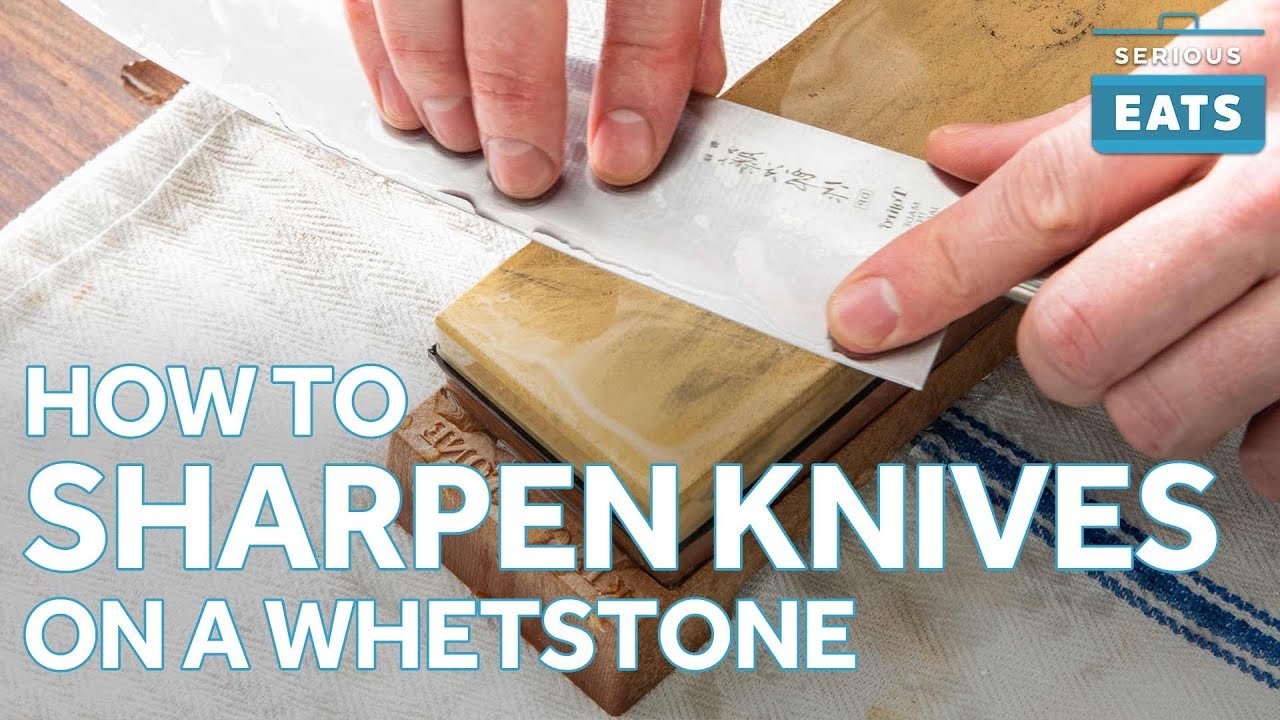
1. Position The Knife
Place the whetstone with the coarse grit facing up. Hold the knife at the correct angle, with the blade facing away from you.
2. Slide The Blade
Push the knife across the stone, from heel to tip, applying gentle pressure. Use a sweeping motion, like spreading butter. Cover the whole edge.
Repeat this motion 8–10 times on one side. Flip the knife and repeat on the other side.
3. Check For A Burr
A burr is a tiny fold of metal that forms on the blade’s edge. Run your finger lightly along the edge—if you feel a rough spot, you’re sharpening well. Once you feel the burr, switch to the finer grit.
4. Sharpen With Fine Grit
Turn the stone over or switch to your fine whetstone. Repeat the same motion, but use less pressure. This polishes the edge and removes the burr.
5. Clean And Test
Rinse the knife and whetstone. Dry the blade completely. Test sharpness by slicing a piece of paper—if the knife cuts cleanly, you’re done.
Practical tip: For best results, sharpen your knife every 2–3 months, depending on use.
Common Mistakes And How To Avoid Them
Many people make errors when sharpening knives. Here are some to watch for:
- Wrong angle: Even a few degrees off can make the knife dull.
- Using too much force: Pressing hard damages the blade and stone.
- Skipping grits: Not moving from coarse to fine leaves the edge rough.
- Failing to check burrs: Without a burr, you’re not sharpening effectively.
- Not soaking the stone: Dry stones don’t sharpen well.
Non-obvious insight: If your knife feels dull after sharpening, check for leftover burrs. These can be gently removed by stroking the blade against a soft wood or cork.
Credit: www.youtube.com
Maintaining Your Whetstone And Knife
Sharpening is just one part of knife care. Here’s how to keep your tools in top condition:
- Clean the whetstone: Rinse after each use. If clogged, scrub with a stiff brush.
- Store properly: Keep the stone dry and away from extreme temperatures.
- Hone your knife: Use a honing rod weekly to keep the edge straight between sharpenings.
- Avoid dishwashers: Wash knives by hand to prevent dulling.
| Care Step | Frequency | Reason |
|---|---|---|
| Sharpening | Every 2–3 months | Restores sharp edge |
| Honing | Weekly | Keeps edge aligned |
| Hand washing | After each use | Protects blade |
| Whetstone cleaning | After sharpening | Removes metal particles |
Safety Tips For Knife Sharpening
Sharpening knives can be risky if not done carefully. Follow these safety tips:
- Keep fingers clear: Always move the knife away from your body.
- Use a stable surface: Prevent slips by placing a towel or mat under the stone.
- Avoid distractions: Focus on the process to prevent accidents.
- Wear cut-resistant gloves if you’re nervous or new to sharpening.
Important: Don’t rush. Slow, steady movements are safer and produce better results.
Troubleshooting: When Sharpening Doesn’t Work
Sometimes, sharpening doesn’t make your knife any better. Here’s what to check:
- Is your whetstone flat? A worn-out stone won’t sharpen evenly. Use a stone fixer to flatten it.
- Are you using the right grit? Too fine a grit won’t repair deep damage.
- Is your knife damaged? If the blade is bent or chipped, professional repair may be needed.
If you’re still having trouble, consider asking an expert or reading more at Wikipedia.
Frequently Asked Questions
How Often Should I Sharpen My Kitchen Knife?
Most home cooks should sharpen knives every 2–3 months, depending on usage. If you cook daily, sharpen more often. Honing weekly helps keep the edge sharp between full sharpenings.
Can I Sharpen All Types Of Knives With A Whetstone?
You can use a whetstone for most kitchen knives, outdoor knives, and even scissors. However, serrated blades and ceramic knives need special tools. Always check your knife’s material before sharpening.
How Do I Know If My Knife Is Sharp Enough?
A sharp knife should cut through paper smoothly and slice tomatoes easily without squashing them. You can also check by gently touching the blade—if it feels smooth, it may need more sharpening.
Is It Possible To Damage My Knife With A Whetstone?
Yes. Using the wrong angle, too much pressure, or skipping grits can damage the blade. Always follow recommended angles and start with gentle pressure. If unsure, practice on a cheaper knife first.
What’s The Difference Between Sharpening And Honing?
Sharpening removes metal to create a new edge. Honing straightens the edge without removing metal. Honing rods are for regular maintenance; whetstones are for restoring sharpness.
Learning how to sharpen a knife with a whetstone is a skill that pays off every time you cook. With practice, you’ll notice your food preparation is faster, safer, and more enjoyable. Always respect the process, keep your tools clean, and take your time. If you want to dive deeper, exploring resources like Wikipedia can give you more background and advanced tips. Remember, a sharp knife is the most important tool in any kitchen—master it, and your cooking will never be the same.
:max_bytes(150000):strip_icc()/__opt__aboutcom__coeus__resources__content_migration__serious_eats__seriouseats.com__2010__04__20200220-knife-sharpening-whetstone-vicky-wasik-5c825782502c4a429c08d0039d1df051.jpg)
Credit: www.seriouseats.com