Can Butcher Block Be Stained
Butcher block countertops are popular in kitchens for their warm, natural look and durability. Many homeowners wonder if they can change the color or refresh the appearance of their butcher block by staining it. The answer is yes, butcher block can be stained—but there are important steps and choices to ensure a good result. Whether you want a darker tone, a lighter finish, or something unique, staining butcher block is a practical way to customize your kitchen surface.
This guide will help you understand the process, what to expect, and how to avoid common mistakes.
What Is Butcher Block?
Butcher block is a type of countertop made by joining strips of wood together. The most common woods used are maple, oak, walnut, and birch. These blocks are durable, can handle knife work, and offer a cozy look. Butcher block is often left unfinished or treated with oil to show the natural grain.
Butcher block is popular because:
- It is strong and lasts long.
- You can sand and refinish it many times.
- It fits many kitchen styles, from modern to rustic.
Why Stain Butcher Block?
Staining butcher block gives you more control over the color and look of your countertop. Some reasons to stain include:
- Matching the countertop with cabinets or flooring.
- Covering stains, scratches, or uneven color.
- Creating a unique kitchen style.
- Protecting the wood from moisture and wear.
Many people do not realize that staining also helps highlight the natural grain of the wood, making the butcher block more attractive.
Types Of Stain For Butcher Block
Different stains create different effects. The main types are:
- Oil-Based Stains: These penetrate deep and give a rich color. They take longer to dry.
- Water-Based Stains: These dry fast and have less odor. They are easy to clean up.
- Gel Stains: These are thick and sit mostly on the surface. Good for vertical surfaces.
- Food-Safe Stains: Some stains are made for surfaces where food is prepared. These are safer, but color choices may be limited.
Choosing the right stain depends on your needs. For kitchen counters, food-safe stains or finishes are recommended.
| Type | Drying Time | Best Use | Food Safe? |
|---|---|---|---|
| Oil-Based | 8-24 hours | Deep color, heavy use | No |
| Water-Based | 1-4 hours | Quick projects, easy clean-up | No |
| Gel | 4-8 hours | Vertical/uneven surfaces | No |
| Food-Safe | Varies | Kitchen, food prep | Yes |
You may also like: Best Butcher Block Cutting Boards
Preparing Butcher Block For Staining
Proper preparation is key for a good result. Many beginners miss these steps and end up with uneven color or blotchy finishes.
- Remove old finish: Sand the surface to remove old oil, varnish, or stains. Start with coarse sandpaper (60-80 grit) and finish with finer grit (120-220).
- Clean the surface: Wipe away dust and debris. Use a damp cloth, then let the wood dry completely.
- Check for damage: Fill any cracks or holes with wood filler. Sand again if needed.
- Test the stain: Try the stain on a small hidden area first to see the color.
Skipping sanding is a common mistake. Stain cannot penetrate through old finishes or oils, so sanding is essential.
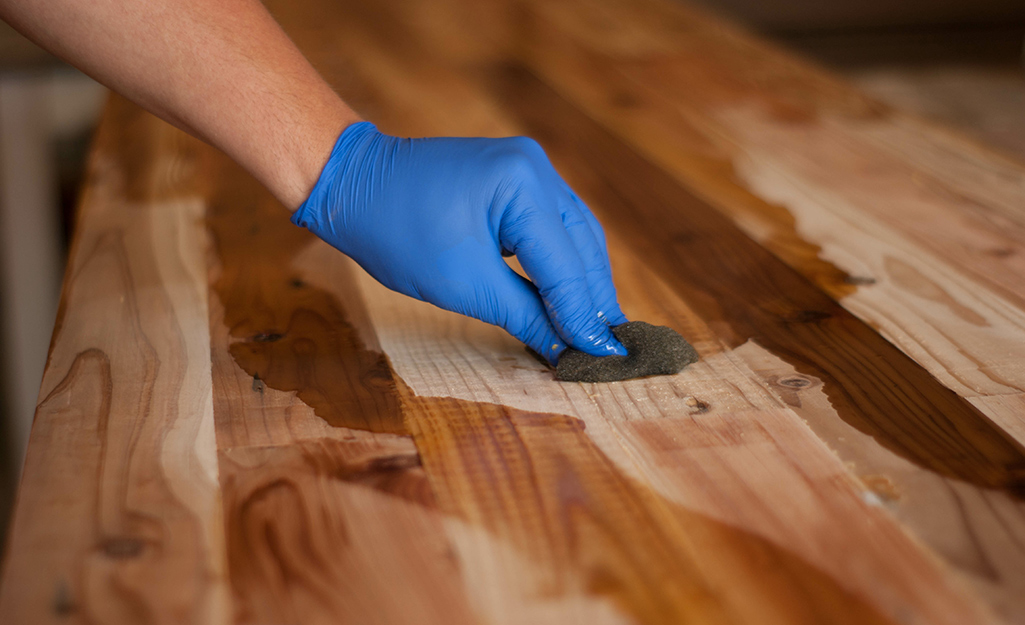
How To Stain Butcher Block: Step-by-step
Staining butcher block is not difficult, but careful work gives the best results. Here’s how:
- Apply stain: Use a clean cloth, brush, or sponge. Follow the wood grain for even coverage.
- Let it soak: Leave the stain on for 5-15 minutes, depending on how dark you want the color.
- Wipe excess: After soaking, wipe off extra stain with a dry cloth.
- Dry time: Let the butcher block dry fully. This can take a few hours or overnight.
- Repeat (if needed): For darker color, apply another coat after the first dries.
- Seal the surface: After staining, protect the wood with a sealant. For kitchen use, choose a food-safe sealant like mineral oil or beeswax.
Practical Tips For Staining
- Always work in a well-ventilated area.
- Wear gloves to avoid skin contact with the stain.
- Don’t rush—drying times are important.
- Use a tack cloth to remove dust before staining.
Many people do not realize that some wood types absorb stain unevenly. Maple, for example, can look blotchy if not properly sanded or treated with a wood conditioner before staining.
Choosing A Stain Color
The color you pick affects the mood and style of your kitchen. Popular choices include:
- Natural: Shows off the wood grain, light finish.
- Honey: Warm golden tone, good for cozy kitchens.
- Walnut: Deep brown, modern and elegant.
- Gray: Trendy, works with stainless steel appliances.
- Whitewash: Lightens the wood, creates a fresh look.
If you are unsure, test two or three colors on small areas. Lighting changes how the stain looks, so check the sample at different times of day.
| Color | Kitchen Style | Popular With |
|---|---|---|
| Natural | Rustic, farmhouse | Traditional homes |
| Honey | Warm, cozy | Family kitchens |
| Walnut | Modern, elegant | Contemporary homes |
| Gray | Urban, trendy | Lofts, apartments |
| Whitewash | Light, airy | Small kitchens |
Sealing And Protecting Your Stained Butcher Block
After staining, sealing is necessary to protect the wood from water and daily use. The most common sealants are:
- Mineral Oil: Easy to apply, food-safe. Needs reapplication every month.
- Beeswax: Gives a soft shine, good for food prep areas.
- Polyurethane: Durable, waterproof, but not food-safe.
- Tung Oil: Natural, food-safe, resists water.
For kitchen counters, stick with food-safe oils and waxes. If you use the surface for cutting, avoid polyurethane.
Many homeowners do not realize that sealants change the final color slightly. A clear oil may darken the stain, so test before doing the whole countertop.
Common Mistakes When Staining Butcher Block
Staining butcher block seems simple, but there are pitfalls. Here are mistakes to avoid:
- Skipping sanding: This leads to uneven stain and blotchy spots.
- Not cleaning dust: Dust affects the finish and texture.
- Using non-food-safe products: These can be unsafe if you use the counter for food.
- Not testing the stain: Colors may look different on your wood.
- Applying thick sealant: Too much can make the surface sticky.
Many beginners also forget to check humidity. Staining in high humidity slows drying and can cause problems.
Credit: www.homedepot.com
Pros And Cons Of Staining Butcher Block
If you’re deciding whether to stain your butcher block, consider these points:
| Pros | Cons |
|---|---|
| Customizes color and look | Can require regular maintenance |
| Highlights wood grain | Some stains are not food-safe |
| Hides stains and scratches | Process takes time |
| Protects wood | Can be tricky for beginners |
Real-world Examples
Homeowners often stain butcher block to match kitchen trends. For example, a family in Chicago stained their maple butcher block with a walnut tone to match their dark cabinets. They used water-based stain and sealed it with beeswax. The result was a rich, glossy finish that lasted for years.
In Seattle, a chef chose a food-safe mineral oil for his butcher block. He applied a light honey stain, then sealed it monthly. The countertop stayed bright and durable, even with heavy use.
Data from the National Kitchen and Bath Association shows that about 15% of new kitchen remodels use butcher block, and nearly half of these are stained for a custom finish.
Maintenance After Staining
Once stained and sealed, butcher block needs care:
- Wipe spills quickly to prevent stains.
- Reapply oil or wax as recommended (usually monthly).
- Avoid harsh cleaners; use mild soap and water.
- Sand out scratches and apply new stain and sealant if needed.
Many people do not realize that regular oiling is not just for looks—it protects the wood from drying out and cracking.
Alternatives To Staining
If you don’t want to stain, there are other ways to change your butcher block’s appearance:
- Painting: Paint gives a solid color, but is not good for food prep areas.
- Bleaching: Lightens wood, but can weaken it.
- Leaving natural: Oil or wax alone keeps the natural grain.
Staining is often the best choice for keeping the wood’s beauty and adding color.
Frequently Asked Questions
Can I Stain Butcher Block If It’s Already Finished?
Yes, but you must sand off the existing finish completely. Stain cannot penetrate through oils, varnish, or sealants.
Is Stained Butcher Block Safe For Food Prep?
Only if you use food-safe stains and sealants. Some stains are not safe for direct contact with food. Always check labels.
How Long Does Stained Butcher Block Last?
With proper care, stained butcher block can last for many years. Regular oiling and cleaning are important to keep the finish.
Can I Change The Stain Color Later?
Yes, you can sand the surface and apply a new stain. However, very dark stains may not be fully removed.
What Is The Best Stain For Butcher Block?
For kitchen counters, use a food-safe stain if you prepare food directly. Water-based stains are easy for beginners, but oil-based stains give deeper color.
If you want more expert advice or examples, see Family Handyman for practical tips and details.
Staining butcher block is a rewarding project that lets you customize your kitchen while keeping the natural beauty of wood. With careful preparation, the right products, and ongoing maintenance, your countertop will look great and last for years.