Ever wonder how does an immersion blender work without a pitcher? It doesn’t need one. The motor and blade come straight to the pot instead.
You hold the motor housing, dip the blade end below the surface, and let the spinning blade puree right where the food is.
Most consumer models spin between 12,000 and 18,000 RPM, with motors rated from 200 to 600 watts. As of 2026, that range still covers nearly every stick blender on the market. But power isn’t the secret.
The shape of the blade housing is.
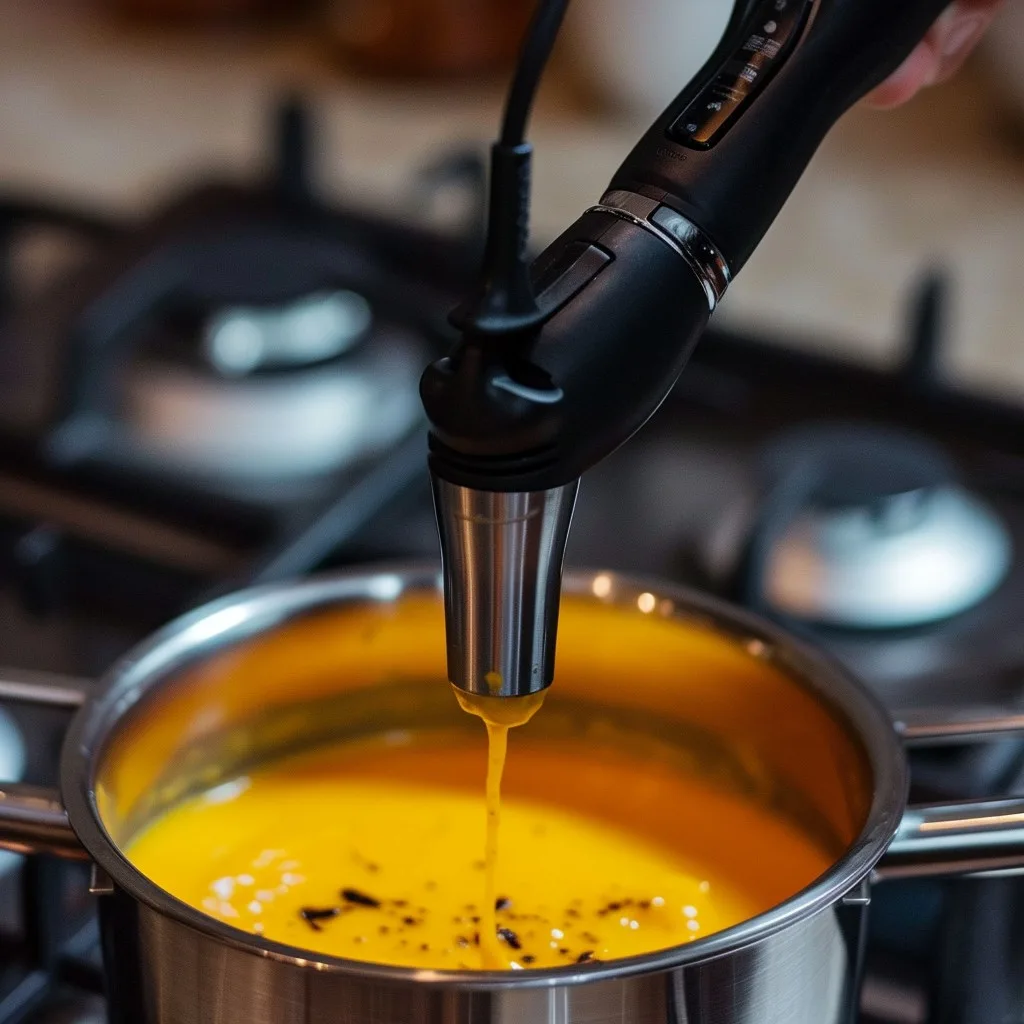
Image source: Web (Bing) / stockcake.com (Web image (fair-use with source credit))
Quick Answer
An immersion blender works with a motor mounted above the blade. The motor spins a short shaft inside the wand. The blade sits inside a base that is open at the bottom.
That open housing pulls liquid up, chops it, and pushes it outward.
Why the Visuals Matter Here
A product photo on a white background hides everything that matters. You see the wand, maybe the trigger, and a bell-shaped base. You never see what happens under the surface.
That’s where the real work is.
The picture at the top of this article shows the machine doing its actual job. The bell guard is under the soup. The motor is above.
That split is the whole story.
Here’s why that matters in real life. If you understand the flow of food through the base, you’ll know why some blenders are smooth and creamy while others turn soup gritty. You’ll also know why you have to keep the blade submerged, why you tilt the wand, and why a shallow pan makes everything splatter.
Once you see it in your head, you’ll never use a stick blender wrong again.
You might find this helpful: Best Immersion Blenders for Beginners
The Anatomy: What You’re Actually Looking At
Take an immersion blender apart and you’ll get three or four basic pieces. The motor housing sits on top. The stainless steel shaft connects to that housing.
At the bottom, you have the blade assembly, which includes the open bell guard.
Most models let you detach the shaft with a quick twist. That’s how you clean the business end without near the motor. Some cheaper wands have a one-piece shaft that still detaches, just less gracefully.
Here’s a breakdown of the main components.
| Component | What It Does |
|---|---|
| Motor housing | Holds the motor, trigger, and speed control |
| Drive shaft | Transfers power from the motor to the blade |
| Blade assembly | Sits inside the bell, does the actual cutting |
| Bell guard | The open base that surrounds the blade, guides liquid flow |
| Clutch | Lets the shaft attach and release from the motor |
The bell guard is the part everyone underestimates. It isn’t just a safety cover. It’s shaped to move food.
Some bells are open all the way around the rim. Others have slots cut into the sides. Both designs create a flow pattern that pulls food upward from the bottom and throws it outward at the top.
That circulation is what purees your soup without a pitcher.
Notice the blade doesn’t sit flush with the bottom. It floats slightly inside the bell. That gap is important.
It leaves room for liquid to enter from below while the blade chops and flings it sideways.
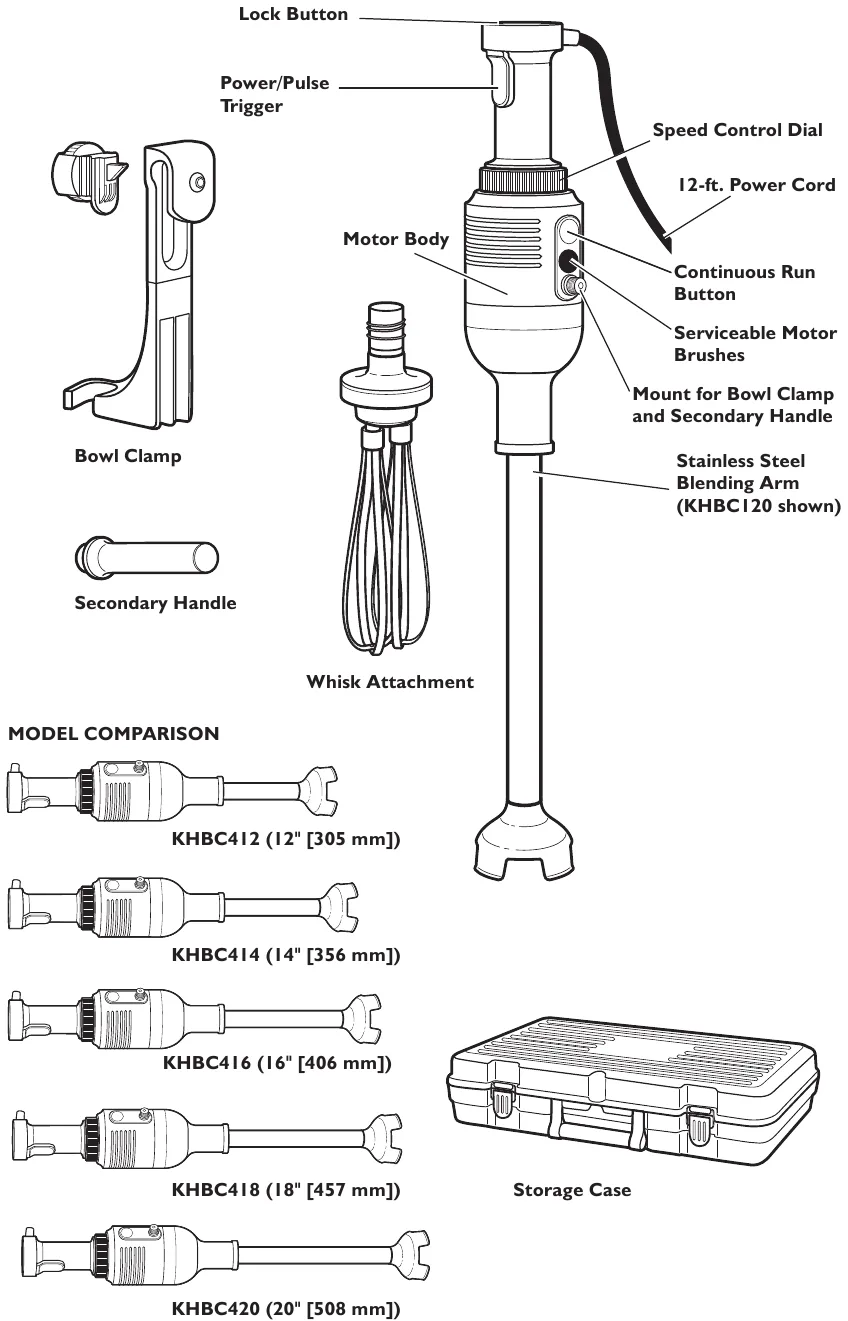
Image source: Web (Bing) / storage.googleapis.com (Web image (fair-use with source credit))
The Core Mechanics: How the Blade Creates a Vortex
The blade is angled, not flat. That angle is why an immersion blender works at all. When the blade spins, it creates lift, kind of like a tiny boat propeller.
Here’s the sequence in plain language.
The spinning blade pushes liquid away from itself. That action creates a low-pressure zone right under the bell. Soup rushes in to fill that empty space.
The blade catches that incoming soup, chops it, and throws it outward again. Repeat this several hundred times per second and you get a vortex.
That vortex is literally the mechanism. It’s a whirlpool in your pot. It pulls chunks down from above, pushes them through the blade, and cycles them back out.
That’s what makes an immersion blender faster than a spoon and closer to a countertop blender.
You don’t want a violent vortex, though. A gentle, steady swirl is the goal. If you see a deep tornado reaching toward the blade, you may be running the motor too fast, especially with a thick soup.
You’ll also get more air mixed in, and that can change the texture of sauces.
The bell guard’s openings control that flow. An open-ring style pulls more from the bottom. A slotted bell pulls a wider, softer stream.
Neither is objectively better. It depends on what you’re blending.
As of 2026, most household models sold in North America carry UL 563 certification, the standard that covers handheld blenders and electric motors. Under that standard, motors are tested for overheating, electrical safety, and normal wear. It’s one more reason to buy from a recognizable brand rather than an unbranded import.
You can check the official listing from UL Solutions if you want to dig into the details.
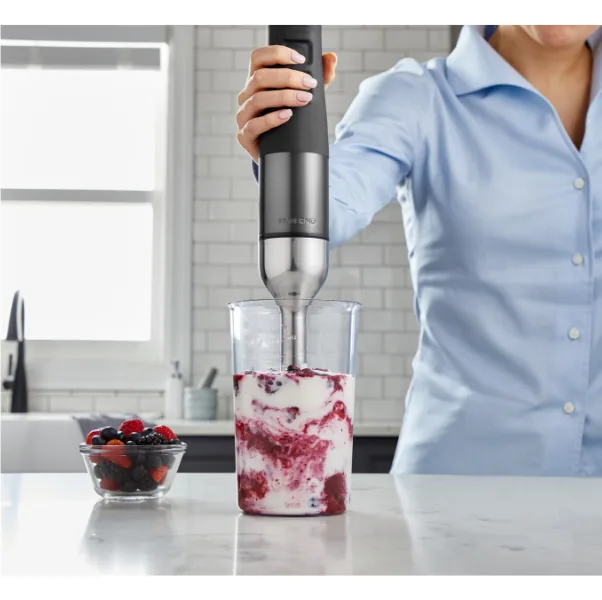
Image source: Web (Bing) / paderno.com (Web image (fair-use with source credit))
Step-by-Step: How to Use One Correctly (With Visual Cues)
The technique matters more than the wattage. A 300-watt blender used correctly beats a 700-watt blender used poorly. Here’s the method that works across models.
Step 1: Lock the shaft into the motor housing
Line up the notches on the shaft with the slots in the motor. Push until you feel a click. If the shaft twists freely, it isn’t locked.
A loose shaft can wobble at speed and scatter soup.
Step 2: Set the speed low
Start with the lowest speed setting. High speed on startup creates a splash the moment the blade grabs liquid. Low speed also pulls food in more gently, so you won’t shoot hot broth across the kitchen.
Step 3: Fully submerge the bell guard
The blade must be under the surface before you pull the trigger. If any part of the bell is exposed, you’ll splatter. In a deep pot, that’s easy.
In a shallow skillet, that’s why you either transfer to another container or add more liquid.
Step 4: Tilt the wand slightly and start
Hold the wand at a small angle, about 15 degrees. That tilt keeps the bottom of the bell open, so liquid can keep feeding in. Push the trigger, let the vortex form, and don’t move the wand for a second.
Step 5: Sweep, don’t stir
Move the wand in slow, gentle circles. Let the vortex do the work. If you’re blending a chunky soup, move the wand up and down through the pot.
If you’re making a smooth sauce, keep the bell submerged and make slow figure-eights.
Step 6: Pulse for texture
For a chunky salsa or a rough pesto, use short pulses instead of continuous running. Press the trigger for one second, release, then press again. Keep the blade moving between pulses so you don’t over-process one spot.
Image source: Web (Bing) / onecreativecook.com (Web image (fair-use with source credit))
What the Speed Settings Actually Do
| Goal | Technique | What to Watch For |
|---|---|---|
| Chunky | Short pulses on low speed | Keep the blade sweeping |
| Silky | Continuous low speed | Tilt and move in circles |
| Frothy | Whisk attachment | Angle the whisk near the surface |
| Frozen | High speed, short bursts | Don’t overfill the cup |
One more tip: don’t lean the wand against the bottom of the pot or force it down. The blade should float just above the bottom.
Pulling the wand down hard can stall the motor or scuff the pan. Let the vortex guide the food in. If you need to scrape the sides, use a heat-safe spatula instead of the blender wand.
Common Visual Mistakes: What You’re Probably Doing Wrong
Most immersion blender mistakes happen because the blade is hidden. You can’t see what it’s doing, so you improvise. Here are the patterns that show up over and over.
Starting the motor above the liquid
This is the classic move. The wand is in the air, you pull the trigger, and soup explodes across the stovetop. The blade spins at thousands of RPM.
It doesn’t slow down because there’s no liquid to resist it. The instant it touches the surface, it flings everything outward. Always start with the bell under the liquid.
Working in a pan that’s too wide or too shallow
A wide skillet gives the vortex nowhere to go. The liquid just sprays over the sides. For an immersion blender to work well, you need a container that’s taller than it is wide.
That’s why soup pots work perfectly and cookie sheets don’t. If your pan is too shallow, transfer the food to a mixing bowl or a stockpot.
Forgetting to tilt the wand
Holding the wand perfectly upright blocks the flow. The open bottom of the bell presses flat against the bottom of the pan, and nothing feeds in. Instead, you chew on the same few chunks.
Tilt the wand just enough to break that seal, and the vortex comes back.
Blending in a nonstick pan at full speed
A pointed blade can chip or scratch nonstick coatings if you press down hard. Keep the blade suspended and move slowly. It’s not a paint scraper.
Overfilling the pot
An immersion blender creates a whirlpool that rises. Fill the pot too high, and hot liquid climbs up the sides and spills over. Leave at least an inch of headroom, ideally two.
Using it as a substitute for a food processor
An immersion blender is great for pureeing and mixing, but it isn’t designed for slicing, shredding, or making dough. Avoid using it to chop hard ingredients like nuts or crackers, as the results can be uneven and may strain the motor.
For the best results, keep the bell guard submerged and move the blender slowly through the mixture. A smooth, steady vortex means the ingredients are circulating properly.
The Attachments: Whisk, Chopper, and Frother Explained Visually
Most immersion blenders ship with more than one head. The blade wand is the star. But the included attachments can replace a few single-purpose gadgets in your drawer.
The whisk attachment snaps onto the motor housing. It looks like a wire balloon whisk with a longer stem. That head is for eggs, cream, and sauces that need air pushed in, not food chopped up.
Use it to make hollandaise or whipped cream. It won’t puree soup.
The chopper attachment is a small plastic bowl with its own lid and blade. You fit the motor onto the lid, and the blade spins inside the bowl. It works like a mini food processor for onions, herbs, or nuts.
It’s handy, but it can’t handle large batches.
The frother is the newest addition in many sets. It’s a small metal disc that spins very fast. It whips air into milk or cream in seconds.
Some models use it for foaming cream, while others rely on the whisk for that job.
If you want to know how to tell which attachment you have, look at the base. A wide wire cage means whisk. A small enclosed bowl means chopper.
A flat spinning disc means frother. Each one locks onto the motor the same way.
What to Look For When Buying (Visual-Spec Guide)
If you’re shopping now, the product photos tell you more than you’d think. Start with the blade assembly. It should be stainless steel, not plastic.
Plastic gets scratched and stained, and it can warp in hot liquid.
Check the bell guard shape. An open ring design works well in deep pots. A slotted design handles shallow pans better.
Neither is the all-around best, so match it to how you cook.
Look at the motor housing size. A thicker housing on a corded model usually means a stronger motor. That said, heavier also means more wrist fatigue.
You’ll want to hold it for a full soup batch, so balance matters.
The speed controls matter more than wattage. Look for a variable-speed dial or trigger. A two-speed model is fine, but a variable-speed dial gives you more control over texture.
Check the photos for buttons or dials on the top face.
Also confirm the power cord placement. A cord sticking straight up can lean into your hand while blending. A cord exiting from the back or side is easier to manage.
As of 2026, several budget brands changed their cord routing because of user complaints.
Pros and Cons at a Glance
| Strength | Weakness |
|---|---|
| Blends in the pot, no transfer | Can’t handle large batches well |
| Easy cleanup in seconds | Needs liquid to work effectively |
| Compact, stores in a drawer | Can splatter if used too aggressively |
| Great for hot soups | Wrist fatigue with heavy heads |
| Multi-function with attachments | Not a replacement for a food processor |
The big win is convenience. You puree, serve, and rinse one wand. There’s no heavy glass pitcher to lift, and no extra container to wash.
The trade-off is volume. For a big pot of chili, an immersion blender handles it fine. For a large batch of smoothies for a family, a countertop blender is faster and more consistent.
Know when to reach for which tool.
Immersion Blender vs. Countertop Blender: A Quick Visual Comparison
A countertop blender has a sealed pitcher. The blades sit at the bottom, and liquid stays inside a container. An immersion blender has an open blade housing.
The blending happens directly in your pot, cup, or bowl.
That difference changes everything about how they behave.
| Factor | Immersion Blender | Countertop Blender |
|---|---|---|
| Hot soup | Blends right in the pot | Needs cooling before blending |
| Cleanup | Rinse one wand | Wash the pitcher, lid, and gasket |
| Batch size | Small to medium | Large |
| Texture control | Manual, variable | Program settings |
| Counter space | None needed | Takes up a corner |
The countertop blender wins for smoothies, frozen drinks, and big batches. It’s also better at creating a completely smooth texture because the blade spins faster and the container keeps everything contained.
The immersion blender wins for soup. You don’t wait for hot liquid to cool. You don’t risk a glass pitcher cracking.
You just lower the wand into the pot and go.
If you already have a decent countertop blender, an immersion blender is a great second tool. If you’re choosing your first blending device, think about what you cook most. Soup lovers should get the wand first.
Smoothie fans should get the countertop first.
Safety Rules That Save Your Countertop (and Your Skin)
The most common immersion blender injury is a hot liquid burn. You blend tomato soup, the vortex builds, and hot soup sprays out. That’s why the submerge rule matters so much.
Keep the bell fully covered and tilt gently.
Never run the blender dry. Without liquid, the blade spins freely and the motor can overheat. Most consumer models don’t have automatic shutoff, so you can burn out the motor in under a minute.
If you hear a high whine, there’s not enough liquid.
Unplug the motor housing before you change attachments or wash the shaft. The switch can stay in the on position if you flick it off by accident. Unplugging removes that risk entirely.
Keep your other hand clear of the pot. Your free hand might rest on the edge while you blend, which is fine. Just don’t let it drift under the blade.
The bell guard is open, so the blade isn’t fully protected.
Finally, never use an immersion blender directly in a nonstick pan at high speed while pressing down. The blade tip can scratch the coating. Keep the wand suspended and move gently.
A little patience protects both your food and your cookware.
Cleaning and Maintenance: Visual Do’s and Don’ts
Detach the shaft and rinse it under warm water with mild soap. Never submerge the motor housing. Wipe it with a damp cloth instead.
Dry everything immediately to prevent water spots.
Check the blade and bell for wear before each use. A dull blade strains the motor. A cracked bell can leak food upward.
Replace parts as soon as you notice damage.
Grease splatter can also coat your hood. Build-up hurts performance, so keep the vent clean.
One-Batch Test: A Real Scenario, Step by Step
Blend tomato soup in a 4-quart pot with 4 cups of liquid. Submerge the bell fully, set the speed to low, and pulse for two seconds. Then tilt the wand and sweep in slow circles.
After 30 seconds, stop and check the texture. Pulse in five-second bursts if chunks remain. The whole process takes under a minute.
Use a heat-safe spatula to scrape the sides if needed.
Quick FAQ: Visual Answers to Common Questions
Can I blend in a glass measuring cup?
Yes, if it’s heat-safe and wide enough. The bell guard needs at least an inch of clearance on all sides. Narrow cups can stall the vortex.
How long can I run it without overheating?
About 60 seconds for most consumer models. Check your manual. If the motor feels hot, stop and let it cool for a few minutes.
Why does my blender splatter?
The blade is too close to the surface. Keep the bell guard fully submerged while blending, and start at a low speed to prevent splashing.
If splattering continues, tilt the wand slightly and move it slowly through the mixture. Avoid lifting the blade above the liquid while it is running.
Can I crush ice with it?
Only if the manual says so. Many brands now offer ice-crushing blades. Standard blade assemblies can dull or crack on ice.
Final Visual Checklist: Before You Press the Trigger
- Bell guard fully submerged.
- Speed set to low.
- Wand tilted about 15 degrees.
- Free hand clear of the pot.
- Pot no more than two-thirds full.
- Vent hood running for hot soups.
That’s it. Now you know exactly what’s happening under the surface. Next time you blend, you’ll see the vortex, understand the flow, and get the texture you want.