Cooking beans in a pressure cooker is a smart way to save time, energy, and effort. If you’ve ever waited hours for beans to soften on the stove, you’ll appreciate how a pressure cooker turns tough beans into creamy, flavorful meals in under an hour.
But many people worry about safety or aren’t sure how to get perfect results. This guide will walk you through everything—from choosing beans to mastering cooking times and avoiding common mistakes. You’ll learn not just the basics, but some lesser-known tips that make your beans taste even better.
Why Use A Pressure Cooker For Beans?
Beans are a staple food in many cultures. They are rich in protein, fiber, and vitamins. Cooking them can be slow—sometimes three hours or more—if you use a regular pot. But a pressure cooker changes this:
- Cuts cooking time by up to 70%
- Saves energy and keeps your kitchen cooler
- Makes beans soft and creamy, even with tough varieties
Some beans, like black beans or kidney beans, are hard to cook evenly with traditional methods. A pressure cooker gives you consistent results, even if you’re a beginner.
Choosing The Right Beans
There are many types of beans you can cook in a pressure cooker. Each one has its own flavor, texture, and cooking needs.
| Bean Type | Soaking Needed? | Pressure Cooking Time | Common Uses |
|---|---|---|---|
| Black Beans | Optional | 20-25 min | Soups, Mexican dishes |
| Kidney Beans | Yes | 25-30 min | Chili, salads |
| Pinto Beans | Optional | 22-28 min | Refried beans, stews |
| Chickpeas | Yes | 35-40 min | Hummus, curries |
| Lentils | No | 8-12 min | Soups, salads |
Dry beans are best. Avoid canned beans, as they are already cooked. For the freshest taste, buy beans from stores with high turnover. Old beans can stay hard even after cooking.
Preparing Beans Before Cooking
Soaking Beans: Is It Necessary?
Soaking beans is a traditional step. It helps beans cook faster and reduces gas-causing compounds. But with a pressure cooker, soaking is optional for most beans except kidney beans and chickpeas. These two cook better and safer if soaked.
Soak beans overnight in plenty of water. If you forget, a quick soak works: cover beans with boiling water, let sit for one hour, then drain.
Rinsing And Sorting
Always rinse beans well before cooking. Remove stones, debris, or damaged beans. This step ensures you get clean, safe beans.
How Much Beans And Water?
Getting the right bean-to-water ratio is key. Too little water leads to burning; too much makes them mushy.
| Bean Type | Dry Beans (cups) | Water (cups) | Yield (cooked cups) |
|---|---|---|---|
| Black Beans | 1 | 3 | 2.5–3 |
| Kidney Beans | 1 | 3 | 2.5–3 |
| Pinto Beans | 1 | 3 | 2.5–3 |
| Chickpeas | 1 | 4 | 2.5–3 |
| Lentils | 1 | 2 | 2–2.5 |
Beans expand a lot. Never fill your pressure cooker more than halfway with beans and water. This prevents clogging and keeps your cooker safe.
Credit: www.camelliabrand.com
Step-by-step: Cooking Beans In A Pressure Cooker
Ingredients
- 1 cup dried beans (choose your type)
- Water (see table above)
- 1–2 teaspoons salt (optional)
- 1–2 tablespoons oil (optional, prevents foaming)
- Spices or aromatics (optional: Garlic, onion, bay leaf)
Instructions
- Sort and rinse beans. Remove any debris.
- Soak beans overnight if needed. Drain and rinse again.
- Add beans to pressure cooker. Pour in fresh water (see ratios above).
- Add salt and oil. Oil helps prevent foam, which can block the cooker’s valve.
- Add spices for flavor. Garlic, onion, or a bay leaf can make beans taste better.
- Close the lid. Make sure the valve is set to “Sealing.”
- Set the cooker. Use manual or bean setting. Choose the cooking time for your bean type.
- Start cooking. The cooker will build pressure, then start the timer.
- When finished, let pressure release naturally. This takes 10–20 minutes. It keeps beans soft and prevents splitting.
- Open the lid carefully. Stir beans and taste. If beans are not soft enough, cook for 5 more minutes.
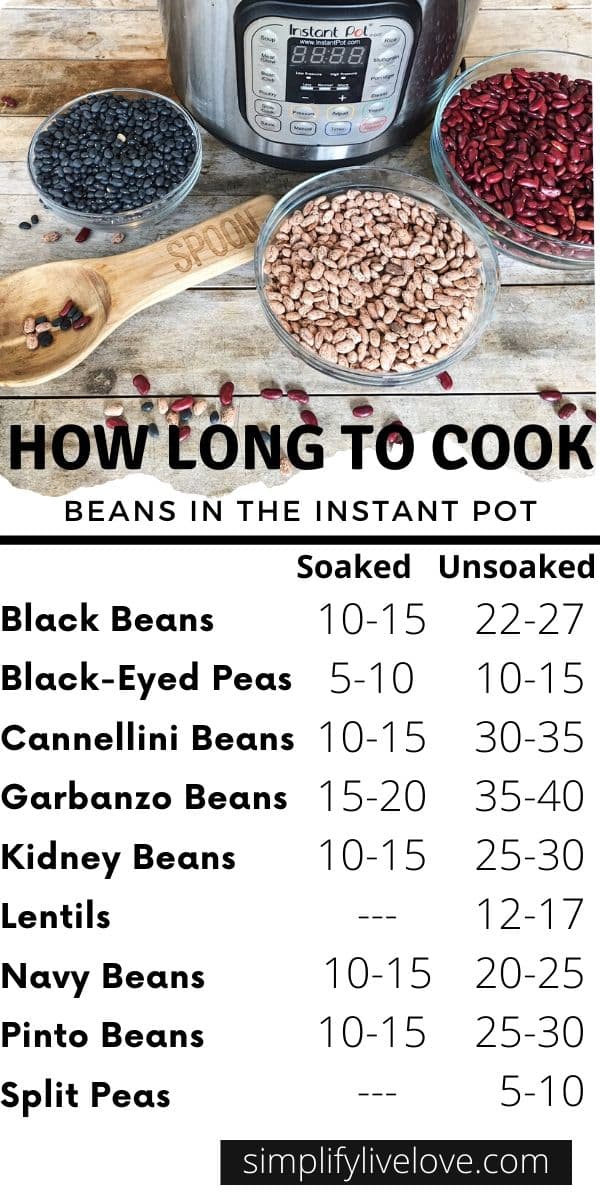
Cooking Times For Common Beans
- Black beans: 20–25 minutes
- Kidney beans: 25–30 minutes (soaked)
- Pinto beans: 22–28 minutes
- Chickpeas: 35–40 minutes (soaked)
- Lentils: 8–12 minutes
These times are for electric pressure cookers like Instant Pot. Stovetop cookers may cook faster—reduce time by 5 minutes.
Key Tips For Perfect Beans
- Natural pressure release is best. Quick release can make beans split and spray liquid.
- Always use enough water. Beans absorb a lot.
- Add acidic ingredients (tomatoes, vinegar) after cooking. Acid slows bean softening.
- If beans are too firm, cook for 5 more minutes under pressure.
- For creamy beans, mash a few against the side of the cooker and stir.
Many beginners don’t know that adding a bit of oil prevents foaming—a common cause of blocked valves. Also, letting beans cool in their cooking liquid helps them stay moist and flavorful.
You may also like: How to Cook Rice in Pressure Cooker
Common Mistakes And How To Avoid Them
Overfilling The Cooker
Never fill more than halfway. Beans expand and can block the vent.
Not Enough Water
If you add too little water, beans burn and stick. Always check water levels.
Cooking Old Beans
Beans stored for years may never soften. Buy fresh beans from stores with fast turnover.
Adding Salt Too Early
Some believe salt toughens beans. In a pressure cooker, salt is safe to add before cooking.
Quick Pressure Release
Don’t rush. Natural release keeps beans whole and creamy.
How To Use Cooked Beans
Cooked beans are versatile. Here are some practical ways to use them:
- Add to soups or stews
- Make bean salads
- Prepare refried beans for tacos
- Blend for hummus or bean dips
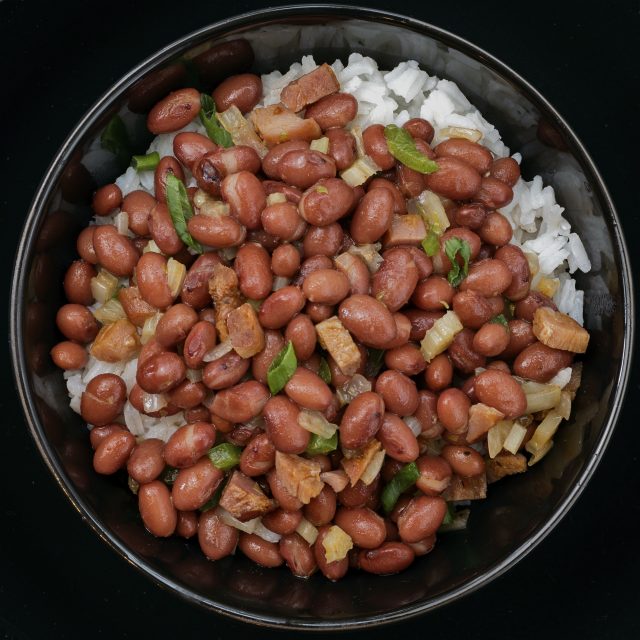
- Serve over rice or grain bowls
Cooked beans last up to 5 days in the fridge. Freeze for longer storage—up to 6 months.
Credit: termovibra.com.br
Comparing Pressure Cooker Vs. Regular Pot
Many people wonder if a pressure cooker is worth it. Here’s a clear comparison:
| Method | Cooking Time | Energy Use | Texture | Effort |
|---|---|---|---|---|
| Pressure Cooker | 20–40 min | Low | Even, creamy | Easy |
| Regular Pot | 1–3 hours | High | Sometimes uneven | Needs monitoring |
The pressure cooker wins for speed, consistency, and less energy.
Safety Tips For Pressure Cooking Beans
Pressure cookers are safe if you follow simple rules:
- Don’t overfill.
- Always check the valve and seals before cooking.
- Use oil to prevent foaming.
- Let pressure release naturally.
- If you see foam or liquid coming from the valve, stop and check for blockages.
Modern electric cookers have built-in safety features. Stovetop models need a little more care.
Non-obvious Insights For Better Beans
- Flavor develops more if you let beans cool in their cooking liquid. Don’t drain right away.
- Add a piece of kombu (seaweed) for extra minerals and easier digestion. Kombu is used in Japanese cooking and helps soften beans.
- For very creamy beans, use unsalted broth instead of water. It adds flavor without toughening beans.
Most people miss these steps, but they make a big difference.
Frequently Asked Questions
Can I Cook Beans Without Soaking In A Pressure Cooker?
Yes, for most beans. Soaking is only needed for kidney beans and chickpeas for safety and better texture. Unsoaked beans may need extra cooking time.
How Do I Prevent Foaming And Clogging?
Add 1–2 tablespoons of oil to the cooking water. Don’t overfill the cooker. Always rinse beans well before cooking.
Can I Use A Pressure Cooker For Canned Beans?
No. Canned beans are already cooked. Just heat them in a regular pot.
How Do I Store Cooked Beans?
Cool beans completely. Place in airtight containers. Refrigerate for up to 5 days. Freeze for up to 6 months.
Are Pressure Cookers Safe For Cooking Beans?
Yes, if you follow safety rules. Don’t overfill, check seals, and use natural release. Modern cookers have safety locks and sensors.
Cooking beans in a pressure cooker is fast, easy, and gives you delicious results. With the right steps, you’ll enjoy soft, flavorful beans every time. Try different varieties, mix in spices, and experiment with recipes. If you want more details about bean nutrition or cooking science, check out Wikipedia’s bean page. Start pressure cooking today and enjoy a healthier, tastier kitchen.
Credit: greenhealthycooking.com