You’ve been there. You drop a raw chicken breast into a saucepan, crank the heat, and hope for the best. Learning how to cook chicken in a saucepan properly comes down to controlling temperature and nailing a few simple steps.
Per USDA food safety guidelines, chicken needs to hit 165°F inside to be safe to eat. That number matters, but so does how you get there. Let’s walk through the method that keeps chicken juicy instead of rubbery.
How to cook chicken in a saucepan
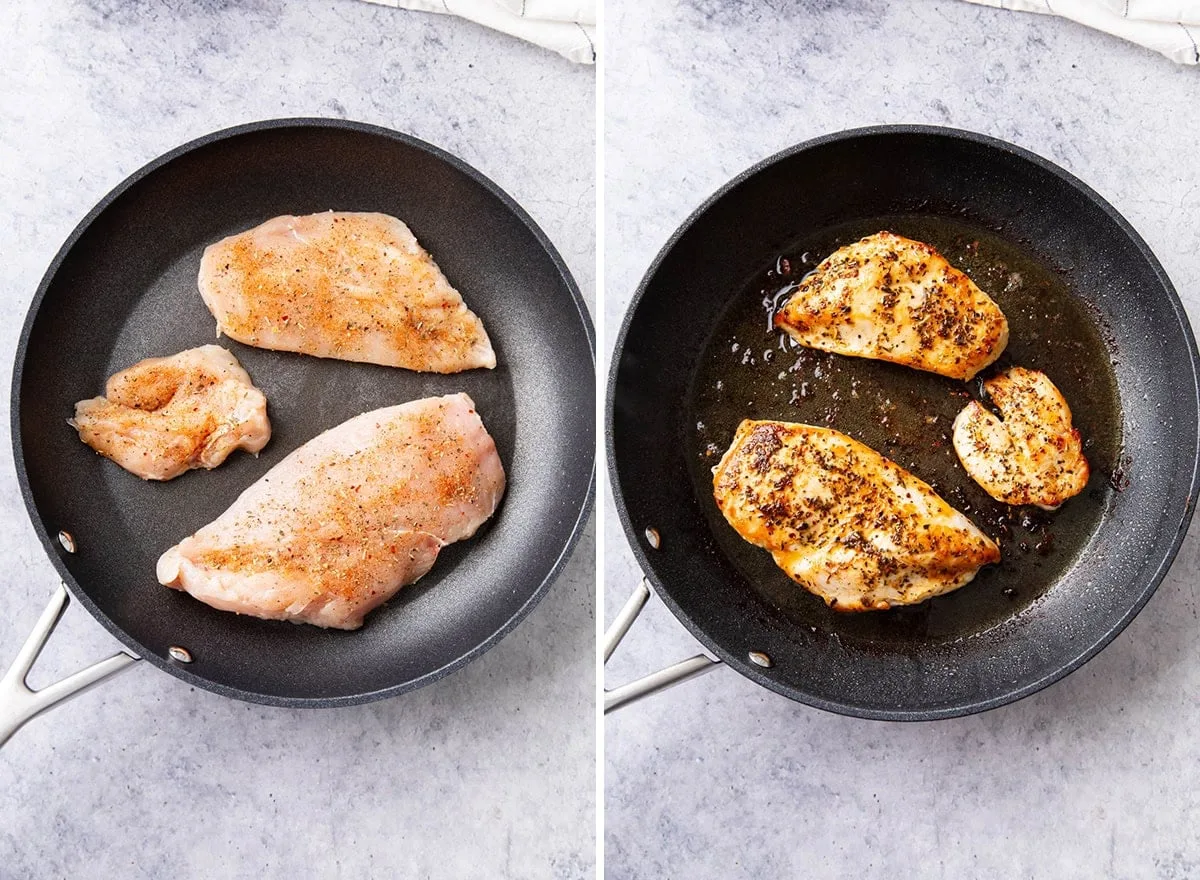
Image source: Bing (Web (fair-use with source credit))
The Short Version: How to Cook Chicken in a Saucepan Without Drying It Out
Sear the chicken in a hot oiled saucepan. Then cover and lower the heat. Cook until the internal temperature hits 160°F.
Rest for five minutes before slicing. Carryover cooking brings it to 165°F.
Why Cooking Chicken in a Saucepan Is Different (and Why Temperature Accuracy Matters)
A saucepan isn’t a skillet. It’s deeper, with taller sides and less flat cooking surface. That changes how heat reaches the chicken.
You can’t rely on a wide, even sear the way you would in a frying pan. Instead, you work with a smaller contact zone, which means the pan can crowd quickly and the temperature can drop fast if you’re not careful.
The taller walls also trap steam. That’s a hidden advantage. You can sear the chicken, add a splash of broth, then cover the pan and let the steam finish the cooking gently.
This is why the saucepan method works so well for beginners. It’s forgiving. The same steam that can ruin a crispy crust in a skillet becomes your tool for even doneness here.
Temperature accuracy matters because chicken doesn’t give you visual clues. The outside can look golden while the center stays raw. Cutting into the meat to check ruins the juices and still doesn’t give you a reliable answer.
A good thermometer solves that problem instantly.
What You Need: The Right Pan, Tools, and Ingredients
You don’t need a drawer full of gadgets. The right pan and a few basics make the whole process click.
| Tool or Ingredient | What to Look For | Why It Matters |
|---|---|---|
| Saucepan | 2 to 3 quarts, heavy-gauge base | Even heat distribution, no hot spots |
| Instant-read thermometer | Digital, reads in 3 to 5 seconds | Takes the guesswork out of doneness |
| Cooking oil | Avocado, canola, or light olive oil | High smoke point prevents burning |
| Chicken | Boneless breasts, thighs, or bone-in pieces | Each cut needs a slightly different time |
| Covering liquid | Chicken broth, stock, or water | Creates steam and builds a pan sauce |
| Lid | Must fit the pan snugly | Traps heat for even cooking |
Choosing the Best Saucepan for Chicken
Go for a heavy-bottomed saucepan. Stainless steel with an aluminum core is ideal. It heats evenly and responds quickly when you adjust the burner.
Non-stick pans work too, but they won’t create browned bits for a pan sauce. If you want that golden crust and flavorful fond, stainless steel is your friend.
Avoid thin, lightweight pans. They create hot spots that scorch the outside before the inside cooks. A warped base is even worse.
It wobbles on the burner and heats unevenly. Test yours by placing it on the stovetop and pressing gently on the handle. Rocking means trouble.
The One Tool You Shouldn’t Skip: An Instant-Read Thermometer
You can estimate doneness by feel, but you’ll never match the precision of a thermometer. As of 2026, the USDA still sets the safe minimum for chicken at 165°F. An instant-read thermometer tells you exactly where you stand in seconds.
Insert the probe into the thickest part of the chicken, avoiding bone. If the temperature reads 160°F, pull it from the heat immediately. The carryover will finish the job.
No thermometer means guessing. Guessing leads to overcooked, dry chicken or worse, undercooked meat. This is one tool you genuinely shouldn’t skip.
The Core Facts: Safe Internal Temperatures and Carryover Cooking
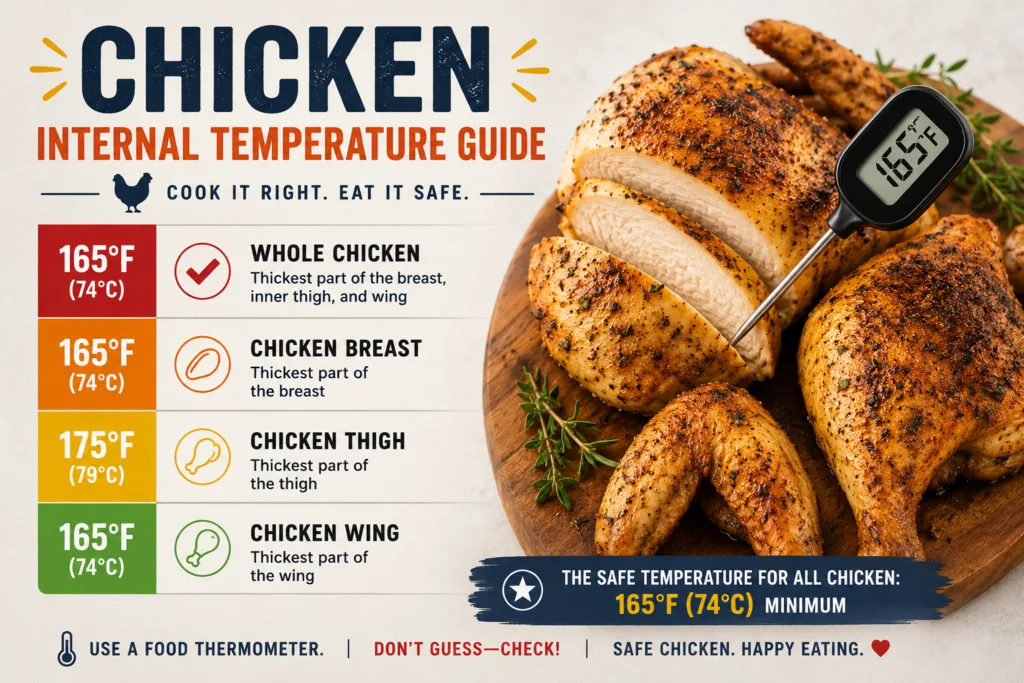
Image source: Bing (Web (fair-use with source credit))
Two numbers control the entire process. The first is 165°F, the safe internal temperature for chicken. The second is 160°F, your target pull temperature on the stovetop.
Carryover cooking is the reason you pull early. When you remove chicken from heat, the internal temperature keeps rising for several minutes. A breast pulled at 160°F can reach 165°F while it rests.
If you wait until the thermometer reads 165°F on the stove, you’ll actually overshoot to 170°F or higher. That’s what produces dry, chalky meat.
| Cut | Pull Temperature | Final Temperature After Rest |
|---|---|---|
| Boneless chicken breast | 160°F | 165°F |
| Boneless chicken thigh | 170°F | 175°F |
| Bone-in thigh or leg | 170°F | 175°F |
Dark meat needs the higher range. Thighs and legs contain more connective tissue, which only breaks down at 170°F and above. Cooking them to 165°F leaves them chewy and unpleasant.
White meat is different. It turns dry at those temperatures, so pulling it early is the trick.
The same science applies across methods. Whether you’re searing, poaching, or braising, the target numbers don’t change. The method only changes how quickly you reach them and how much moisture you keep inside.
Choose Your Cut: Breasts vs. Thighs vs. Bone-In
Your choice of chicken cut changes your cooking time, your technique, and your final result. There’s no one “best” cut for a saucepan. There’s only the best cut for what you’re making.
How the Cut Changes Your Method
Boneless, skinless chicken breasts cook fast. They’re thick in the middle and thin at the edges, which makes even cooking a challenge. You’ll want to pound them to an even thickness first.
Then sear quickly and finish covered over low heat.
Boneless thighs are more forgiving. Their higher fat content means they stay moist even if you run a few degrees over. You can sear them hard and simmer them in a sauce without stress.
They take a few minutes longer than breasts but reward you with deep flavor.
Bone-in pieces need the longest time. The bone slows heat transfer, and the meat closest to it cooks last. You’ll often start with a sear, add liquid, cover, and simmer for 15 to 20 minutes.
Braising works beautifully because the gentle heat breaks down connective tissue and keeps everything tender.
| Cut | Cook Time (Approx.) | Best Method | Key Advantage |
|---|---|---|---|
| Boneless breast | 8 to 12 minutes total | Sear, then cover | Lean, mild, cooks fast |
| Boneless thigh | 12 to 16 minutes total | Sear, then simmer | Juicy, forgiving, flavorful |
| Bone-in thigh or leg | 18 to 25 minutes total | Sear, then braise | Rich taste, shreds easily |
Best Cuts for Weeknights vs. Slow Simmers
For busy weeknights, boneless thighs are the sweet spot. They don’t dry out when you look away for a minute. They also pair well with almost any sauce, from a quick lemon-butter pan sauce to a spicy tomato base.
Boneless breasts work best when you’re watching the clock. They cook in under 15 minutes, making them ideal for quick dinners and meal prep. Just remember to pound them thin and pull them at 160°F.
For slow simmers and Sunday-style meals, go bone-in. The longer cooking time builds a richer flavor, and the bones add body to any broth or sauce. Once the meat hits 170°F to 175°F, it easily pulls away from the bone.
Shred it for tacos, soups, or saucy rice bowls.
Step-by-Step Guide: How to Sear Chicken Breasts in a Saucepan
Searing locks in flavor and creates that golden crust you want. The saucepan’s depth helps trap moisture, so you get a tender interior without needing a skillet.
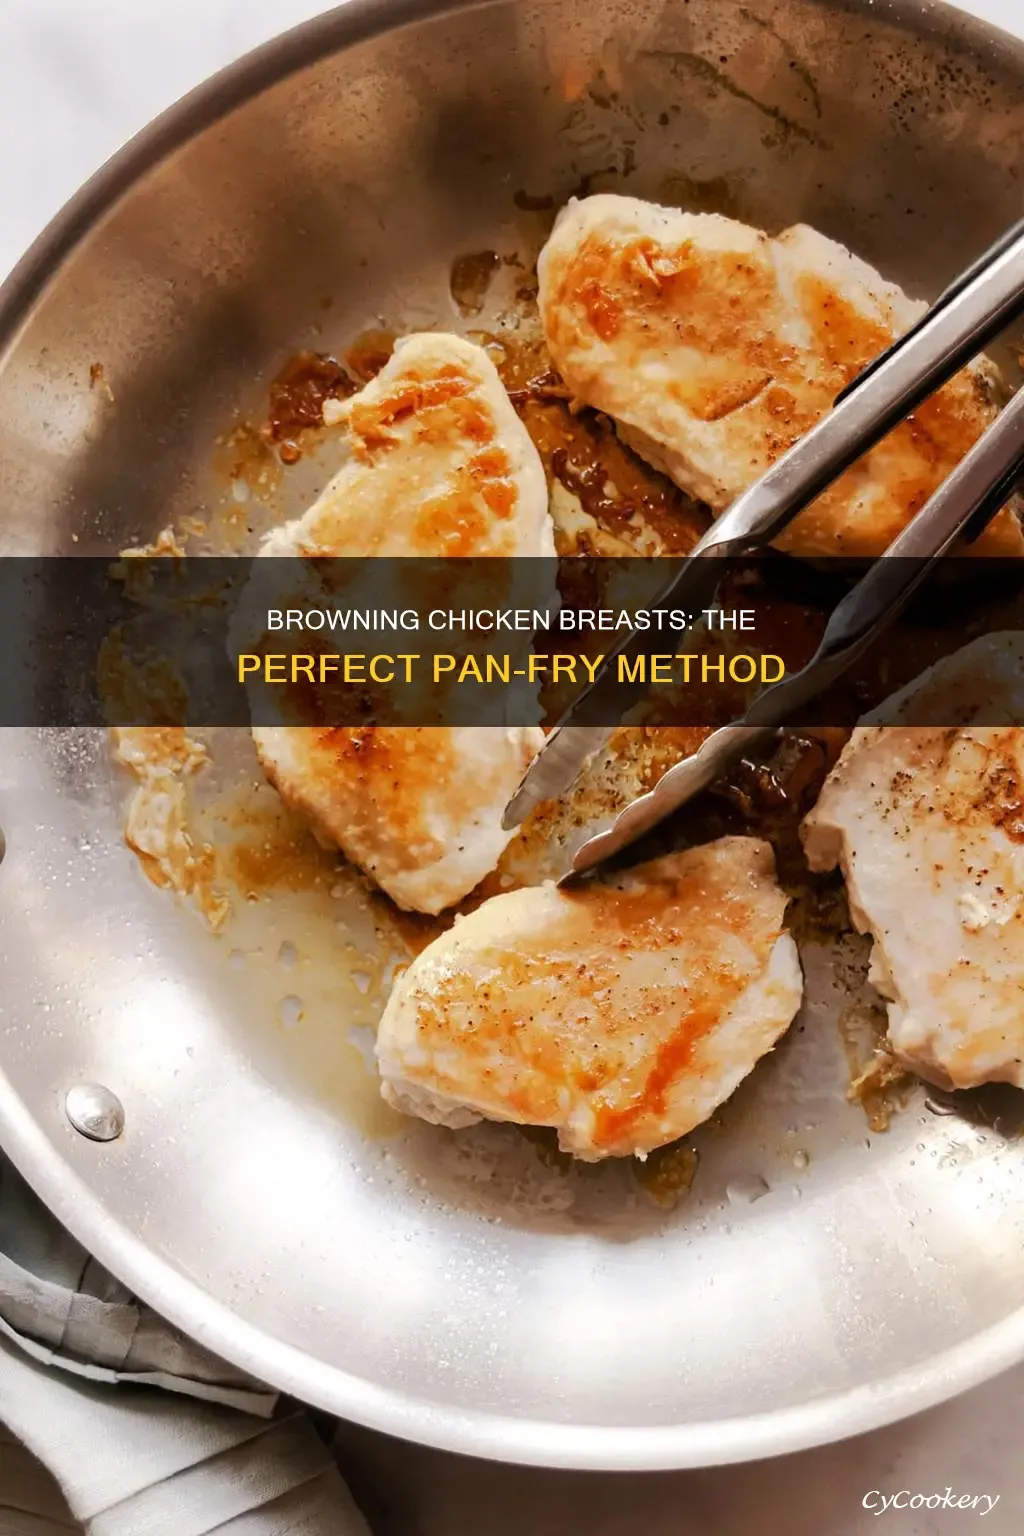
Image source: Web (Bing) / cycookery.com (Web image (fair-use with source credit))
Prepping the Chicken for a Golden Crust
Start with even thickness. Place each breast between two sheets of plastic wrap and pound to about 1/2 inch. This helps the meat cook evenly from edge to center.
Pat the chicken completely dry with paper towels. Moisture on the surface steams instead of browning. Season generously with salt and pepper.
If you want extra flavor, add garlic powder or paprika at this stage.
Let the chicken sit at room temperature for 15 minutes before cooking. Cold meat lowers the pan temperature too fast. This small step makes a noticeable difference in crust development.
Pan-Sealing and Resting Sequence
Heat your saucepan over medium-high for two minutes. Add one to two tablespoons of high-smoke-point oil. You’ll know it’s ready when the oil shimmers and a tiny breadcrumb sizzles on contact.
Place the chicken in the pan, leaving space between pieces. If the pan is crowded, cook in batches. Sear for four to five minutes without moving the meat.
The crust forms naturally when it’s ready to release.
Flip and cook for another three to four minutes. Then cover the pan and reduce heat to low. Cook until the internal temperature reads 160°F.
This takes about two to four more minutes depending on thickness.
Transfer the chicken to a cutting board and rest it uncovered for five minutes. The carryover heat finishes the cook to 165°F. Resting also lets the juices redistribute so slices stay moist.
Step-by-Step Guide: How to Poach Chicken in a Saucepan for Shredding
Poaching is the gentlest way to cook chicken in a saucepan. The meat simmers in liquid, so it stays soft and easily shreds for tacos, salads, and soups.
Add three cups of chicken broth to your saucepan. Bring it to a gentle simmer over medium heat. You want small bubbles, not a rolling boil.
A hard boil makes the meat tough.
Season the liquid with aromatics like garlic, onion, bay leaf, or peppercorns. Add the chicken breasts or thighs in a single layer. The liquid should mostly cover the meat.
Add a little water if needed.
Cover the pan and reduce heat to low. Poach boneless breasts for 12 to 15 minutes. Cook boneless thighs for 18 to 20 minutes.
Check the temperature after the minimum time.
Remove the chicken when it hits 160°F for breasts or 170°F for thighs. Let it rest on a cutting board for five minutes. Then shred with two forks or your hands.
The poaching liquid doubles as a flavorful stock. Strain it and save it for rice, soups, or pan sauces. It freezes well in an ice cube tray for quick flavor boosts later.
Step-by-Step Guide: How to Braise Bone-In Chicken for Fall-Off-the-Bone Results
Braising combines a hard sear with a long, gentle simmer. This method works best for bone-in thighs and legs. The slow cooking breaks down connective tissue and renders the fat.
Season the chicken pieces and pat them dry. Heat two tablespoons of oil in your saucepan over medium-high. Sear the chicken in batches, skin side down first, for four to five minutes per batch.
You want deep golden brown on both sides.
Remove the chicken and lower the heat to medium. Add diced onion, carrot, and celery if you like. Cook for three minutes until softened.
Add a splash of broth or wine to scrape up the browned bits on the pan’s bottom.
Return the chicken to the saucepan and add enough broth to come halfway up the pieces. Add herbs like thyme, rosemary, or bay leaf. Bring the liquid to a gentle simmer.
Cover the pan and reduce heat to low. Braise for 20 to 25 minutes for bone-in thighs. Check the thickest piece with a thermometer.
Pull it when it reaches 170°F to 175°F for optimal tenderness.
Let the chicken rest in the cooking liquid for five minutes with the heat off. The meat will absorb some sauce and stay glossy. Serve it as-is or shred it for saucy dishes.
Common Mistakes to Avoid — and How to Fix Them
Overcrowding the Pan
Too much chicken in one pan drops the surface temperature instantly. The meat steams in its own juices instead of browning. You end up with gray, rubbery chicken and no crust.
Fix it by cooking in batches. If you’re cooking for a family, sear the first batch, set it aside, then sear the rest. The browned bits from the first batch only add flavor to the second.
Cooking Cold Chicken Straight From the Fridge
Cold chicken shocks the pan’s heat. The outside cooks faster than the inside, leading to a dry exterior and a raw center. This is one of the biggest causes of uneven results.
Fix it by letting chicken sit at room temperature for 15 to 20 minutes before cooking. This isn’t long enough for bacteria to multiply. It’s long enough for a more even cook.
Cutting Into the Meat Too Early
Slicing right after cooking releases all the juices onto your cutting board. The chicken turns dry and less flavorful. That first slice can be so tempting, but patience pays off.
Fix it by resting the chicken for five minutes uncovered. The internal temperature rises during this time, and the juices settle back into the meat fibers. Then slice, and you’ll see the difference.
Safety, Cross-Contamination, and Food Storage Rules That Aren’t Optional
Why You Should Never Rinse Raw Chicken
Rinsing raw chicken does nothing to remove bacteria. It splashes contaminated water across your sink, countertop, and nearby dishes. This spreads pathogens like Salmonella and Campylobacter instead of eliminating them.
The US Department of Agriculture (USDA) explicitly warns against washing raw poultry. Only heat kills the bacteria, and heat works just as well on unrinsed chicken. Skip the rinse and go straight to the pan.
The 2-Hour Rule for Leftovers
Cooked chicken must go into the refrigerator within two hours of leaving the heat. If the room is above 90°F, that window drops to one hour. This rule prevents bacterial growth in the “danger zone” between 40°F and 140°F.
Store leftover chicken in shallow, airtight containers. It stays good for three to four days in the fridge. For longer storage, freeze it for up to four months.
When to Seek Professional Help (and When to Call a Doctor)
If chicken sits at room temperature for more than two hours, don’t taste it to decide. Throw it out. The risk of foodborne illness isn’t worth the cost of a few pieces of meat.
Seek medical attention if you develop symptoms like fever above 101.5°F, vomiting that prevents keeping liquids down, or diarrhea lasting more than three days. The CDC estimates that each year, about one million Americans get sick from contaminated poultry. Following safe handling rules keeps you out of that number.
Expert Tips: Resting, Slicing Against the Grain, and Making a Quick Pan Sauce
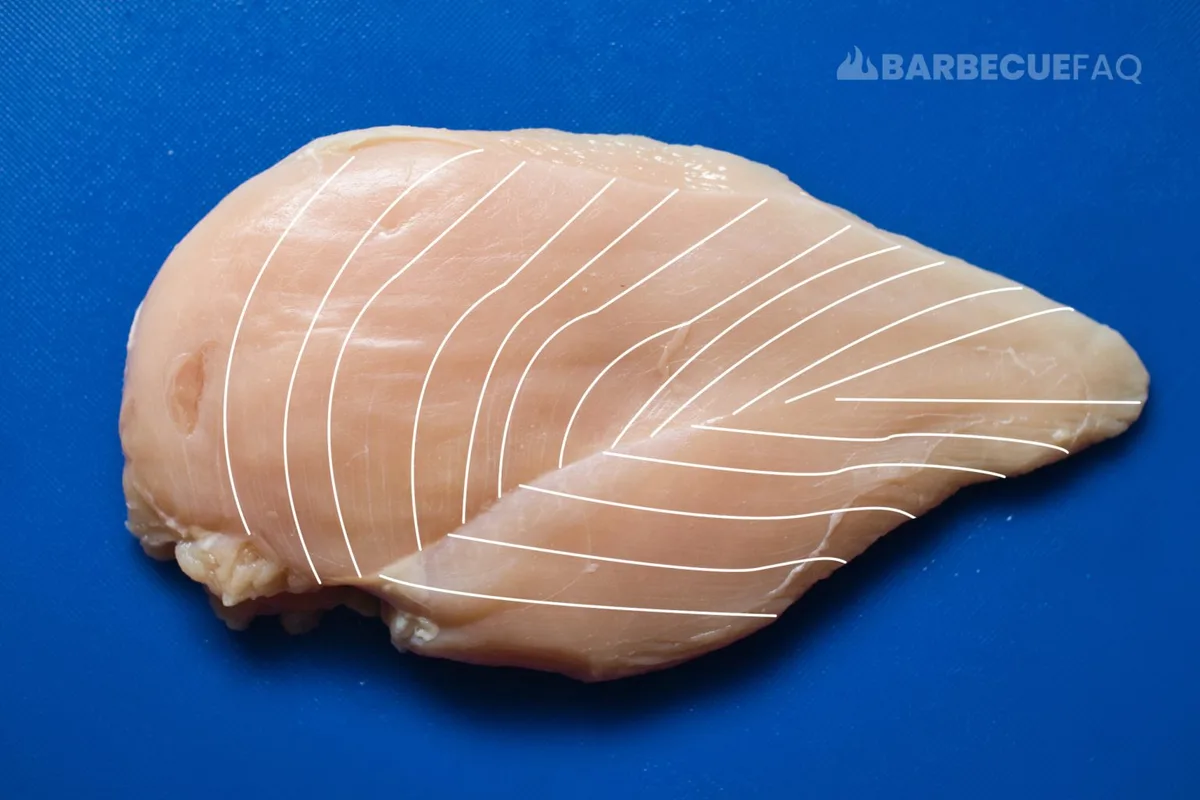
Image source: Web (Bing) / barbecuefaq.com (Web image (fair-use with source credit))
Resting is non-negotiable. Five minutes uncovered lets the juices settle back into the meat. Skip this step and you’ll lose all the moisture you worked to keep.
Slice against the grain. Look at the cooked breast and find the direction of the muscle fibers. Cut perpendicular to those lines.
Shortened fibers make each bite more tender.
Deglazing makes a fast pan sauce. Remove the chicken and set the heat to medium. Pour in a half cup of broth or white wine.
Scrape the browned bits from the bottom with a wooden spoon.
Simmer for two to three minutes until slightly thickened. Whisk in a tablespoon of butter for shine and flavor. Season with salt and pepper.
Pour it over the sliced chicken and serve.
Frequently Asked Questions
Can you cook raw chicken in a saucepan?
Yes. A saucepan works well for searing, poaching, and braising chicken. Use medium-high heat for browning, then lower the heat and cover to finish cooking gently.
Always check the internal temperature with a thermometer.
How long does chicken take to cook in a saucepan?
Boneless breasts take about 8 to 12 minutes total. Boneless thighs need 12 to 16 minutes. Bone-in pieces take 18 to 25 minutes.
Times vary with thickness and pan temperature, so rely on a thermometer.
Do you need a lid to cook chicken in a saucepan?
A lid helps but isn’t required. It traps steam and heat, which cooks the chicken more evenly and speeds up the process. If you’re searing only, you can skip the lid.
For poaching or braising, always cover.
Can you cook frozen chicken in a saucepan?
Yes, but it’s not ideal. Frozen chicken cooks unevenly and takes about 50 percent longer. Thaw chicken in the refrigerator overnight for best results.
If you must cook frozen, use a gentle poach and check the temperature thoroughly.
How do you keep chicken from sticking to a saucepan?
Heat the pan properly first. Add oil and wait until it shimmers before placing the chicken. Pat the chicken dry and use enough oil to coat the surface.
If the meat sticks, it likely isn’t ready to flip yet.
The Bottom Line: A Verified Summary for Safe, Juicy Saucepan Chicken
Cooking chicken in a saucepan is simple once you control heat and time. Sear for color, lower the heat, cover, and pull the meat at the right internal temperature. Per the USDA, 165°F is the safe minimum.
Pulling at 160°F and resting covers the difference safely.
Use a digital thermometer every time. It’s the only reliable way to hit the target and avoid dry meat. Choose your cut based on the meal: breasts for speed, thighs for forgiveness, bone-in pieces for deep flavor.
Avoid overcrowding, cold chicken, and early slicing. Follow the two-hour rule for leftovers and never rinse raw poultry. Master these fundamentals and a saucepan becomes one of the most reliable tools in your kitchen.