Skip to content
Disassembling a KitchenAid stand mixer is not just about taking apart a machine; it’s about understanding how your trusted kitchen helper works. Many people want to clean inside, fix a jam, or replace a broken part, but they hesitate because the process seems complex.
In reality, with the right tools and guidance, you can safely disassemble your stand mixer at home. This article shows you how to do it step by step, explains what you need, and gives practical advice to avoid mistakes. Whether you own a classic Artisan or a heavy-duty Professional model, you’ll find clear instructions and useful tips here.
By the end, you’ll feel confident to tackle the job and know how to put everything back together without confusion.
Why Disassemble Your Kitchenaid Stand Mixer?
Most KitchenAid mixers last for years. But over time, food can get trapped inside, gears may wear down, or grease can dry up. If you notice strange noises, reduced power, or leaking oil, it’s time for a deep clean or repair. Disassembling lets you:
- Clean hidden areas
- Inspect and replace worn parts
- Fix mechanical issues
- Save money on professional service
Regular maintenance can extend your mixer’s life by 5–10 years, according to appliance repair data. Many owners are surprised how much smoother their mixer runs after a full overhaul.
Tools And Materials Needed
Before starting, gather these items:
- Screwdriver set (Phillips and flathead)
- Needle-nose pliers
- Hex/Allen wrenches
- Soft cloths
- Grease (food-safe, for gears)
- Replacement parts (if needed)
- Small containers (for screws)
- Plastic pry tool (optional, for removing covers)
- Camera or notebook (to track steps)
Having all tools ready prevents frustration and lost parts. Many beginners miss the importance of organizing screws—using small cups for each step helps you remember where they go later.

Credit: www.amazon.com
Safety And Preparation
Unplug your mixer before starting. Place it on a sturdy, flat surface. Lay down a towel to protect both the machine and your counter. Take photos as you go, especially if this is your first time. These pictures will help during reassembly.
If your mixer is still under warranty, check if opening it will void coverage. Some repairs require professional service, so review the manual or contact KitchenAid support if unsure.
Step-by-step Guide To Disassembling A Kitchenaid Stand Mixer
The process is similar for most models, but some Professional and Commercial mixers have extra parts. Here’s a general guide:
1. Remove Attachments And Bowl
Take off the mixing bowl, beater, and any other attachments. Clean these separately.
2. Take Off The Back Cover
Use a Phillips screwdriver to remove the screws on the rear cover. This exposes the motor area.
3. Remove The Metal Band
Many mixers have a decorative band around the body. Gently unscrew or pry off this band. Set aside.
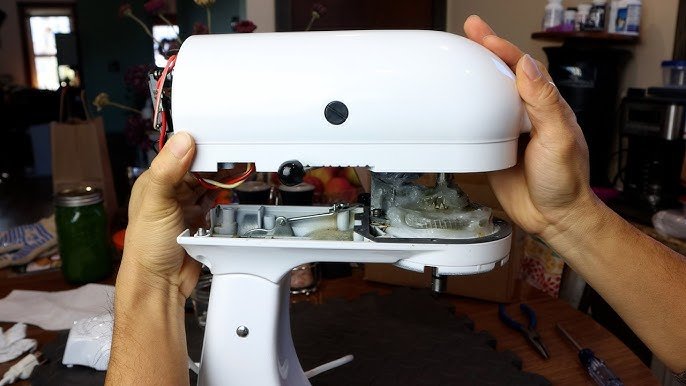
4. Unscrew The Top Housing
Locate the screws holding the top cover (usually 4–6 screws). Remove them carefully. Lift off the cover to expose the internal gears.
5. Inspect And Remove Gear Assembly
The gear box is now visible. If you see old, dirty grease, wipe it out. Check gears for wear or broken teeth.
To remove the gear assembly:
- Unscrew retaining screws
- Carefully lift out gears
- Note their arrangement (take a picture)
6. Remove Motor And Planetary Assembly
If you need to access the motor, unscrew its mounting bolts. The planetary assembly (the part that spins the beater) is below. To remove:
- Unscrew the center shaft bolt
- Gently pull the planetary off
7. Clean And Replace Parts
Clean all parts with a damp cloth. If gears or seals are damaged, replace them with new ones. Apply fresh food-grade grease to gears.
8. Reassemble In Reverse Order
Follow your photos and notes to put everything back. Tighten all screws firmly, but don’t over-tighten (this can crack plastic or strip threads).
Comparison: Artisan Vs. Professional Series Disassembly
Different KitchenAid mixers have small but important differences. Here’s a quick comparison:
| Feature | Artisan Series | Professional Series |
|---|---|---|
| Top cover screws | 4–5 | 6–8 |
| Gear assembly type | Single | Double |
| Motor location | Rear | Central |
| Planetary removal | Easy | Requires extra tools |
| Grease needed | ~2 oz | ~3 oz |
If you own a Professional model, expect more screws and larger parts. Some gears are heavier and require extra care when removing.
Common Mistakes And How To Avoid Them
Many beginners make errors that can cause problems:
- Losing screws: Keep screws in labeled containers.
- Forgetting gear positions: Take photos before removing gears.
- Using wrong grease: Only use food-grade grease—standard grease is unsafe.
- Over-tightening screws: This can crack plastic or strip threads.
- Neglecting electrical safety: Always unplug before working.
A less obvious mistake is mixing new and old grease. Always remove old grease completely before applying new. Otherwise, dirt and metal particles can cause gear wear.

Credit: www.youtube.com
Cleaning Tips For Mixer Parts
Deep cleaning improves both performance and hygiene. Here are practical steps:
- Wipe metal gears with a damp cloth; avoid soaking (water can cause rust).
- Clean plastic covers with mild soap and water.
- For tough grime, use a toothbrush or cotton swab.
- Dry all parts fully before reassembly.
If you want to sanitize, use a solution of 1 tablespoon vinegar in 1 cup water. Wipe, then dry well. Avoid harsh chemicals—they can damage finishes and seals.
How Often Should You Disassemble And Service?
KitchenAid recommends servicing every 2–3 years for heavy use, or after 200–300 hours of mixing. For home bakers, once every 3–5 years is enough. If your mixer sounds louder, leaks grease, or struggles with heavy dough, service it sooner.
Data from appliance repair shops shows that mixers with regular maintenance last up to 15 years. Those neglected often fail after 8–10 years.
Reassembly: What To Watch Out For
Putting your mixer back together is as important as disassembly. Here’s what to check:
- Gears must mesh smoothly—test by turning by hand.
- Wires should be secured, not pinched.
- All screws must be tight but not forced.
- The planetary should spin freely.
- After reassembly, plug in and run on low speed first.
Many people forget to check for leftover parts. If you have extra pieces, review your photos and steps.
Signs You Need Professional Help
Sometimes, a mixer has deeper problems. Seek expert service if:
- You see burned wires or smell burning.
- The motor won’t turn even after cleaning.
- Gears are badly damaged or missing teeth.
- You feel unsure about electrical parts.
KitchenAid’s official support can help with these cases. For more tips, visit their website at KitchenAid Service & Support.
Data: Mixer Failure Causes
Understanding why mixers fail helps you prevent issues.
| Failure Cause | Percentage of Cases | Typical Solution |
|---|---|---|
| Worn gears | 35% | Replace gears, regrease |
| Electrical issues | 25% | Repair wiring/motor |
| Grease leakage | 20% | Clean and regrease |
| Broken planetary | 10% | Replace planetary |
| Other | 10% | General maintenance |
Most problems are mechanical, not electrical. So regular cleaning and gear inspection can prevent 55% of failures.
Practical Insights Most People Miss
- Documenting each step: Use your phone to record video as you disassemble. This helps you remember screw positions and gear placement.
- Buying parts in advance: Order replacement gears, grease, and seals before starting. Waiting for parts mid-job leaves your mixer unusable.
- Checking power cord and switch: Many people focus on gears but ignore the power switch. If your mixer is slow to start, inspect the switch and cord for wear.
Credit: www.youtube.com
Frequently Asked Questions
How Long Does It Take To Disassemble A Kitchenaid Mixer?
For most models, expect 45–90 minutes. If it’s your first time, plan for extra time to take notes and photos. More complex models may take up to 2 hours.
Can I Disassemble My Mixer If It’s Under Warranty?
Disassembling can void the warranty. Check your warranty terms. If unsure, contact KitchenAid support before starting.
What Type Of Grease Should I Use?
Always use food-grade grease. Standard machine grease is unsafe for kitchen appliances. KitchenAid recommends their own branded grease, but other brands are available.
Is It Safe To Clean Electrical Parts?
Avoid water or liquid cleaners on electrical components. Use dry cloths or compressed air. If wires are damaged, seek professional repair.
How Do I Know If My Mixer Needs New Gears?
Signs include loud grinding noises, difficulty mixing, or visible damage to gear teeth. If you see metal shavings in old grease, replace gears.
Disassembling your KitchenAid stand mixer is a practical way to keep it running smoothly for years. With careful steps and the right tools, you can clean, repair, and even upgrade your mixer at home. Remember to document each stage, use the correct grease, and avoid rushing.
If you meet a problem you can’t solve, don’t hesitate to ask for professional help. With regular maintenance, your mixer can outlast many other kitchen appliances and continue to support your cooking adventures.