Skip to content
A kitchen is the heart of a home, but when your undermount kitchen sink starts to sag or leak, it can cause real frustration. Many homeowners face this problem, especially as sinks age or if they were installed poorly. A loose or detached undermount sink doesn’t just look bad—it can also lead to water damage, mold, and expensive repairs if ignored. The good news? With the right tools, guidance, and some patience, you can fix most undermount sink problems yourself, even if you’re not a professional plumber.
This guide covers everything you need to know about fixing an undermount kitchen sink. You’ll learn why these sinks fail, the steps to re-secure them, and practical tips to prevent future issues. Whether your sink is slightly loose or has completely fallen, you’ll find clear instructions and expert insights to help you restore your kitchen’s centerpiece.
Understanding Undermount Kitchen Sinks
Before you start repairs, it’s helpful to know what makes an undermount sink different from other types. Unlike drop-in sinks that rest on top of the counter, undermount sinks are attached beneath the countertop. This creates a smooth, modern look and makes cleaning easier, but the installation method also means the sink relies heavily on strong adhesives and supports.
Undermount sinks are usually made from stainless steel, granite composite, or porcelain. Each material has its own weight and mounting requirements. Heavy sinks need extra support, while lighter models may only need strong adhesive and clips.
Common Reasons An Undermount Sink Fails
Understanding why your sink came loose helps you fix it properly and avoid repeat problems.
1. Adhesive Failure
The most common issue is that the glue or silicone holding the sink has weakened or broken down over time.
2. Improper Installation
If the sink wasn’t secured with enough clips or brackets, or if the adhesive was poorly applied, it may detach.
3. Water Damage
Moisture can break down adhesive and cause wood or particleboard countertops to swell, loosening the sink.
4. Heavy Use Or Impact
Dropping pots or leaning on the sink can cause it to pull away from the countertop.
5. Countertop Issues
Cracks or movement in granite or quartz countertops can also lead to a detached sink.
Tools And Materials You’ll Need
Gather everything before you start to save time and avoid frustration.
- Adjustable wrench
- Screwdriver (Phillips and flathead)
- Putty knife
- Utility knife
- Acetone or rubbing alcohol
- Masking tape
- Epoxy or silicone adhesive (check your sink and countertop materials for compatibility)
- Undermount sink clips/brackets (if missing or damaged)
- Caulking gun
- Silicone sealant
- Bucket or towels for water spills
- Support props (2x4s or jacks)
- Disposable gloves
- Safety glasses
If your sink is especially heavy, ask someone to help lift and support it during repairs.
Step-by-step Guide: How To Fix An Undermount Kitchen Sink
Let’s walk through the process, focusing on both minor and major sink failures.
1. Prepare And Assess The Area
Start by clearing out everything under the sink. Turn off the water supply if you’ll be disconnecting plumbing. Place a bucket or towels under the pipes to catch drips.
Inspect the sink to see if it’s completely detached, sagging, or just loose at the edges. If the sink is still connected to the countertop by some adhesive, you may be able to repair it without full removal.
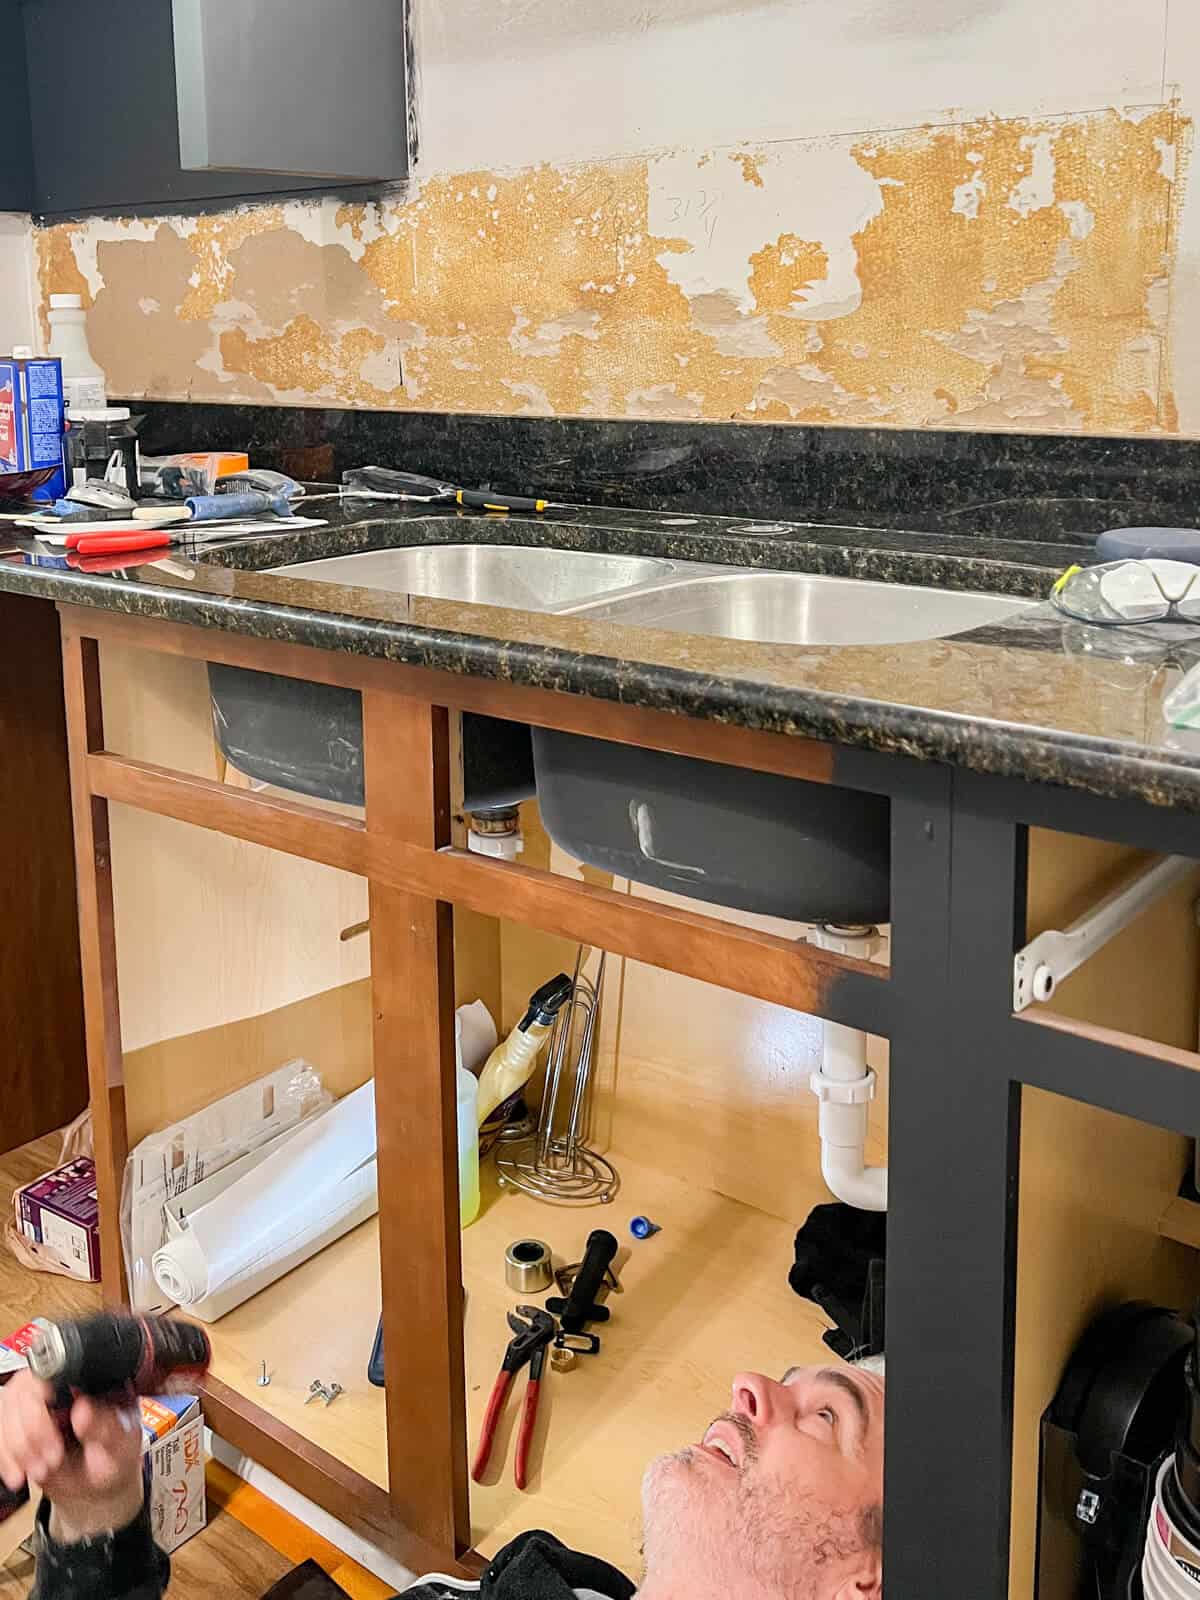
2. Disconnect Plumbing (if Needed)
In many cases, you’ll need to remove the P-trap (the curved pipe under your sink) and the water supply lines. Use your adjustable wrench to loosen the connections. Take photos before you begin—this makes reassembly easier.
If your sink is only slightly loose, you might be able to work without removing the plumbing, but full removal allows for a better repair.
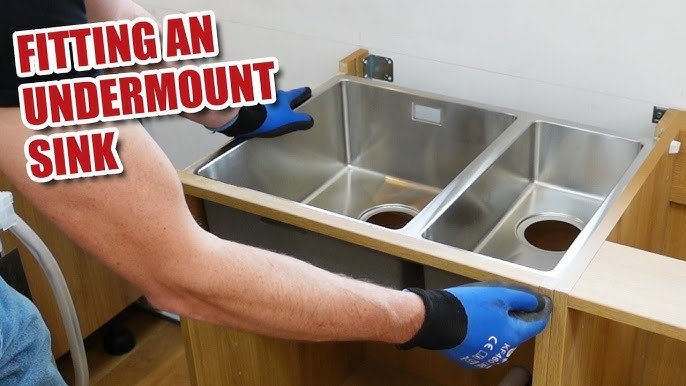
3. Support The Sink
Before removing any supports or adhesive, use sturdy props or jacks beneath the sink bowl to hold it in place. This prevents the sink from falling and damaging your pipes or countertop.
A simple method is to place a 2×4 across the cabinet opening and use a jack or another 2×4 vertically to press against the bottom of the sink.
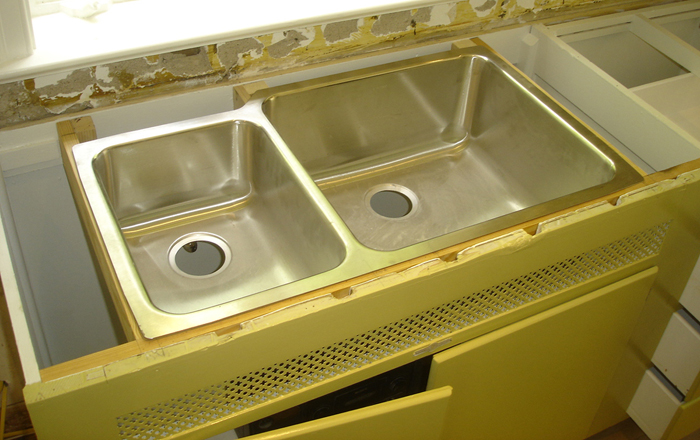
4. Remove Old Adhesive And Hardware
Use a utility knife or putty knife to carefully cut away the old silicone or adhesive around the edges of the sink. Remove any clips or brackets, using a screwdriver if needed.
Clean the underside of the countertop and the rim of the sink with acetone or rubbing alcohol. This step is critical—leftover residue can prevent the new adhesive from bonding.
5. Check For Damage
Look for cracks in the countertop or chips on the sink rim. If you find damage, you may need to consult a countertop specialist, especially with granite or quartz. Minor chips can sometimes be filled with epoxy.
6. Apply New Adhesive
Choose an adhesive suitable for your countertop and sink material. For stone countertops, use a high-strength two-part epoxy or special undermount sink adhesive. For laminate, a premium silicone may be enough.
Apply a continuous bead around the entire rim of the sink. Don’t use too much—excess will squeeze out and be hard to clean.
7. Reinstall Sink Clips Or Brackets
Press the sink up against the countertop. While the adhesive is still wet, attach new or cleaned sink clips/brackets. Space them evenly—most sinks need at least 4-6 clips for proper support. Tighten just enough to hold the sink in place without over-compressing the adhesive.
If your original sink didn’t have enough clips, add more. This is a common reason sinks sag later.
8. Let Adhesive Cure
Follow the manufacturer’s instructions for drying time. This is often 12–24 hours. Do not reconnect plumbing or use the sink until it’s fully cured. Rushing this step is a common mistake.
9. Reconnect Plumbing
Once the adhesive is cured and the sink is secure, remove the supports. Reconnect the plumbing pipes and water supply lines. Check for leaks by running water for several minutes.
10. Apply Silicone Sealant
Apply a thin bead of waterproof silicone sealant around the sink edge where it meets the countertop. Smooth with your finger or a caulking tool. This step prevents water from seeping into the gap.
Table: Common Adhesives For Undermount Sinks
Here’s a quick look at popular adhesives and their best uses.
| Adhesive Type | Best For | Average Cure Time | Water Resistance |
|---|---|---|---|
| Two-Part Epoxy | Granite, Quartz | 12–24 hours | Excellent |
| Premium Silicone | Laminate, Wood | 8–24 hours | Good |
| Construction Adhesive | Metal, Composite | 24 hours | Very Good |
Special Tips For Granite And Quartz Countertops
Stone countertops are popular, but they need special care. Never use ordinary glue or cheap silicone—they won’t hold the heavy weight. Always use a two-part epoxy made for stone.
Don’t overtighten sink clips. Granite can crack if too much pressure is applied. If you’re unsure, ask a stone fabricator for advice.
Credit: www.youtube.com
Table: Signs Your Sink Needs Immediate Repair
If you notice these warning signs, act fast to avoid bigger problems.
| Warning Sign | What It Means | Action Needed |
|---|---|---|
| Sagging sink rim | Loose adhesive or missing supports | Re-secure with adhesive and clips |
| Water leaking under sink | Seal is broken | Replace silicone and check plumbing |
| Cracked countertop | Structural failure | Consult a professional |
| Mold or mildew | Water intrusion | Clean, repair, and reseal |
Preventing Future Problems
Once your sink is secure, it’s smart to take steps to prevent it from coming loose again.
- Check clips every 6 months. Tighten if needed.
- Avoid standing or leaning on the sink rim.
- Clean with care. Don’t use sharp tools around the sealant.
- Dry spills quickly to stop water from seeping below the countertop.
- Inspect for leaks regularly, especially if you notice odors or stains.
Many homeowners forget that regular checks and quick fixes can add years to your undermount sink’s life.
When To Call A Professional
Most undermount sink repairs are DIY-friendly, but some situations need expert help:
- Cracked granite or quartz countertops
- Sink bowl is severely deformed or rusted
- You’re unsure about disconnecting/reconnecting plumbing
- Repeated adhesive failure
A skilled plumber or countertop specialist can ensure a lasting fix and help you avoid further damage.
Table: Diy Vs. Professional Repair Comparison
Here’s a side-by-side look at when to handle repairs yourself and when to hire a pro.
| Repair Type | DIY | Professional Needed |
|---|---|---|
| Loose sink, minor adhesive failure | Yes | No |
| Broken clips or missing supports | Yes | No |
| Cracked countertop | No | Yes |
| Major plumbing changes | No | Yes |
Credit: notinggrace.com
Non-obvious Insights And Pro Tips
Many beginners miss these details:
- Cleanliness is critical. Even tiny amounts of old adhesive or grease can stop new adhesive from working. Use acetone and wipe twice.
- Curing time matters. The most common reason for repeat sink failure is not letting adhesive cure fully. Plan to leave the sink unused for a full day.
- Brackets add strength. Even if your sink was installed with just glue, adding brackets or clips gives extra security.
Frequently Asked Questions
How Long Does It Take To Fix An Undermount Kitchen Sink?
Most repairs take 2–4 hours of active work, but you’ll need to wait 12–24 hours for adhesives to cure before using the sink again.
What Adhesive Should I Use For Granite Countertops?
Use a two-part epoxy designed for stone. Regular silicone or construction adhesives may not hold the heavy weight of a granite sink for long.
Can I Fix A Loose Undermount Sink Without Removing The Plumbing?
Sometimes, yes. If the sink is only a little loose, you may be able to add adhesive and secure it without fully disconnecting pipes. But for a strong repair, removing plumbing gives better access.
What If My Sink Keeps Coming Loose?
Repeated failures usually mean the wrong adhesive was used, there aren’t enough supports, or the surfaces weren’t cleaned properly. Try using more clips and a stronger adhesive, or call a professional.
Is Professional Repair Expensive?
Costs vary, but a typical undermount sink repair by a plumber or countertop specialist can cost $200–$500. DIY repairs can be done for less than $50 in materials.
Restoring your undermount kitchen sink is a practical project for most homeowners. With the right tools, good preparation, and careful attention to detail, you can have a sturdy, leak-free sink that lasts for years. For more detailed guidance, check resources like the Wikipedia Kitchen Sink page. Your kitchen deserves nothing less than a reliable, beautiful sink—now you know how to keep it that way.
Credit: concretecountertopinstitute.com