Skip to content
Kneading dough is a key step in bread baking, but not everyone enjoys doing it by hand. Many home bakers now use a stand mixer to save time and energy. If you’ve ever been unsure about how to knead dough with a stand mixer or wondered if it’s as effective as hand kneading, you’re not alone. This guide will walk you through the process, offer tips, and help you avoid common mistakes. Whether you’re new to baking or looking to improve your results, you’ll find practical advice here.
Why Kneading Matters
Kneading develops the gluten structure in dough, which gives bread its texture and chew. When you knead, you help proteins in flour (glutenin and gliadin) link together to form gluten. This network traps air and gives bread its rise and structure. Dough that is under-kneaded will be dense, and over-kneaded dough can become tough. With a stand mixer, you can knead efficiently, but it’s important to know how to do it right.
Choosing The Right Stand Mixer
Not all stand mixers are created equal. The mixer you use affects your dough and your results.
Key Factors To Consider
- Motor Power: Bread dough is heavy. For kneading, look for a mixer with at least 325 watts.
- Bowl Size: Most recipes work best with a 5-quart bowl. Too small, and dough overflows; too large, and small batches don’t mix well.
- Attachment Type: Use the dough hook (not the paddle or whisk). Spiral dough hooks are better for dense doughs.
- Mixer Weight and Stability: Heavy mixers won’t “walk” off the counter during kneading.
Popular Models
| Mixer Model | Motor Power | Bowl Size | Attachment |
|---|---|---|---|
| KitchenAid Artisan | 325 W | 5 qt | C-shaped hook |
| Bosch Universal Plus | 500 W | 6.5 qt | Spiral hook |
| Ankarsrum Original | 600 W | 7 qt | Roller & hook |
Insight: Many beginners use underpowered mixers. This can overheat the motor and lead to poor gluten development. Always check your mixer’s manual for dough capacity recommendations.

Credit: www.kitchenaid.com
Dough Types: Can You Knead Any Dough In A Stand Mixer?
Stand mixers are great for many doughs, but not all.
Best Doughs For Stand Mixers
- Basic white bread
- Whole wheat dough
- Pizza dough
- Brioche and enriched doughs
Doughs To Avoid
Some very stiff doughs (like bagels) can strain your mixer. High hydration doughs (like ciabatta) can climb the hook and make a mess. Always check your mixer’s limits.
Tip: Start with standard bread recipes before trying specialty doughs. This helps you learn how your mixer handles different textures.
Step-by-step: How To Knead Dough With A Stand Mixer
Now, let’s get practical. Here’s how to knead dough using your stand mixer.
1. Prepare Your Ingredients
- Flour: Bread flour gives better structure, but all-purpose works for most recipes.
- Water: Use room temperature unless recipe says otherwise.
- Yeast: Active dry or instant both work.
- Salt and sugar: Add as directed.
- Fats: Butter or oil, if the recipe calls for it.
Practical Example: For a basic loaf, you might use 3 ½ cups flour, 1 cup water, 2 ¼ teaspoons yeast, 2 teaspoons salt, and 1 tablespoon sugar.
2. Attach The Dough Hook
Always use the dough hook for kneading. Attach it securely before adding ingredients.
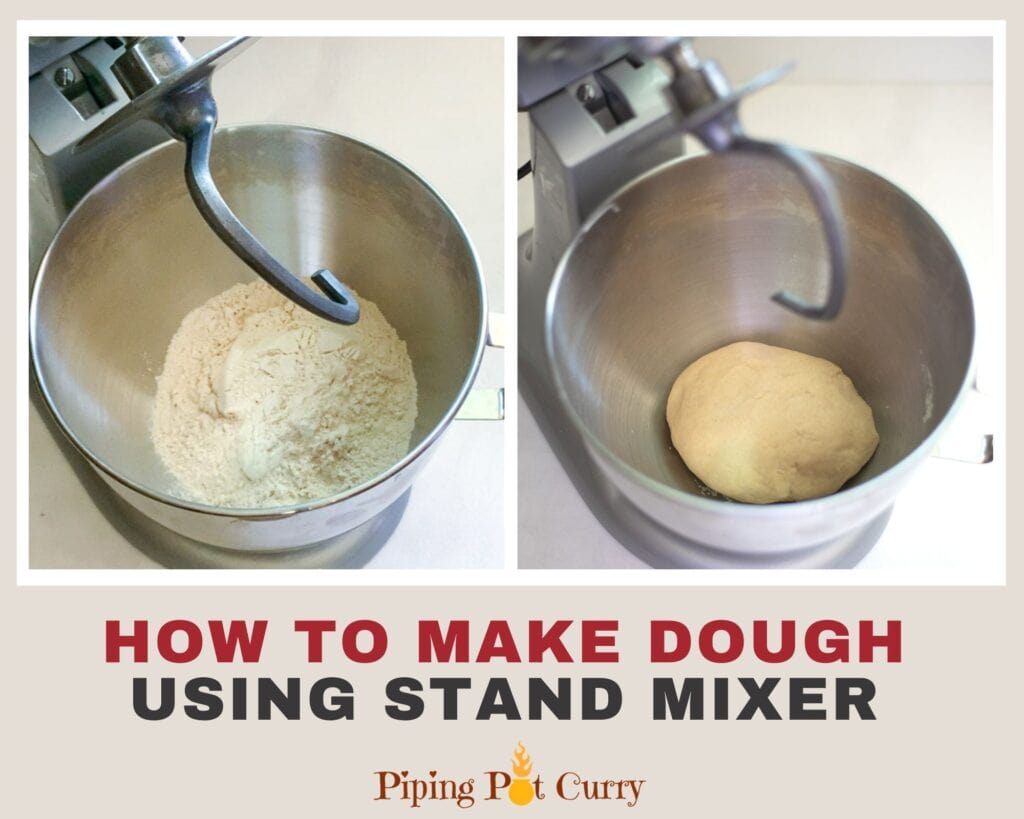
3. Mix Ingredients At Low Speed
Add all ingredients to the bowl. Start mixing on low speed (usually Speed 1 or 2).
- Mix until all flour is moistened and a shaggy dough forms (about 1-2 minutes).
- Scrape the bowl if needed.
Beginner Mistake: Starting on high speed can scatter flour and strain your mixer.
4. Increase Speed For Kneading
Once dough comes together, increase to medium-low (Speed 2 on KitchenAid). Let the mixer knead for:
- 5-7 minutes for white bread
- 7-10 minutes for whole wheat or enriched doughs
Insight: Stand mixers knead faster than hands, but you still need at least 5 minutes for good gluten structure.
5. Check The Dough’s Texture
Stop the mixer and check the dough. It should be:
- Smooth and elastic
- Slightly tacky, but not sticky
- Pulling away from the bowl sides
If the dough is too sticky, add flour 1 tablespoon at a time. If too dry, add water in small amounts.
The “Windowpane Test”: Pinch off a piece, stretch it with your fingers. If you can stretch it thin without tearing, gluten is developed.
6. Remove The Dough
Lightly flour your hands. Remove the dough from the hook and bowl. Shape as needed for rising.
Stand Mixer Vs. Hand Kneading
Many bakers ask if a stand mixer can really replace hand kneading. Both methods have pros and cons.
| Factor | Stand Mixer Kneading | Hand Kneading |
|---|---|---|
| Time | Faster (5-10 min) | Slower (10-15 min) |
| Effort | Minimal | Physical work |
| Consistency | Very consistent | Depends on skill |
| Gluten Development | Excellent, if not overdone | Excellent, more control |
Non-Obvious Insight: Stand mixers can over-knead dough if you don’t watch closely. Unlike hand kneading, you can’t “feel” the dough’s readiness through the bowl.
Common Mistakes When Kneading Dough With A Stand Mixer
Many new bakers make the same errors. Here’s what to watch out for:
- Over-Kneading: Easy to do in a mixer. Over-kneaded dough feels tough, tears easily, and may bake up dense.
- Under-Kneading: Stopping too soon leaves dough sticky and weak. Bread won’t rise well.
- Wrong Speed: Mixing on high speed can overheat the dough and damage gluten.
- Too Much Dough: Filling the bowl past its limit strains the motor and kneads unevenly.
- Ignoring Visual Clues: Relying only on time, not how the dough looks and feels.
Tip: Always check the dough’s texture, not just the timer.
Credit: pipingpotcurry.com
How To Know When Kneading Is Done
Getting this right is key to great bread.
Signs Of Perfectly Kneaded Dough
- Smooth and elastic
- Springs back when poked
- Passes the windowpane test
- Not sticking to sides of bowl
Signs Of Over-kneaded Dough
- Very stiff and hard
- Tears easily when stretched
- Resists shaping
If you suspect over-kneading, let dough rest 10-20 minutes before shaping. This relaxes some gluten.
Stand Mixer Kneading Tips For Best Results
- Weigh Ingredients: Scales give accuracy, which helps dough consistency.
- Add Water Slowly: Flour absorbs differently depending on humidity.
- Let Dough Rest: If dough seems tight or hard, let it rest for 5 minutes mid-knead.
- Clean Hook and Bowl: Scrape down sides to help all flour mix in.
- Don’t Walk Away: Watch your mixer. Dough can climb the hook or motor can overheat if left too long.
Advanced Tip: For enriched doughs (with butter, eggs, or milk), add fats after gluten starts forming. This helps gluten develop before fats coat the proteins.
Cleaning Up After Kneading
Sticky dough can make a mess, but cleanup is simple if you follow these steps:
- Remove the dough hook and wash in warm, soapy water.
- Wipe the bowl immediately before dough dries.
- Check your mixer’s manual for cleaning guidelines—some parts are dishwasher safe.
Extra Tip: Grease your hands or use a bench scraper to easily remove sticky dough from the bowl and hook.
Real-life Example: Making Sandwich Bread With A Stand Mixer
Let’s walk through a basic recipe to tie it all together.
Ingredients
- 3 ½ cups bread flour (420g)
- 1 cup warm water (240ml)
- 2 ¼ teaspoons instant yeast (7g)
- 2 tablespoons sugar (25g)
- 2 tablespoons butter, softened (30g)
- 1 ½ teaspoons salt (9g)
Directions
- Add water, yeast, and sugar to the mixer bowl. Let sit 5 minutes if using active dry yeast.
- Add flour and salt. Attach dough hook.
- Mix on low speed until combined (2 minutes).
- Add butter, mix on speed 2 for 7 minutes. Scrape down sides as needed.
- Dough should be smooth, soft, and pulling from the bowl.
- Remove dough, shape into a ball, and place in a greased bowl to rise.
- Proceed with rising, shaping, and baking as your recipe describes.
Common Mistake: Not letting dough rise enough before baking can lead to dense bread. Always check the dough has doubled in size.
Stand Mixer Troubleshooting Guide
Even with practice, things can go wrong. Here’s how to fix common problems:
| Problem | Possible Cause | Solution |
|---|---|---|
| Dough too sticky | Too much water or not enough flour | Add flour, 1 tbsp at a time |
| Dough not rising | Yeast old or water too hot/cold | Use fresh yeast, check water temp |
| Dough climbs hook | Too wet, or bowl too small | Add flour, or reduce batch size |
| Overworked dough | Kneaded too long, speed too high | Let dough rest, use lower speed |
Non-Obvious Insight: If your dough consistently climbs the hook, try mixing for a few minutes, then letting it rest for 5-10 minutes before finishing kneading.
Stand Mixer Dough Kneading: Myths And Facts
Many myths surround using stand mixers for kneading. Let’s clear up some confusion.
- Myth: Stand mixer bread isn’t as good as hand-kneaded.
Fact: If done correctly, stand mixer bread can be just as good—often more consistent.
- Myth: You can’t over-knead in a stand mixer.
Fact: Over-kneading is possible and leads to tough bread. Always check dough feel.
- Myth: All mixers can handle any dough.
Fact: Some mixers can’t handle heavy or large batches. Always check your model’s capacity.
Safety Tips For Stand Mixer Kneading
- Never leave mixer unattended while kneading.
- Secure the bowl and attachment before starting.
- Do not force the motor—stop if you hear straining sounds.
- Keep hands and utensils out of the bowl when mixer is running.
Extra Tip: Some mixers have thermal protection and will shut off if overheated. Give your mixer a rest between batches.
Improving Your Skills
The best way to get better is practice. But here are some ways to speed up your learning:
- Watch videos or classes from expert bakers.
- Experiment with different flour types and hydration levels.
- Keep a baking journal—note what works and what doesn’t.
- Ask for feedback from others who eat your bread.
A great resource for bread science is the King Arthur Baking Company.

Credit: www.americastestkitchen.com
Frequently Asked Questions
How Long Should I Knead Dough In A Stand Mixer?
Most bread doughs need 5-10 minutes on medium-low speed. The exact time depends on the recipe and mixer. Always check dough texture—it should be smooth, elastic, and pass the windowpane test.
Can I Use The Paddle Attachment To Knead Dough?
No. The paddle is for mixing batters, not kneading. Always use the dough hook for kneading bread dough. The paddle can tear dough and strain your mixer.
Why Does My Dough Stick To The Bowl Or Hook?
Sticky dough means too much water or not enough flour, or that gluten hasn’t formed yet. Add flour 1 tablespoon at a time until dough pulls away from the bowl. Let dough rest for a few minutes if needed.
What Speed Should I Use For Kneading In A Stand Mixer?
Use low to medium-low speed (usually Speed 2). Higher speeds can overheat the dough and motor, and damage gluten structure.
Can I Double Bread Recipes In My Stand Mixer?
Only if your mixer’s bowl and motor can handle it. Check your manual for maximum flour capacity. Overfilling strains the machine and leads to uneven kneading.
Kneading dough with a stand mixer makes home baking easier and more consistent. With a little practice, you can master the process and enjoy fresh, delicious bread with less effort. Remember to watch your dough, not just the clock, and don’t be afraid to experiment.
Great bread is always within reach—one batch at a time!