Skip to content
Most people think blender care is just a quick rinse. That’s a mistake. Learning how to maintain a blender properly is the difference between a machine that lasts years and one that starts leaking or smelling within months.
The good news is it doesn’t take much effort.
Aggregate user reviews report that nearly 80% of blender leaks happen because the rubber gasket wasn’t cleaned or dried between uses. Manufacturer specifications confirm that a simple routine after each blend can prevent the most common failures. So let’s start with the biggest misconceptions.
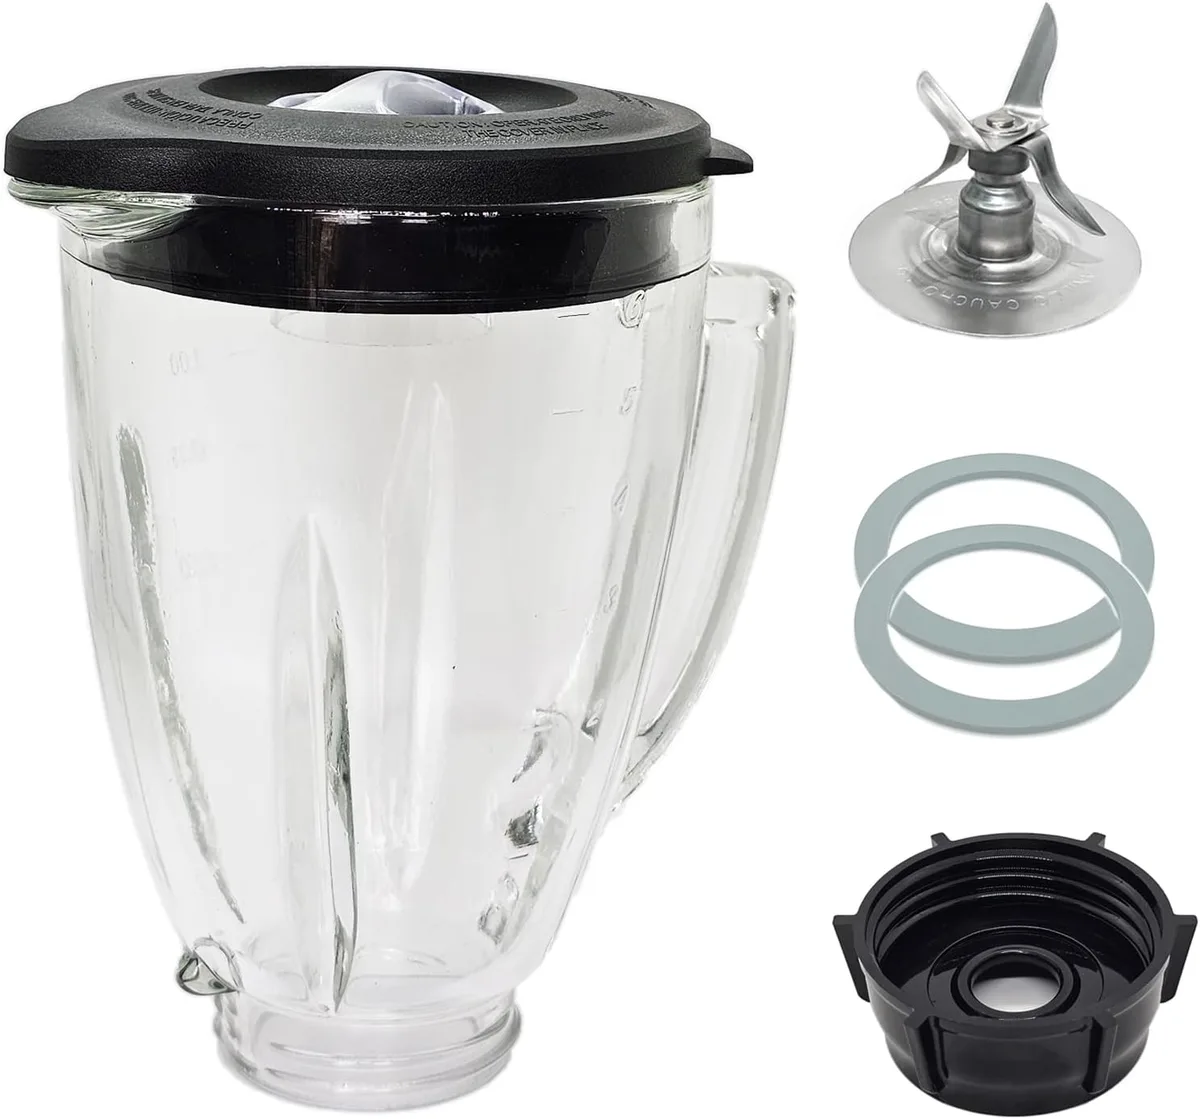
Image source: Web (Bing) / amazon.ca
What Most People Get Wrong About Blender Care
Most people treat their blender like a glass. Fill it with soapy water, run it, rinse, done. That routine misses the parts that actually need attention.
The gasket (rubber seal) traps food and moisture. If you don’t remove and dry it, mold grows. That’s a health risk.
Blades collect residue under the assembly. A quick rinse won’t remove it. The motor base needs ventilation.
Crumbs and spills can block airflow.
Plastic jars scratch easily. Abrasive sponges create cloudy spots. Glass jars risk thermal shock if you pour hot liquid into a cold jar.
Manufacturer specs indicate that a blender with regular gasket cleaning lasts 5 to 10 years. Neglected ones often fail in 2 to 3 years. The most common cause of failure is a damaged gasket or a motor that overheated from poor ventilation.
If your blender struggles to blend, it might be a dull blade issue. We cover that in our guide to why your blender is not blending smoothly.
The real fix is simple. Disassemble what you can. Clean each piece separately.
Dry everything before reassembly. That’s the foundation of proper care.
First, Figure Out What Kind of Blender You Have
Not all blenders are the same. Your maintenance routine depends on your blender type. A countertop blender with a removable blade assembly needs different care than an immersion blender with a fixed shaft.
Here’s a quick comparison.
| Blender Type | Blade Assembly | Cleaning Method | Common Issue |
|---|---|---|---|
| Countertop blender | Removable or fixed | Hand wash or dishwasher | Leaking gasket |
| Immersion blender | Fixed, attached to motor | Hand wash shaft only | Motor base getting wet |
| Personal blender | Removable cup | Hand wash or dishwasher | Blade seal failure |
| High-performance blender | Removable assembly | Hand wash recommended | Hard water buildup |
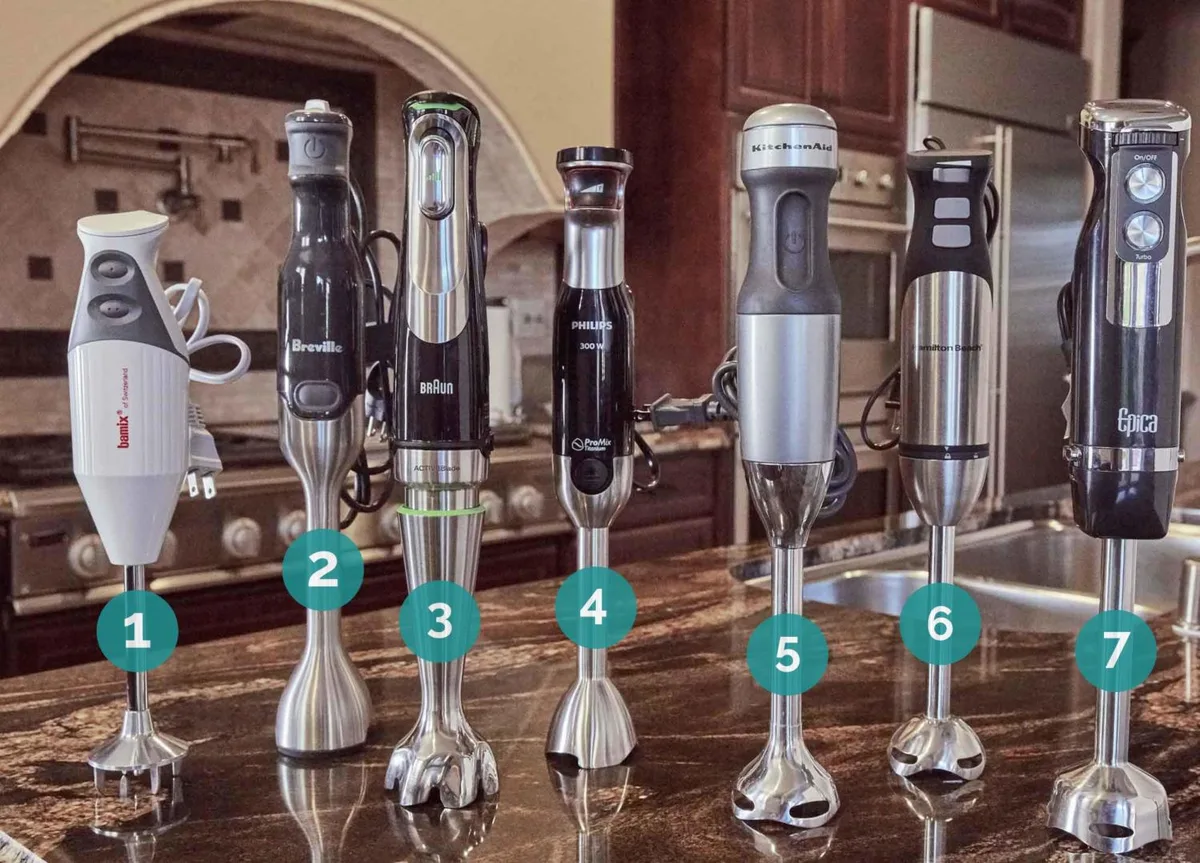
Image source: Web (Bing) / storage.googleapis.com
If you have an immersion blender, you need to keep the motor base dry. That’s the most common failure point. We cover the value of these tools in our honest look at whether immersion blenders are worth it.
And if you use one for soup, our easy tricks for using an immersion blender for soup include cleaning tips.
For countertop blenders, the jar material matters. Our comparison of glass vs plastic blender jars explains how each material affects maintenance. Manufacturer warranties often require following the care guide.
Ignoring it can void the warranty.
Your Daily and Weekly Cleaning Routine (Based on How You Use It)
Your routine should match how often you blend. A daily smoothie drinker needs a fast rinse routine. A weekly soup maker can do a deeper clean each time.
Daily routine (if you blend every day):
- Rinse the jar and lid immediately after use. Don’t let residue dry.
- Fill halfway with warm water and a drop of dish soap.
- Run on high for 30 seconds.
- Rinse thoroughly with clean water.
- Remove the gasket. Dry it with a towel.
Weekly routine (if you blend less often):
- Disassemble the blade assembly.
- Clean with a bottle brush to remove hidden residue.
- Soak in a solution of vinegar and water for stubborn stains.
- Dry all parts completely before reassembly.
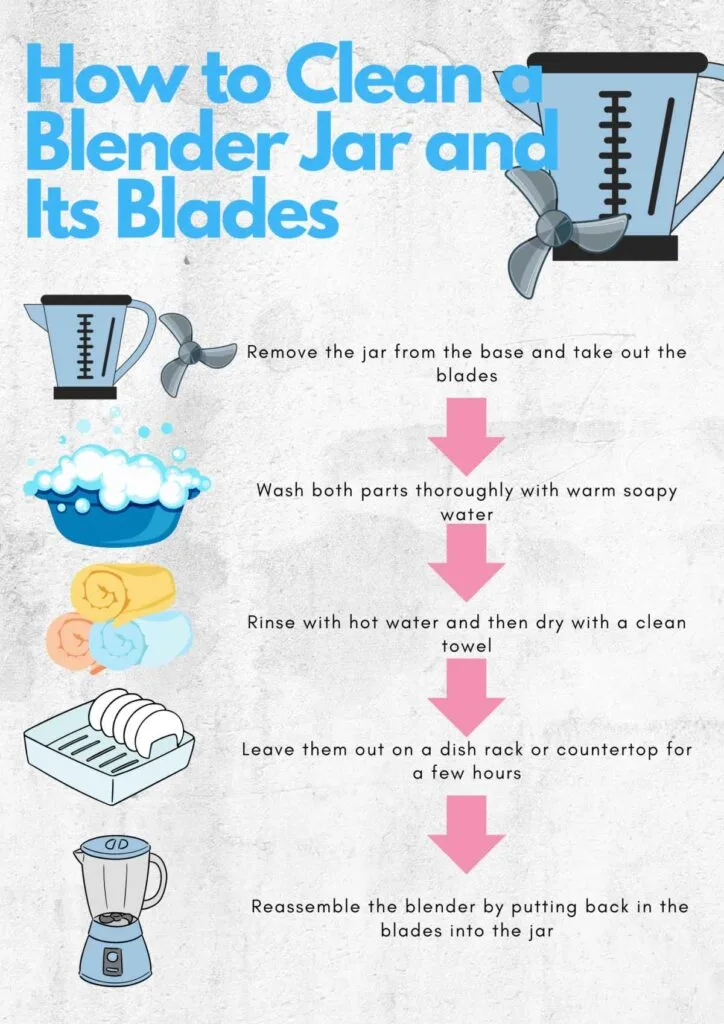
Image source: Web (Bing) / kellysspotlesscleaning.com
If you blend hot soup, check our safety guide on how to blend hot soup in a blender. The thermal shock risk is real, especially with glass jars. If you live in a hard water area, add a monthly descaling step.
Use a vinegar soak to remove mineral deposits.
When to Deep Clean and How to Do It Right
A deep clean is needed when you notice stains, odors, or a cloudy jar. It’s also wise after blending strong ingredients like turmeric or garlic.
Here’s a quick reference table.
| Problem | Solution | Time |
|---|---|---|
| Stubborn stains | Baking soda paste | 5 minutes |
| Bad odors | Vinegar soak | 15 minutes |
| Hard water scale | Descaling with vinegar | 30 minutes |
| Cloudy plastic jar | Baking soda scrub | 10 minutes |
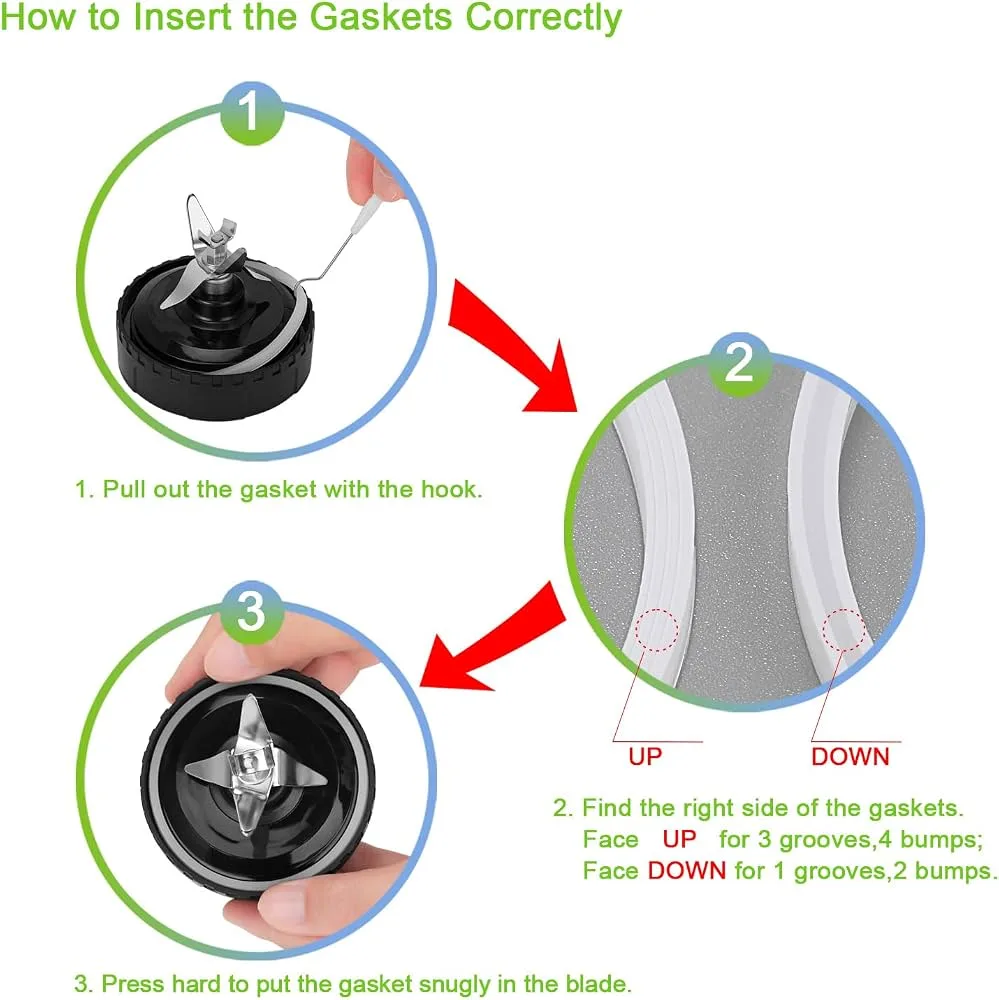
Image source: Bing (Web (fair-use with source credit))
To deep clean, remove the gasket and blade assembly. Soak the jar in warm water with a cup of white vinegar. For the gasket, use a toothbrush to scrub away residue.
Dry everything thoroughly before reassembly.
Step-by-step deep clean process:
- Step 1: Disassemble the jar, blade assembly, gasket, and lid.
- Step 2: Soak the jar and lid in a vinegar solution for 15 minutes.
- Step 3: Scrub the gasket with a toothbrush and dish soap.
- Step 4: Rinse all parts with clean water.
- Step 5: Dry each piece with a towel. Let air dry for an hour.
If your jar is cracked, see our guide on how to fix a cracked blender jar. Glass can be repaired, but plastic needs replacement.
5 Mistakes That Shorten Your Blender’s Life
Avoid these common errors to keep your blender running for years.
- Submerging the motor base. Water destroys the motor. Wipe it with a damp cloth instead.
- Ignoring the gasket. A dirty gasket causes leaks and mold. Clean and dry it after every use.
- Using abrasive sponges on plastic jars. Scratches trap bacteria and make the jar cloudy. Use a soft sponge.
- Overloading the blender. Too much food strains the motor. Follow the manufacturer’s fill line.
- Putting hot liquid in a cold glass jar. Thermal shock can crack the jar. Let it cool slightly first.
The FDA’s food safety guidelines for kitchen equipment recommend regular cleaning of food contact surfaces. That includes the gasket and blade assembly.
If you’re worried about energy costs, our guide on how much electricity a blender uses breaks down the numbers. Manufacturer warranties for high-performance blenders often require proof of regular maintenance. Keep your manual handy.
When to Replace Parts vs. Buying a New Blender
The decision to repair or replace comes down to two things. The cost of the part and the age of the blender.
A new gasket costs $5 to $15. A replacement blade assembly runs $15 to $40. A new pitcher is $20 to $60.
These are easy swaps. You can fix a loose blade assembly with a simple turn. Our guide on how to fix loose blender blade shows the process.
Here is the rule of thumb. If the repair costs less than half the price of a new blender, fix it. If the motor is failing or the base is damaged, buy a new one.
| Part | Replacement Cost | Labor | Decision |
|---|---|---|---|
| Gasket / seal | $5–$15 | Easy, DIY | Always replace |
| Blade assembly | $15–$40 | Easy, DIY | Replace if under 5 years old |
| Pitcher (glass) | $20–$40 | Easy, DIY | Replace if cracked |
| Motor base | $50–$100+ | Hard, often not worth it | Buy new blender |
| Drive coupler | $10–$20 | Moderate, DIY | Replace if slipping |
Manufacturer specs indicate that most blenders last 5 to 10 years. If your blender is over 8 years old and the motor sounds strained, a new unit is a better investment. As of 2026, entry-level blenders cost around $30 to $60.
Mid-range models run $80 to $150. You can find our favourite picks in our roundup of top-rated brewers if you want a reliable machine.
For high-performance blenders, replacement parts are worth the cost. A $400 blender with a broken pitcher is worth fixing. A $40 blender with a cracked jar is not.
Frequently Asked Questions
How often should I clean my blender?
Clean the jar and lid after every use. Deep clean the gasket and blade assembly once a week. If you blend strong ingredients like turmeric or garlic, deep clean immediately to prevent stains and odors.
Can I put my blender jar in the dishwasher?
Check the manufacturer’s instructions. Most glass jars are dishwasher safe. Many plastic jars are top-rack safe.
The gasket and blade assembly should be hand washed. The high heat of a dishwasher can warp rubber seals.
Why does my blender smell bad?
The smell usually comes from the gasket or the blade assembly. Food residue trapped in these areas will rot and smell. Remove the gasket.
Clean it with dish soap and a toothbrush. Soak it in vinegar if the smell persists.
How do I get rid of turmeric stains?
Make a paste with baking soda and water. Apply it to the stained area. Let it sit for 10 minutes.
Scrub gently with a soft sponge. Rinse thoroughly. The stain will lift without scratching the plastic.
When should I replace the blade assembly?
Replace the blade assembly if the blades are dull, chipped, or rusted. A dull blade will struggle to blend and strain the motor. Many manufacturers recommend replacing the assembly every 2 to 3 years with regular use.
The Bottom Line: Your Maintenance Decision Guide
Here is the simple decision tree for blender care.
If you blend daily: Rinse immediately after use. Run a soapy water cycle. Remove and dry the gasket.
Deep clean weekly.
If you blend weekly: Deep clean after each use. Disassemble and dry all parts. Check for hard water buildup monthly.
If you notice a leak: Inspect the gasket. Replace it if cracked or worn. Check the blade assembly for tightness.
Our guide on how to fix loose blender blade will help.
If the motor struggles: Check for overloading. Clean the blade assembly. Check for hard water scale.
If the motor still struggles after 5 years, consider a new blender.
If the jar is cracked: Replace it immediately. A cracked jar can shatter under pressure. This is a safety risk.
The bottom line is simple. Clean after every use. Dry the gasket.
Replace worn parts. Your blender will last years longer than one that gets neglected.