Skip to content
If you’re facing a clogged sink, planning a kitchen remodel, or simply looking to upgrade your plumbing skills, learning how to pipe a kitchen sink drain can save time, money, and stress. Many people find the task intimidating, but with the right guidance, even beginners can do it successfully.
This guide explains each step in clear, simple language, and covers everything from choosing the right materials to avoiding common mistakes. Whether you’re replacing an old drain or installing a new one, you’ll find practical advice and insights that help you get the job done right.
Understanding Kitchen Sink Drain Basics
Before you start, it’s important to know the basic parts and how they fit together. A typical kitchen sink drain system includes:
- Sink strainer: The metal basket that sits in the sink hole.
- Tailpiece: The straight pipe that connects to the strainer.
- P-trap: The U-shaped pipe that prevents sewer gases from entering your kitchen.
- Trap arm: The horizontal pipe that connects the P-trap to the wall drain.
- Wall drain: The pipe inside the wall that carries waste water away.
Each part must be connected tightly to avoid leaks. Many drains use PVC pipes, which are lightweight and easy to cut. Older homes may have metal pipes, but PVC is now the standard for most kitchen sinks.
Choosing The Right Materials
The success of your drain depends on using the right materials. Here’s a comparison of common pipe types used in kitchen sinks:
| Pipe Type | Durability | Ease of Installation | Cost |
|---|---|---|---|
| PVC | High | Easy | Low |
| ABS | High | Moderate | Moderate |
| Metal (Chrome/Brass) | Medium | Challenging | High |
Most homeowners choose PVC because it’s affordable, resistant to corrosion, and simple to assemble. You’ll also need pipe fittings (such as elbows and couplings), plumber’s putty, washers, and slip nuts. Always buy extra washers and nuts, as these are common sources of leaks.
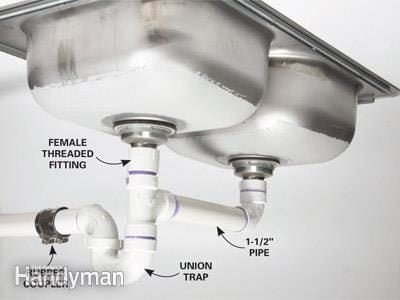
Credit: www.familyhandyman.com
Tools And Supplies You Need
To pipe a kitchen sink drain, gather these basic tools and supplies:
- Adjustable wrench
- Pipe cutter or hacksaw
- Plumber’s putty
- Pipe tape (Teflon)
- Bucket and rags
- PVC glue (if required)
- Measuring tape
Many beginners overlook the importance of having a bucket ready. When disconnecting old pipes, water often spills out. Keeping rags nearby helps you quickly clean any mess and avoid slippery floors.
Step-by-step Guide To Piping A Kitchen Sink Drain
Let’s break down the process into clear steps. Even if you’re new to plumbing, following these steps will help you install a drain that works reliably.
1. Remove The Old Drain (if Applicable)
If you’re replacing an old drain, start by removing it:
- Place a bucket under the sink to catch water.
- Loosen the slip nuts on the old pipes using your wrench.
- Remove the P-trap and tailpiece.
- Clean the area around the sink hole.
Sometimes, old pipes are stuck due to rust or mineral buildup. Applying a little WD-40 and waiting a few minutes can help loosen them.
2. Install The Sink Strainer
The strainer forms the top part of your drain. Here’s how to install it:
- Roll a thin rope of plumber’s putty and place it around the underside of the strainer flange.
- Insert the strainer into the sink hole.
- From underneath, secure the strainer with the provided washer and locknut.
- Tighten the locknut until the strainer is firm. Wipe away excess putty.
Non-obvious insight: Many people overtighten the locknut, which can crack the sink or deform the strainer. Tighten until snug, not overly tight.
3. Attach The Tailpiece
The tailpiece connects directly to the strainer:
- Slide a slip nut and washer onto the tailpiece.
- Insert the tailpiece into the strainer’s bottom opening.
- Tighten the slip nut by hand, then use the wrench for a final snug fit.
Measure the length of the tailpiece. If it’s too long, use a hacksaw to cut it. PVC pipes are easy to cut, but always sand the edges after cutting to remove burrs.
4. Assemble The P-trap
The P-trap is essential for blocking sewer gases:
- Connect the curved P-trap to the tailpiece using a slip nut and washer.
- Attach the trap arm to the other end of the P-trap.
- Align the trap arm with the wall drain opening.
The P-trap should always sit below the sink’s drain and align horizontally with the wall pipe. If the trap arm is too long, trim it. If it’s too short, add a coupling and extra pipe.
5. Connect To The Wall Drain
To finish, connect the trap arm to the wall drain:
- Slide a slip nut and washer onto the trap arm.
- Insert the trap arm into the wall drain fitting.
- Tighten the slip nut.
If your wall drain is metal, use a rubber gasket for a tight seal. Double-check all connections to make sure they’re snug.
6. Test For Leaks
Testing is crucial. Here’s how:
- Run water in the sink for several minutes.
- Check every joint for drips.
- Tighten any leaking connections.
- Dry everything with a rag.
If you see a persistent leak, disassemble the affected joint and check the washer. Washers often twist during installation, so straighten or replace them.
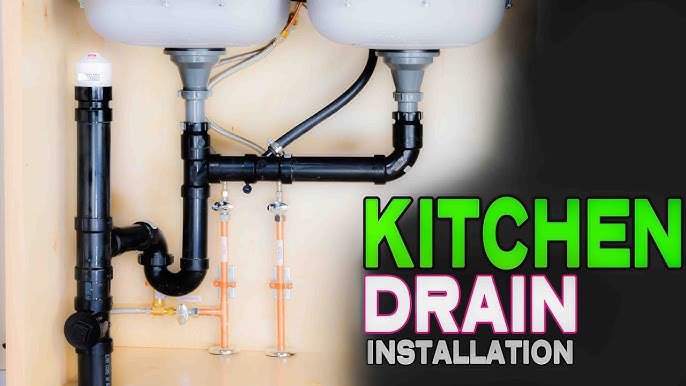
Credit: www.youtube.com
Common Mistakes And How To Avoid Them
Even experienced DIYers can make errors. Here are some frequent mistakes and tips to avoid them:
- Wrong pipe size: Kitchen sink drains usually use 1 1/2-inch pipes. Using a smaller or larger pipe can cause slow drainage or leaks.
- Skipping plumber’s putty: Without putty under the strainer, water can seep around the sink hole.
- Loose slip nuts: These must be hand-tight, then snugged with a wrench. Too loose means leaks, too tight means cracks.
- Improper trap alignment: The P-trap must be horizontal, not angled. Angled traps lose their water seal and allow odors.
- Mixing pipe materials: Connecting metal to PVC requires special adapters. Without them, leaks and corrosion occur.
| Mistake | Impact | How to Fix |
|---|---|---|
| Wrong pipe size | Leak or slow drain | Use 1 1/2-inch pipes and fittings |
| Loose nuts | Water leaks | Tighten by hand, then wrench |
| Improper trap alignment | Sewer odors | Keep trap arm horizontal |
Non-obvious insight: Many people forget to check local plumbing codes. Some regions require air admittance valves or vent pipes to prevent siphoning. Always check with your city or county before starting work.
Practical Tips For A Reliable Drain Installation
Here are a few practical tips that can make your installation easier and longer-lasting:
- Dry fit everything first: Assemble pipes without tightening to check alignment. This helps you see if cuts or extra fittings are needed.
- Mark pipe cuts carefully: Use a marker for straight, accurate cuts. Uneven cuts lead to poor seals.
- Use pipe tape on threaded joints: For metal connections, wrap Teflon tape around threads to prevent leaks.
- Keep spare washers and nuts: These are inexpensive and can solve most leak problems.
- Clean all surfaces before assembly: Dirt and debris can prevent proper seals.
If you have a double sink, you’ll need a T-fitting to connect both basins to the same P-trap. Double sinks are slightly more complex, but the principles are the same: keep pipes aligned and joints snug.
:max_bytes(150000):strip_icc()/how-to-install-a-sink-drain-2718789_hero_5078-64538f6f90d545c7af0728e4bf8f894e.jpg)
Credit: www.thespruce.com
When To Call A Professional
While most kitchen sink drains are simple enough for DIY installation, there are times when it’s best to call a plumber:
- Multiple leaks after repeated fixes
- Drain line is clogged and can’t be cleared
- Damage to wall or floor pipes
- Local codes require special venting
A licensed plumber will have the experience and tools to solve complex problems. If you’re unsure or uncomfortable with any part of the process, asking for professional help is a smart move.
Comparing Diy Vs. Professional Installation
Many homeowners wonder whether to install their own kitchen sink drain or hire a professional. Here’s a quick comparison:
| Factor | DIY | Professional |
|---|---|---|
| Cost | $20–$50 (materials only) | $150–$300 (labor + materials) |
| Time | 1–2 hours | 30–60 minutes |
| Skill Required | Basic | Advanced |
| Guarantee | No | Yes |
If you’re comfortable with tools and can follow instructions, DIY is usually safe and cost-effective. For complicated setups or repeated problems, a professional is often best.
Frequently Asked Questions
How Long Does It Take To Pipe A Kitchen Sink Drain?
For most DIYers, the process takes 1–2 hours. If you’re new to plumbing, allow extra time for measuring and fitting pipes. Professionals can finish in less than an hour.
What Size Pipe Should I Use For A Kitchen Sink Drain?
The standard size is 1 1/2 inches in diameter. This fits most kitchen sinks and prevents slow drainage or clogs. Double-check your sink’s specifications before buying pipes.
Can I Use Pvc Pipes For All Parts Of The Drain?
Yes, PVC pipes are suitable for most kitchen sink drain setups. They’re easy to cut and assemble, and resist corrosion. However, you may need special adapters if your wall drain is metal.
Why Does My Drain Smell Bad After Installation?
Bad smells are often caused by an improperly installed P-trap. The trap must stay filled with water to block sewer gases. Make sure the trap arm is horizontal and the joints are tight.
Do I Need To Follow Local Plumbing Codes?
Absolutely. Local codes may require venting or special fittings. Check your city or county regulations before starting. For more details, visit National Plumbing Codes.
Piping a kitchen sink drain is a skill you can learn with patience and the right tools. With careful planning and attention to detail, you’ll have a reliable drain that works smoothly for years. Remember to check for leaks, follow safety tips, and don’t hesitate to call a professional for difficult jobs.
Your kitchen—and your peace of mind—will thank you.