Many bakers find proofing bread dough a bit tricky, especially when the weather is cold or humid. Getting the temperature just right can make all the difference between a fluffy loaf and a dense brick. It’s no wonder that figuring out how to proof bread dough in an air fryer with dehydrate setting is a popular question for home bakers.
But don’t worry, it’s actually quite simple once you know the steps. We’ll walk you through everything you need to know to get perfect proofing every time.
Key Takeaways
- You can successfully proof bread dough in an air fryer using its dehydrate setting.
- The dehydrate setting provides a consistent, warm environment ideal for yeast activity.
- Proper temperature control is key to avoiding over-proofing or under-proofing.
- Using a thermometer is recommended to ensure the correct temperature.
- This method offers a reliable alternative to traditional proofing methods, especially in challenging climates.
- The air fryer method is straightforward and requires minimal special equipment.
Proofing Bread Dough in Your Air Fryer
Why Use an Air Fryer for Proofing
Using your air fryer for proofing bread dough might sound a little unusual at first, but it makes a lot of sense. Air fryers are excellent at maintaining a steady, gentle heat. This controlled warmth is exactly what bread dough needs to rise beautifully.
Yeast, the magic ingredient in bread, thrives in a warm, humid environment. Traditional proofing spots like a sunny windowsill or a slightly warmed oven can be inconsistent. The air fryer’s dehydrate setting is specifically designed to create this kind of controlled, low-heat environment without cooking your dough.
This makes it a fantastic tool for bakers looking for a reliable way to achieve that perfect rise, especially when the ambient temperature in your kitchen isn’t cooperating.
The Science Behind Yeast Activation
Yeast are tiny living organisms. When you mix them with flour, water, and sugar, they begin to eat the sugars. As they eat, they release gases, mostly carbon dioxide.
This gas gets trapped by the gluten in the dough, causing it to expand and rise. For this process to work best, yeast needs a specific temperature range. Too cold, and they become sluggish, leading to a slow or non-existent rise.
Too hot, and the yeast can die, resulting in a dense loaf. The ideal temperature for yeast activity is generally between 75°F and 85°F (24°C to 29°C). Slightly warmer temperatures, up to around 95°F (35°C), can speed up the process, but you risk over-proofing if it gets much hotter.
Comparing Air Fryer Proofing to Other Methods
Proofing bread dough is a critical step that can be influenced by many factors. Traditional methods include leaving the dough in a warm spot on the counter, placing it in a turned-off oven with the light on, or using a dedicated proofing box. Each has its pros and cons.
A warm counter can be unpredictable depending on the room temperature. An oven with the light on might provide enough warmth, but it can also fluctuate. A proofing box offers excellent control but is an extra piece of equipment to buy and store.
The air fryer’s dehydrate setting offers a controlled temperature that’s often more consistent than these common methods. It’s a readily available appliance that many people already own.
- Consistency is key for yeast. Your air fryer’s dehydrate mode offers this.
- This method avoids the drastic temperature changes found in some other proofing spots.
- It’s a practical solution for kitchens that are consistently too cold for proofing.
- You can often achieve a faster and more reliable rise compared to leaving dough out.
Setting Up Your Air Fryer for Proofing
Choosing the Right Temperature
The most crucial step when using your air fryer for proofing is selecting the correct temperature. Most air fryers with a dehydrate setting will allow you to adjust the temperature. For proofing bread dough, you want to aim for a range of 80°F to 90°F (27°C to 32°C).
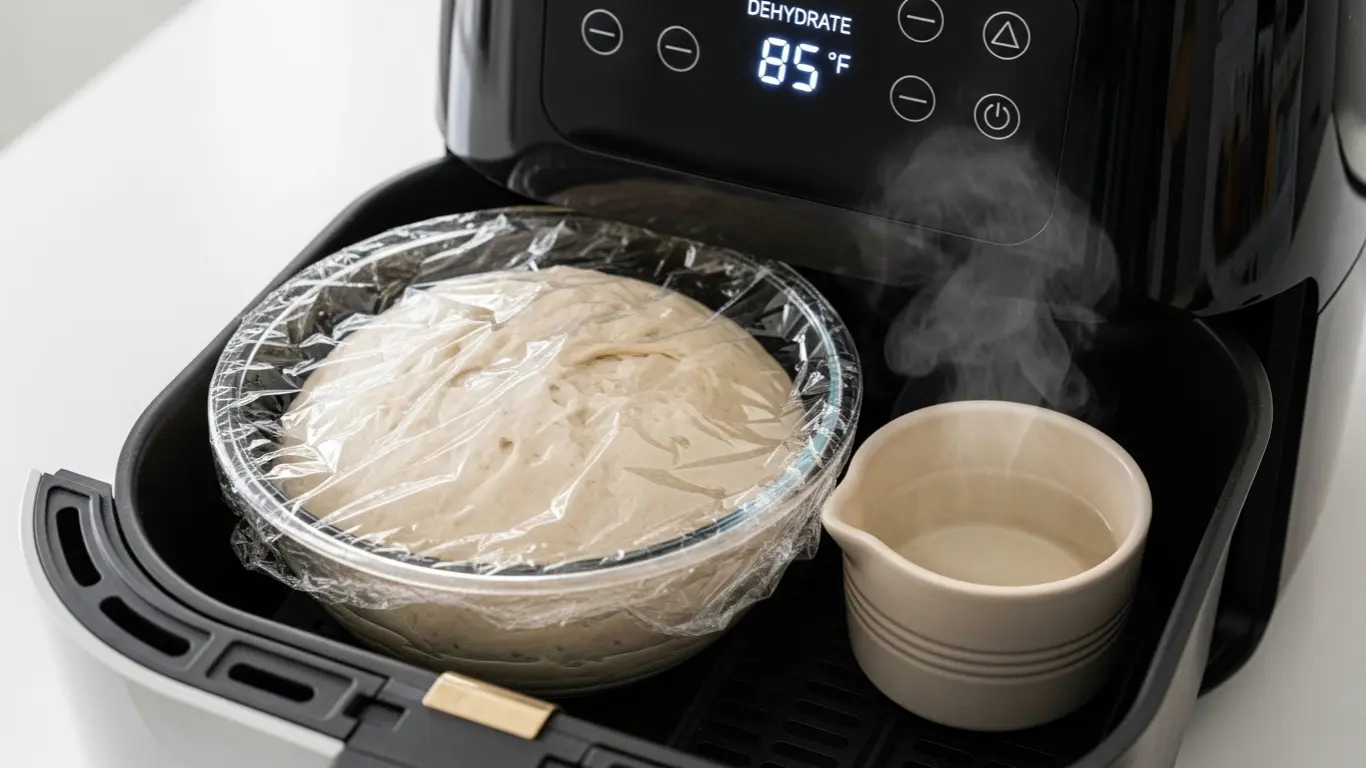
This temperature range is warm enough to encourage active yeast growth without cooking the dough. If your air fryer’s lowest dehydrate setting is higher than this, you might need to experiment. Some people have success by placing a small pan of hot water inside the air fryer along with the dough, and then running the dehydrate setting at its lowest available temperature.
This helps to create a humid environment while the water slowly cools, preventing the air fryer from getting too hot.
Creating the Ideal Environment
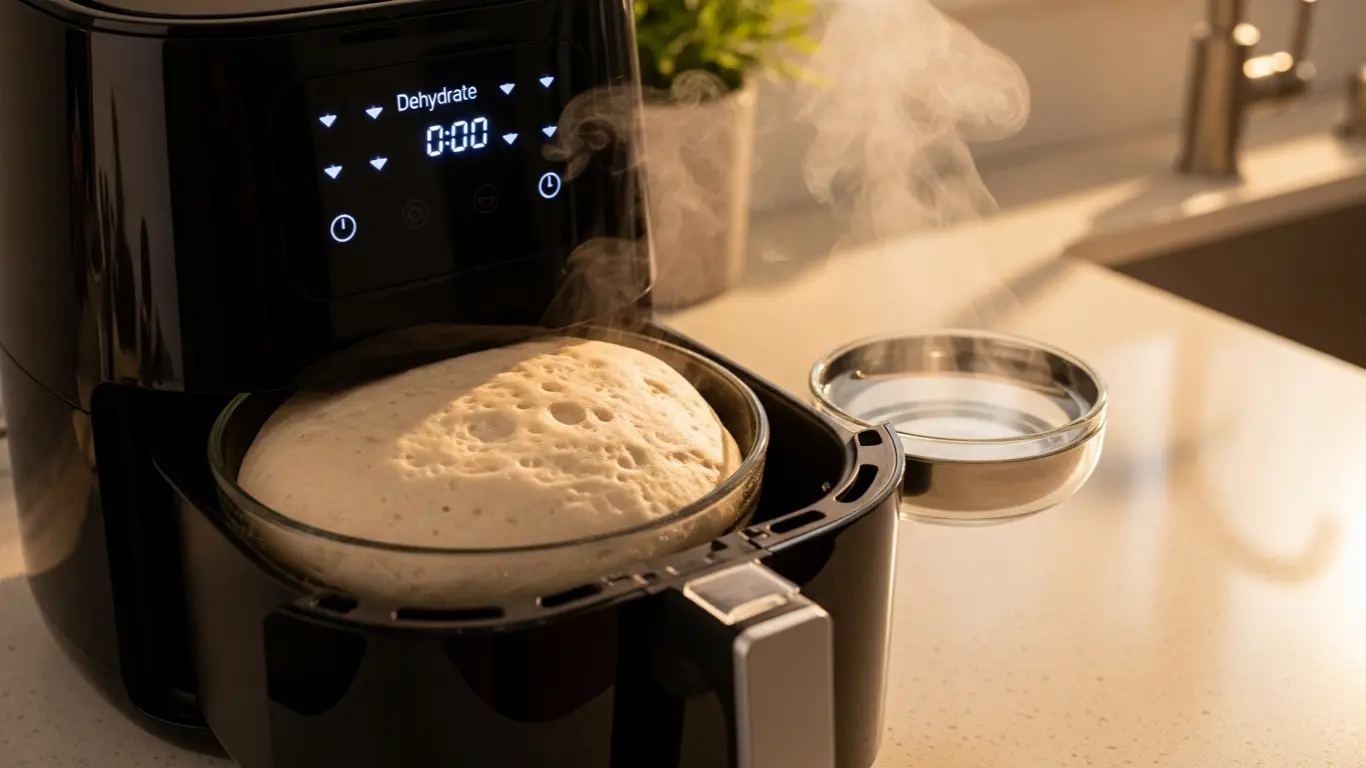
Once you’ve set your air fryer to the correct temperature, you need to ensure the environment inside is also suitable for proofing. Bread dough needs a little humidity to prevent the surface from drying out and forming a tough skin. This is where the air fryer’s enclosed nature really helps.
You can enhance the humidity further by placing a shallow, oven-safe dish filled with hot water on the bottom rack of the air fryer before you start the dehydrate cycle. This water will evaporate, creating a steamy environment that keeps your dough moist and supple. Make sure the water is hot but not boiling when you place it in.
The circulating warm air from the dehydrate setting will then gently warm the dough, encouraging it to rise evenly.
Preparing Your Dough and Air Fryer Basket
Before placing your dough in the air fryer, ensure it’s in a suitable bowl or proofing basket. The bowl should be large enough for the dough to double or even triple in size. Lightly oiling the inside of the bowl or dusting it with flour will prevent the dough from sticking.
If you are placing the dough directly into the air fryer basket, make sure the basket is clean and dry. Some people prefer to line the basket with parchment paper to make cleanup easier and to prevent sticking. However, ensure the parchment paper doesn’t cover the air holes, as this can impede air circulation.
Gently cover the bowl or basket with plastic wrap or a damp kitchen towel to keep the dough from drying out. This simple step is vital for achieving a soft crust.
- Aim for 80°F to 90°F (27°C to 32°C) for your dehydrate setting.
- Use a pan of hot water to add humidity and stabilize temperature.
- Cover your dough to keep its surface moist during proofing.
- Lightly grease or flour your bowl to prevent sticking.
Step-by-Step Guide: How to Proof Bread Dough in an Air Fryer with Dehydrate Setting
Now that you understand the principles, let’s get to the practical steps of how to proof bread dough in an air fryer with dehydrate setting. This process is designed to be simple and effective, giving you consistent results every time you bake. Follow these instructions carefully for the best outcome.
Step 1 Prepare Your Dough
Mix your bread dough according to your favorite recipe. Once you have a well-kneaded and smooth ball of dough, place it in a lightly oiled bowl. Make sure the bowl is large enough to accommodate the dough as it rises, typically doubling or tripling in size.
Cover the bowl tightly with plastic wrap or a damp tea towel. This prevents the dough from drying out while it proofs.
Step 2 Preheat the Air Fryer
Set your air fryer to its dehydrate function. If your model allows temperature adjustment, set it to approximately 85°F (29°C). If it doesn’t have temperature control, you may need to experiment.
For many models, the lowest setting is sufficient. If you have a way to monitor the temperature, great. If not, trust that the dehydrate setting is designed for low, consistent heat.
If your air fryer runs hotter than ideal, a good trick is to place a small oven-safe dish filled with hot (not boiling) water on the bottom rack. This adds humidity and helps regulate the temperature by absorbing excess heat.
Step 3 Place Dough in Air Fryer
Gently place the covered bowl of dough into the preheated air fryer basket or on the rack. Ensure there is space around the bowl for air circulation. If you are proofing directly in the basket, make sure it is lightly oiled or lined with parchment paper.
Again, cover the dough if it’s not already in a covered bowl.
Step 4 Proof the Dough
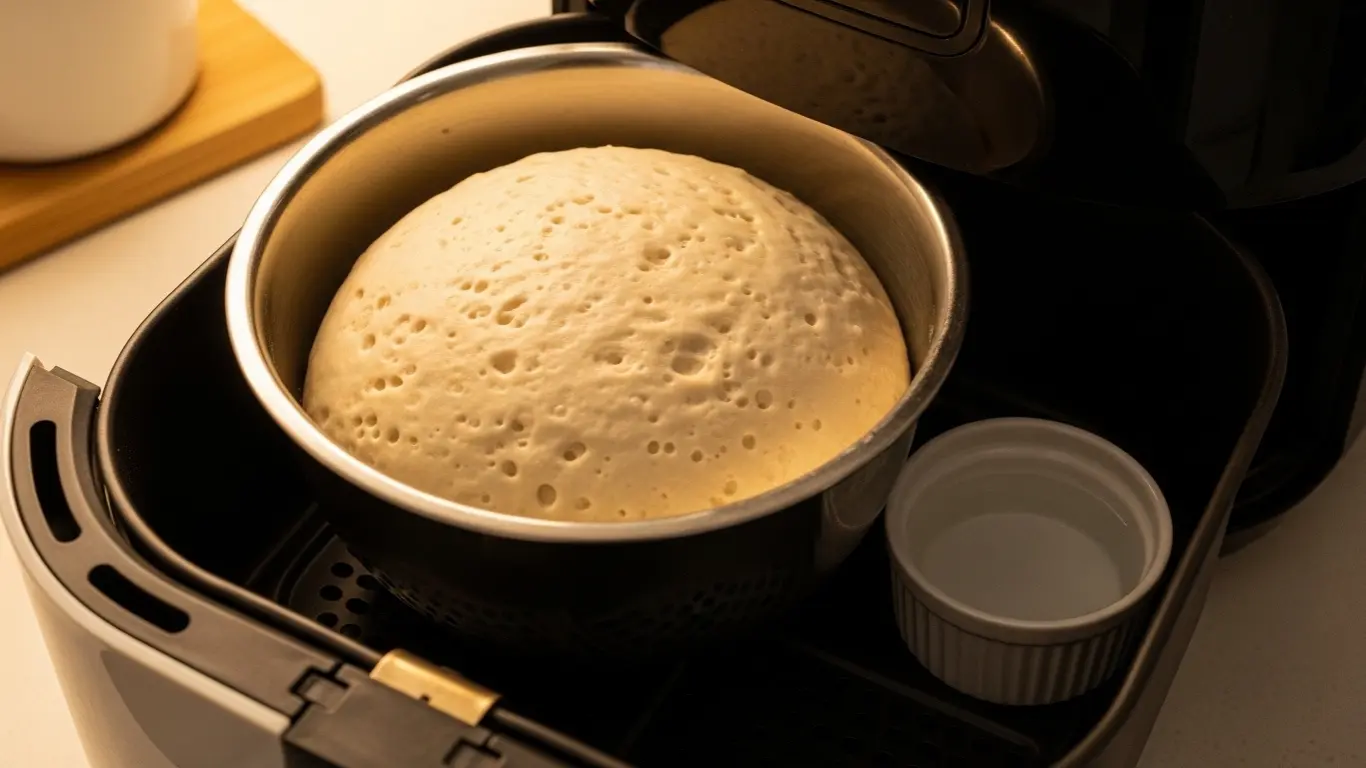
Let the dough proof for the time specified in your recipe, or until it has doubled in size. This usually takes anywhere from 30 minutes to 1.5 hours, depending on your yeast and dough. Check the dough periodically.
You can tell it’s ready when it looks visibly larger and feels light and airy. Gently poke it with a floured finger; if the indentation springs back slowly, it’s ready. If it springs back immediately, it needs more time.
If it stays indented, it might be over-proofed.
Checking for Doneness
To check if your dough is perfectly proofed, gently press a floured finger into the side of the dough. If the indentation springs back slowly and only partially, the dough is ready to bake. If the indentation disappears immediately, it needs more time.
If the indentation remains and the dough deflates, it has been over-proofed. Over-proofed dough can result in a dense, collapsed loaf.
Step 5 Remove and Bake
Once your dough has reached the desired size, carefully remove the bowl from the air fryer. It’s now ready for the next stage of your recipe, which is usually shaping and baking. Do not leave the dough in the air fryer while it bakes, as this is not its intended function and could damage the appliance or cook the dough unevenly.
Remember that air fryers vary. You might need to adjust the temperature or time slightly based on your specific model. The goal is gentle warmth and humidity, not cooking.
This method makes how to proof bread dough in an air fryer with dehydrate setting accessible and reliable for everyone.
- Prepare your dough and place it in a lightly oiled, appropriately sized bowl.
- Cover the bowl securely to retain moisture.
- Preheat your air fryer to about 85°F (29°C) using the dehydrate setting.
- Add a small dish of hot water to the air fryer for humidity, if desired.
- Place the covered dough bowl into the air fryer basket or onto the rack.
- Allow the dough to proof until doubled in size, checking periodically.
- Carefully remove the dough and proceed with baking as per your recipe.
Troubleshooting Common Proofing Issues
Dough Not Rising Enough
If your dough isn’t rising as much as expected, there are a few common culprits. The most frequent reason is yeast that isn’t active enough. This could be due to expired yeast, water that was too hot or too cold when activating it, or insufficient proofing time.
Another possibility is that your air fryer’s dehydrate setting is too low, even with the water pan. You might also need to extend the proofing time. If you’re using a recipe that calls for a specific kneading time, ensure you’ve met that requirement, as proper gluten development is essential for trapping the gases produced by the yeast.
A low rise can also happen if the dough is too cold. While the dehydrate setting is meant to provide warmth, if the initial dough temperature was very low, it might take longer to reach optimal rising conditions. Try pre-warming your bowl slightly before adding the dough, or ensure the room temperature around the air fryer is not extremely cold.
Sometimes, the flour itself can be a factor; older flour might have reduced leavening power.
Dough Over-Proofing Too Quickly
Conversely, if your dough is proofing too fast and seems to be collapsing, it might be getting too warm or proofing for too long. Even on the dehydrate setting, if your air fryer is very efficient, it can heat up quickly. If your dough is over-proofing, try lowering the temperature slightly on your dehydrate setting or reducing the time the dough spends proofing.
You can also try using cooler water when initially mixing your dough. Over-proofed dough has expanded too much, causing the gluten structure to break down. This leads to a dense, gummy texture in the final baked product.
Another sign of over-proofing is when the dough starts to smell strongly of alcohol. This indicates the yeast has consumed most of the available sugars and is starting to break down the dough itself. If you notice this, remove the dough from the air fryer immediately and proceed to shaping and baking.
It’s always better to under-proof slightly than to over-proof, as dough can often continue to rise in the oven. A dough that has collapsed in the bowl is a clear indicator that it’s over-proofed.
Surface Drying or Cracking
A common issue during proofing is the surface of the dough drying out and forming a tough skin. This prevents the dough from expanding evenly. If you’re experiencing this, it likely means your covering isn’t tight enough, or the air circulation within the air fryer is too strong.
Make sure your plastic wrap or damp tea towel is creating a good seal over the bowl. If you’re using a bowl without a lid, ensure it’s completely covered. Using the pan of hot water inside the air fryer can significantly help maintain humidity and prevent the surface from drying out.
This creates a moist environment conducive to a soft, pliable dough.
If the cracking is extensive, it suggests the dough has dried out quite a bit. In such cases, you can try gently reshaping the dough if it’s not too fragile, or proceed with baking and accept a slightly less airy loaf. For future bakes, focus on ensuring a consistently moist environment.
Some bakers also lightly mist the surface of the dough with water before covering it to give it an extra moisture boost. The goal is to keep the surface flexible so it can stretch as the dough rises.
Using a Thermometer for Accuracy
For the most precise proofing, using an instant-read thermometer is highly recommended. You can place the thermometer inside the air fryer to monitor the air temperature. You can also carefully insert it into the dough itself to check its internal temperature.
This will help you fine-tune the dehydrate setting and water amount to achieve the perfect 80°F to 90°F (27°C to 32°C) range consistently. Consistent temperature monitoring takes the guesswork out of proofing, ensuring your yeast is always happy and active. This is especially useful when you’re first learning how to proof bread dough in an air fryer with dehydrate setting.
- If dough is slow to rise, check yeast activity and ensure adequate warmth.
- For fast rising and collapse, reduce temperature or proofing time.
- Prevent surface drying with a tight cover and added humidity from hot water.
- Use an instant-read thermometer for precise temperature control.
- Always check your recipe for specific proofing times and adjust as needed.
Optimizing Your Air Fryer Proofing Experience
Humidity Control Explained
Humidity is just as important as temperature for successful dough proofing. A dry environment will cause the surface of your dough to form a crust, restricting its ability to expand. In an air fryer, the circulating air can be drying.
To combat this, place a shallow, oven-safe dish filled with hot water on the bottom rack of your air fryer. As the dehydrate setting runs, the water evaporates, creating steam that keeps the dough moist and supple. This is a simple yet highly effective way to improve your proofing results.
Aim for a noticeable mist in the air when you open the air fryer briefly to check on your dough.
Some bakers even lightly mist the top of the dough with water before covering it, especially if they are concerned about dryness. The combination of a covered bowl and the steam from the water pan usually provides ample humidity. If you find your air fryer still feels too dry, you might consider placing a slightly larger pan of water, or even two small ones.
The goal is to maintain a humid, warm microclimate within the air fryer, mimicking a professional proofing box as closely as possible.
Dough Hydration and Proofing Time
The hydration level of your dough (the ratio of water to flour) can significantly impact proofing time. Doughs with higher hydration (wetter doughs) often proof faster because the yeast has more liquid to work with and the gluten structure can be more relaxed. Conversely, doughs with lower hydration (drier doughs) might take longer to rise.
When using your air fryer, it’s important to pay attention to how your dough behaves relative to your recipe’s expected proofing time. Don’t be afraid to let it proof longer if it needs to, especially if you’re using a colder starting temperature or a less active yeast.
If you’re experimenting with new recipes or trying to perfect how to proof bread dough in an air fryer with dehydrate setting, keep a notebook. Jot down the dough’s hydration percentage, the ambient temperature, the air fryer temperature you used, and the actual proofing time. Over time, you’ll develop a feel for how different doughs perform in your specific air fryer and kitchen environment.
This data will help you become a more consistent baker.
Preheating vs. Cold Start
Most recipes assume a dough that starts at room temperature. However, you can also start proofing dough directly from the refrigerator, especially if you’ve made a large batch or want to slow down fermentation. A cold start will, of course, require a longer proofing time.
If you’re proofing cold dough in the air fryer, set the dehydrate function to its lowest possible temperature and allow extra time. You might still benefit from the water pan to gently warm and humidify the environment without shocking the cold dough. For recipes that call for a relatively quick proof, a preheated air fryer is generally the way to go.
If you decide to preheat your air fryer, aim for that 80°F to 90°F (27°C to 32°C) range. If you are proofing a dough that has already had a primary fermentation and you’re doing a second proof, the time might be shorter. The key is to observe the dough itself rather than relying solely on the clock.
A well-risen dough is the ultimate indicator of successful proofing, regardless of the method used.
- Use a pan of hot water to create a humid environment.
- Higher hydration doughs may proof faster; adjust time accordingly.
- Cold dough requires longer proofing times, even in a warm environment.
- Observe the dough’s appearance for readiness, not just the clock.
- Keep notes on your proofing conditions for better consistency.
Examples and Scenarios
Scenario 1 A Chilly Morning Bake
Sarah wanted to bake croissants on a cool Saturday morning. Her kitchen felt quite chilly, making her usual counter-proofing unreliable. She mixed her dough, let it rest for its initial bulk fermentation, and then shaped it into individual croissants.
Instead of leaving them on a cool baking sheet, she placed them in a proofing basket on a rack inside her air fryer. She set the dehydrate function to 85°F (29°C) and placed a small dish of hot water at the bottom. Within an hour, her croissants had puffed up beautifully, ready for baking into flaky, golden pastries.
The air fryer provided the consistent warmth her kitchen lacked.
Scenario 2 Sourdough Starter Revival
Mark’s sourdough starter had become a bit sluggish after a few days of neglect. He wanted to get it active again for some bread baking. He fed his starter and placed the jar on a small plate inside his air fryer.
He set the dehydrate function to 80°F (27°C) and added a small amount of hot water to the bottom of the air fryer. Within a few hours, his starter was showing vigorous activity, doubling in size and creating lots of bubbles. The controlled warmth helped revive the yeast and bacteria colony quickly and reliably, preparing it for baking.
Sample Kitchen Setup
For optimal results, consider this setup:
- Air Fryer Model: Any air fryer with a dehydrate setting that can be controlled or estimated for temperature.
- Proofing Vessel: An appropriately sized bowl or a woven proofing basket (banneton).
- Moisture Element: An oven-safe ramekin or small baking dish filled with hot water.
- Thermometer (Optional but Recommended): An instant-read thermometer to verify the air fryer’s internal temperature.
This simple setup allows you to create a controlled environment perfect for coaxing your dough to rise beautifully. It’s a cost-effective alternative to a dedicated proofing box, using appliances you likely already own.
Frequently Asked Questions
Question: Can I use my air fryer for the second proof of bread dough
Answer: Yes, absolutely. The second proof is just as sensitive to temperature and humidity as the first, so the air fryer with its dehydrate setting is perfect for it.
Question: What is the ideal temperature for proofing bread dough
Answer: The ideal temperature range for proofing bread dough is generally between 75°F and 85°F (24°C to 29°C). Slightly warmer, up to 90°F (32°C), can speed things up, but be careful not to go much higher.
Question: How long does it take to proof dough in an air fryer
Answer: Proofing time varies greatly depending on your recipe, yeast, and dough temperature. It typically takes between 30 minutes and 1.5 hours, but always check the dough for doubling in size rather than relying solely on the clock.
Question: What if my air fryer doesn’t have a dehydrate setting
Answer: If your air fryer lacks a dehydrate setting, you may be able to use a “warm” or very low bake setting, carefully monitoring the temperature to ensure it doesn’t get too hot. Alternatively, you could try proofing in a conventional oven with just the oven light on.
Question: Do I need to cover the dough when proofing in the air fryer
Answer: Yes, it’s essential to cover your dough, whether it’s in a bowl or basket, with plastic wrap or a damp cloth. This prevents the surface from drying out and forming a crust.
Wrap Up
Learning how to proof bread dough in an air fryer with dehydrate setting offers a reliable way to achieve perfect bread rises. This method uses consistent, gentle warmth and humidity to encourage yeast activity. By controlling the temperature and moisture, you can overcome challenging kitchen conditions.
Your air fryer becomes a valuable tool for better bread baking.

Hi, I’m Raju Dey — a food lover with a degree in Culinary Arts from El Centro College. I’ve spent 4+ years testing air fryers, blenders, and other kitchen tools in real home kitchens. At KitchenWink.com, I share honest tips and reviews to help you cook smarter. My goal is to give you advice you can trust — based on hands-on experience, not hype.