Why Is My Stand Mixer Leaking Oil?
A stand mixer is a kitchen hero for baking and cooking. But when you see oil leaking from your mixer, it’s both confusing and worrying. Many people panic, thinking their machine is broken or unsafe. The truth is, oil leaks are common in many mixers—especially older or heavily used models. Understanding the cause can help you fix the problem and keep your mixer working for years.
Let’s explore why your stand mixer leaks oil, how to prevent it, and what to do if it happens. You’ll get practical advice, simple explanations, and real examples. By the end, you’ll know exactly how to handle this sticky issue.
What Causes Oil Leaks In Stand Mixers?
Stand mixers use grease inside their gearbox to keep parts moving smoothly. Over time, this grease can separate and turn into oil. Here are the main reasons oil leaks happen:
1. Age And Usage
Every mixer has a thick grease inside, which helps the gears work without friction. As the mixer gets older or is used often, the grease starts to break down. When this happens, the grease separates into solid and liquid parts. The liquid part is oil. If your mixer is more than 2-3 years old or used weekly, oil leaks are more likely.
2. Storage Conditions
Storing your mixer in a warm place or letting it sit unused for months can also cause the grease to separate. Heat and long periods without use both speed up this process. If your kitchen gets hot in summer or you haven’t used your mixer in a while, check for oil leaks.
3. Overfilling Or Overuse
Mixing heavy doughs or running your mixer for long periods can stress the internal parts. This heat and pressure can push separated oil out of the gearbox. If you use your mixer for big batches or thick doughs, it’s more likely to leak oil.
4. Seal Failure
There are rubber or silicone seals inside the mixer to keep grease and oil in place. If these seals wear out, oil can escape. Cheap mixers or old models often have weaker seals.
5. Manufacturing Defects
Sometimes, new mixers leak oil because of mistakes during assembly. These defects are rare, but they can happen with any brand.
How To Recognize An Oil Leak
Oil leaks are usually easy to spot. Here’s what to look for:
- Sticky residue: You may see a yellow or brown sticky liquid around the attachment hub or under the head of the mixer.
- Drips and stains: Oil can drip onto the bowl, your counter, or even inside the mixer’s body.
- Greasy smell: The oil from mixer grease often has a chemical or greasy odor.
- Noise changes: If the gearbox is losing grease, you might hear new grinding or whirring sounds.
If you notice these signs, it’s likely your mixer is leaking oil.
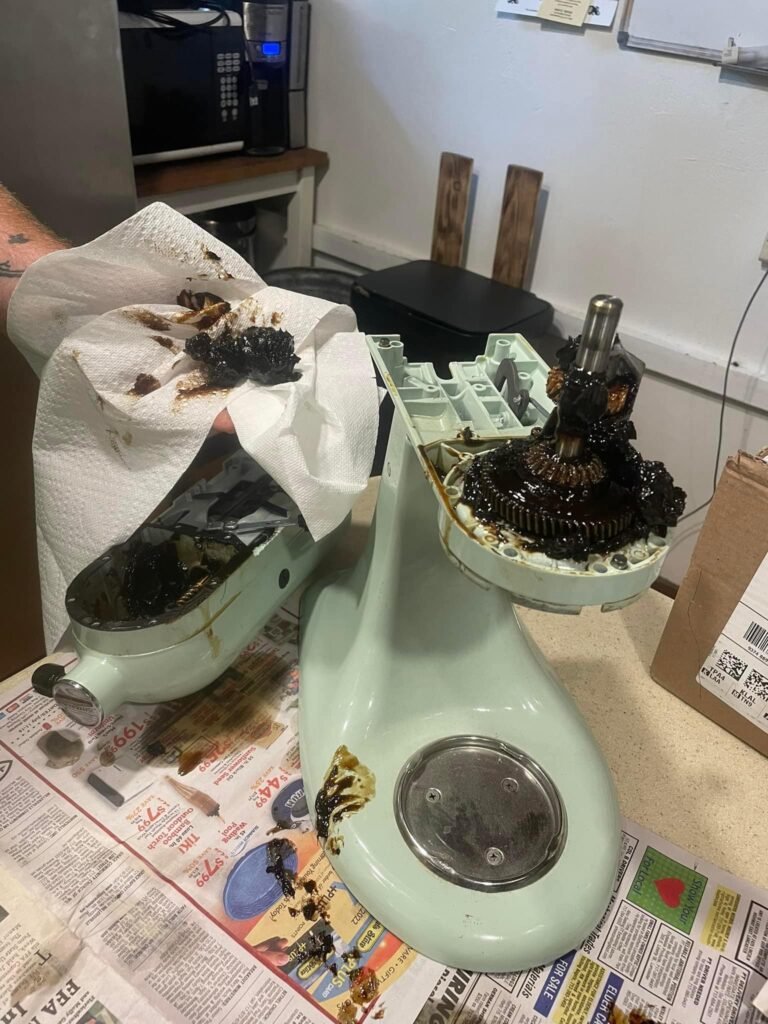
Credit: www.chapelhillforge.com
Is It Dangerous If My Mixer Leaks Oil?
Most oil leaks are not dangerous, but they can cause problems:
- Food contamination: Oil can drip into your dough or batter. This is unhealthy and can ruin recipes.
- Mixer damage: Without enough grease, the gears can wear out faster, leading to expensive repairs.
- Messy kitchen: Oil stains are tough to clean and can attract dirt.
It’s important to fix the leak quickly to avoid these issues.
Which Stand Mixers Leak Oil Most Often?
Some brands and models are more likely to leak oil. Here’s a comparison of popular stand mixers:
| Brand | Common Leak Frequency | Average Lifespan Before Leak |
|---|---|---|
| KitchenAid | Medium | 3-5 years |
| Hamilton Beach | Low | 5-7 years |
| Cuisinart | Medium | 4-6 years |
| Sunbeam | High | 2-4 years |
KitchenAid mixers are famous for reliability, but oil leaks are a common complaint. Hamilton Beach and Cuisinart mixers leak less often but still show problems after years of use. Sunbeam mixers tend to leak sooner due to weaker seals and thinner grease.
What Should You Do When Your Mixer Leaks Oil?
If your stand mixer is leaking oil, you have several options:
Step 1: Stop Using The Mixer
If you see oil dripping, stop using the mixer right away. Using it when low on grease can damage the gears.
Step 2: Clean Up
Wipe away any visible oil with a damp cloth. Clean the affected parts to avoid food contamination.
Step 3: Check The Warranty
Look at your mixer’s warranty. Many brands cover gearbox problems or oil leaks within a certain period.
Step 4: Decide On Repair Or Replacement
You can fix oil leaks yourself or get professional help. Here’s a comparison of your options:
| Repair Option | Average Cost | Skill Needed | Time Required |
|---|---|---|---|
| DIY Grease Replacement | $20-$40 | Medium | 2-3 hours |
| Professional Service | $70-$150 | None | 1-2 weeks |
| Buy New Mixer | $200-$600 | None | Instant |
DIY repairs are cheaper but require some skill. Professional service is safer but takes longer and costs more.
How To Fix Oil Leaks At Home
If you want to fix your mixer yourself, follow these steps:
1. Gather Tools And Supplies
- Replacement food-grade grease (about 4-6 oz)
- Screwdrivers (usually Phillips and flat-head)
- Clean rags and gloves
- New seals if needed
2. Remove The Mixer’s Head
Unplug the mixer. Remove the screws holding the top cover. Lift off the cover to expose the gearbox.
3. Clean Out Old Grease
Use a rag to wipe away all old grease from the gears. Make sure no oil or grease is left.
4. Apply New Grease
Add fresh, food-safe grease to all gears. Spread it evenly, but don’t overfill.
5. Replace Seals
If the seals are worn or damaged, replace them. This prevents future leaks.
6. Reassemble The Mixer
Put the cover back on and tighten all screws. Wipe away any leftover oil.
7. Test
Plug in the mixer and run it empty for a few minutes. Check for leaks.
Tip: Always use food-safe grease. Regular machine grease is unsafe for kitchen appliances.

Credit: www.youtube.com
How To Prevent Oil Leaks
Prevention is the best way to keep your mixer healthy. Here’s what you can do:
- Use your mixer regularly: Running the mixer often keeps grease from separating.
- Store in a cool place: Heat causes grease to break down. Keep your mixer in a cool, dry kitchen cabinet.
- Don’t overload: Avoid mixing huge batches or heavy doughs often. This stresses the gears and seals.
- Check seals yearly: Inspect seals each year for wear. Replace if needed.
- Clean after use: Wipe the mixer after every use to spot early leaks.
Common Mistakes When Handling Oil Leaks
Many people make mistakes trying to fix oil leaks. Here are some to avoid:
- Using regular machine grease: Only use food-safe grease. Machine grease can contaminate food.
- Ignoring small leaks: Small leaks can turn into big problems. Fix them quickly.
- Overfilling with grease: Too much grease can cause leaks. Follow the recommended amount.
- Skipping seal replacement: Bad seals are a main cause of leaks. Always check them.
Real-life Example: Kitchenaid Mixer Oil Leak
Sarah, a home baker in Texas, noticed yellow oil dripping from her KitchenAid mixer after two years. She cleaned the mixer and continued baking, but the leak got worse. She contacted KitchenAid, who offered a gearbox repair under warranty. The technician replaced the grease and seals. Sarah’s mixer now runs smoothly, and she learned to check her mixer’s seals every year.
Data: Mixer Oil Leaks By Age
Here’s a look at how often mixers leak oil based on age:
| Mixer Age | Percentage with Oil Leaks |
|---|---|
| Under 2 years | 10% |
| 2-4 years | 24% |
| 5+ years | 42% |
This data shows oil leaks become much more common after five years. Early maintenance can help avoid problems.
When Should You Replace Your Stand Mixer?
If your mixer leaks oil often or the gears sound rough, consider replacement. New mixers have better seals and improved grease formulas. If repair costs are close to the price of a new mixer, upgrading is a smart choice.
Expert Advice: Choosing A Mixer That Won’t Leak
When buying a mixer, look for these features:
- High-quality seals: Rubber or silicone seals last longer.
- Food-safe grease: Ask about the grease used. Cheaper mixers may use unsafe formulas.
- Warranty coverage: Pick brands with strong warranties on gearbox and motor.
You can find more guidance from manufacturers, such as KitchenAid’s official maintenance tips on their site.
Credit: www.youtube.com
Frequently Asked Questions
What Is The Oil Leaking From My Mixer?
The oil is separated grease from the gearbox. Over time, the grease breaks down and leaks as yellow or brown oil.
Can I Keep Using My Mixer If It Leaks Oil?
No. Using a mixer with low grease can damage the gears. Stop using it and fix the leak before baking again.
How Often Should I Replace Mixer Grease?
Most experts recommend replacing grease every 3-4 years, or sooner if you see leaks.
Is The Oil Harmful If It Gets Into Food?
Yes. Mixer oil is not food-safe and can cause health problems if eaten. Always clean up leaks and replace contaminated food.
Where Can I Find Food-grade Grease For Mixers?
You can buy food-safe grease online or at appliance stores. Look for brands recommended by your mixer manufacturer. For more details, visit the KitchenAid official support page.
A leaking stand mixer can be frustrating, but it doesn’t mean your kitchen days are over. With proper care, you can fix the leak, prevent future problems, and keep baking with confidence. Remember to check your mixer regularly, use food-safe grease, and don’t ignore small leaks.
Your mixer will last longer, and your food will stay safe.