Vacuum sealing is a popular method for preserving food, saving space, and keeping items fresh for longer. Many people wonder if they can use this technique at home with mason jars—those classic glass containers often used for canning. The answer is yes, but there are important things to know before you start.
This article will guide you through the process, explain the benefits, and highlight common mistakes. If you are new to vacuum sealing or just want to learn more about using mason jars at home, you’ll find everything you need right here.
What Is Vacuum Sealing And Why Use Mason Jars?
Vacuum sealing removes air from a container, which helps prevent spoilage, mold, and bacteria growth. Air causes foods to go stale and lose flavor. By sealing out air, your food stays fresher, sometimes for weeks or months longer.
Mason jars are made of thick glass, making them a safe choice for vacuum sealing. Unlike plastic bags, jars don’t compress, so delicate foods (like berries or crackers) keep their shape. You can also see what’s inside easily and wash the jars for reuse.
Many people vacuum seal mason jars to:
- Store dry goods (beans, rice, nuts, pasta)
- Preserve dehydrated fruits and vegetables
- Keep spices and herbs fresh
- Organize pantry items
If you care about food quality and reducing waste, vacuum sealing in mason jars is a smart solution.
Can You Vacuum Seal Mason Jars At Home?
Yes, you can vacuum seal mason jars at home, but you need the right equipment and method. Unlike plastic bags, jars require a special approach because they are rigid and have a metal lid.
Here are the main ways to vacuum seal mason jars:
- Using a vacuum sealer with a jar attachment
- Using a handheld vacuum pump
- Using alternative DIY methods
Let’s look at each in detail.
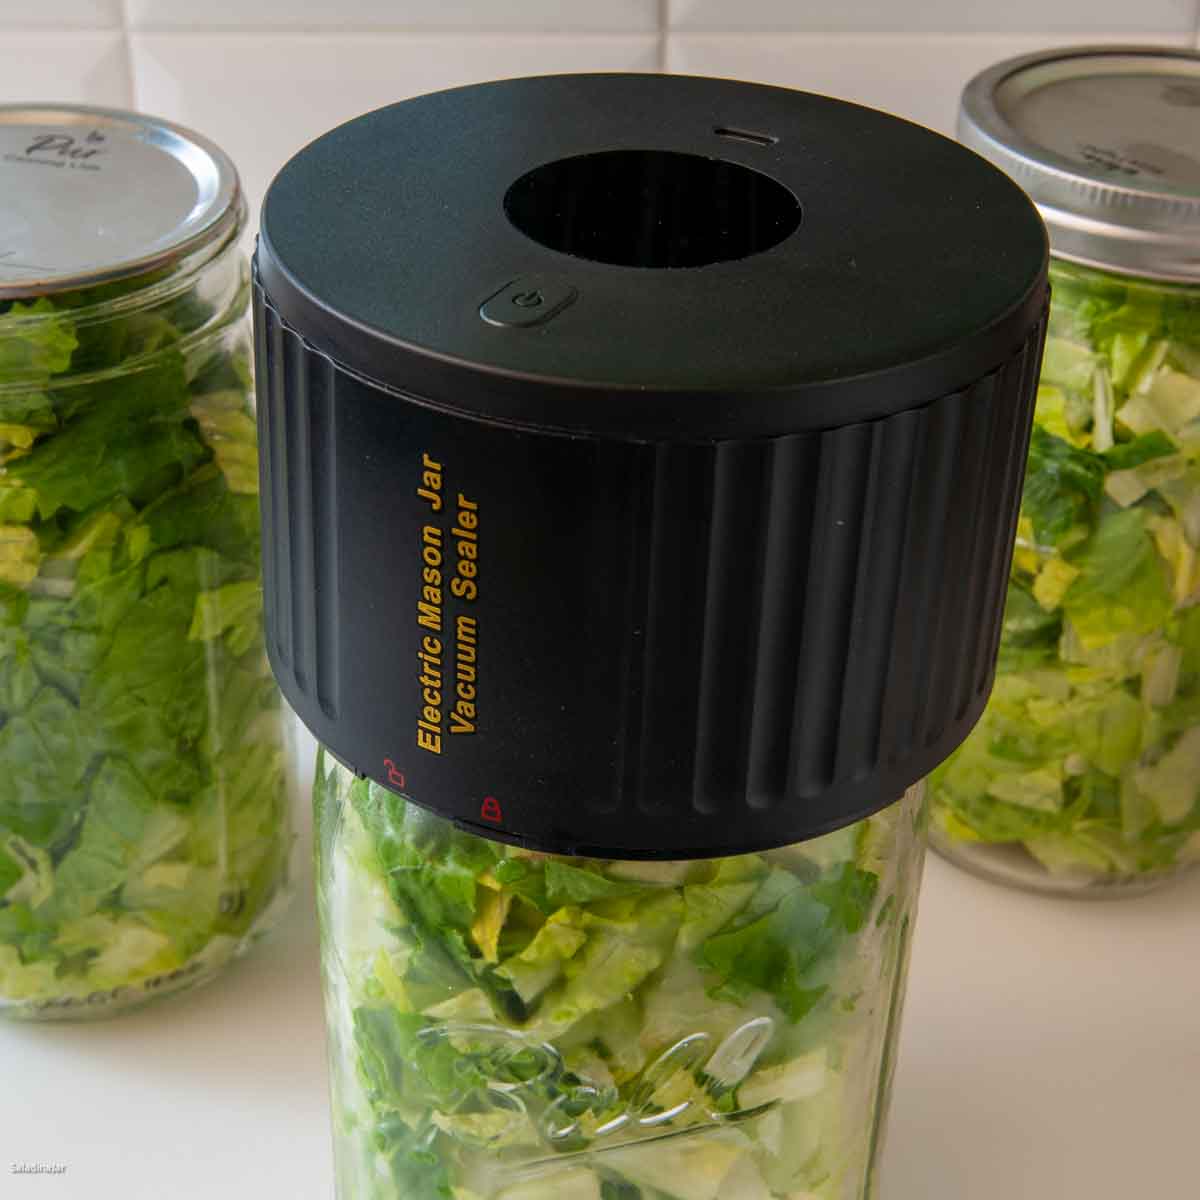
1. Vacuum Sealer With Jar Attachment
The easiest and most reliable method is with a vacuum sealer that includes a jar sealing attachment. Many popular brands, like FoodSaver, sell these accessories.
How it works:
- Place your food in a clean, dry mason jar.
- Put the flat metal lid on top (do not screw on the band).
- Attach the jar sealer over the lid.
- Connect the hose from the vacuum sealer to the jar sealer.
- Press the vacuum button. The machine will remove air and seal the jar.
This method works best for regular and wide-mouth mason jars. Some attachments are only compatible with wide-mouth jars, so check before buying.
2. Handheld Vacuum Pump
If you don’t have a full vacuum sealer, you can use a handheld vacuum pump. These are small, affordable tools that manually remove air.
Steps:
- Fill the jar and place the lid.
- Position the pump’s nozzle over the lid (using a special adapter).
- Pump several times until you feel resistance.
This method is slower and may not be as strong as electric sealers, but it works for small batches.
3. Diy Methods
Some people try DIY tricks, like using a hot water bath or a manual suction device. While you might get a temporary seal, these methods are less reliable. If you want a strong, lasting seal, use a vacuum sealer or pump.
Pro Tip: For best results, always use new lids. Old lids may not seal properly.
Choosing The Right Mason Jar For Vacuum Sealing
Not all mason jars are created equal. To ensure safety and a tight seal, choose jars designed for canning.
Here’s a comparison of common types:
| Type | Suitable for Vacuum Sealing? | Notes |
|---|---|---|
| Regular-Mouth Mason Jar | Yes | Needs standard jar sealer attachment |
| Wide-Mouth Mason Jar | Yes | Often easier to seal; fits more foods |
| Quilted Jelly Jar | Sometimes | Check lid size and compatibility |
| Plastic Storage Jar | No | Not airtight; not suitable for vacuum sealing |
Wide-mouth jars are usually preferred because they are easier to clean, fill, and seal. Always inspect jars for chips or cracks—damaged jars can break under pressure.
Step-by-step Guide: How To Vacuum Seal Mason Jars At Home
Let’s break down the process so you can do it safely and effectively.
What You Need
- Mason jars (regular or wide-mouth)
- New metal lids
- Jar sealer attachment (for vacuum sealer or pump)
- Vacuum sealer (electric or handheld)
- Clean, dry food items
Step 1: Prepare The Jar
Wash the jar and lid thoroughly. Dry both completely. Any moisture can cause mold or spoilage.
Step 2: Fill The Jar
Add your food. Leave about 1 inch of space at the top. Do not overfill—the lid needs space to seal.
Step 3: Place The Lid
Set the flat metal lid on the jar. Do not screw on the band.
Step 4: Attach Sealer
Fit the jar sealer attachment over the lid. If using a vacuum sealer, connect the hose. If using a handheld pump, position the adapter.
Step 5: Vacuum Seal
Activate the vacuum. The machine or pump will remove air and create suction. When finished, the lid should be tightly sealed.
Step 6: Test The Seal
Remove the attachment. Check the lid—it should be firm and slightly concave. If the lid pops off easily, repeat the process.
Step 7: Store
Label the jar with contents and date. Store in a cool, dry place.
Non-obvious insight: Some foods, like powders or fine grains, can get sucked into the vacuum hose. Use a coffee filter or parchment paper between the food and lid to prevent mess.
Credit: saladinajar.com
Benefits Of Vacuum Sealing Mason Jars
Vacuum sealing in mason jars offers unique advantages over plastic bags or containers:
- Preserves freshness for weeks or months
- Protects delicate foods from crushing
- Reduces waste—glass jars are reusable
- Prevents pest infestation (bugs can’t get in)
- Organizes your pantry—clear jars make it easy to see contents
A study by the National Center for Home Food Preservation found that vacuum sealing can extend shelf life of dried foods by 3–5 times compared to regular containers.
Common Mistakes And How To Avoid Them
Even experienced home preservers make mistakes. Here are some to watch for:
- Using old or damaged lids: These may not seal properly.
- Overfilling jars: This prevents the lid from sealing.
- Storing jars in warm, humid places: Moisture can break the seal.
- Forgetting to label jars: You won’t remember what’s inside or when it was sealed.
- Vacuum sealing wet foods: Most home vacuum sealers are designed for dry goods only.
If you vacuum seal liquids, use a freezer-safe jar and freeze first. Otherwise, liquid can be sucked out during vacuuming, causing a mess.
How Long Do Foods Last In Vacuum-sealed Mason Jars?
The shelf life depends on the food, storage conditions, and how well you sealed the jar.
Here’s a comparison of average shelf life for common foods:
| Food | Vacuum-Sealed Shelf Life | Regular Jar Shelf Life |
|---|---|---|
| Dried beans | 1–2 years | 6–12 months |
| Rice | 1–2 years | 6–12 months |
| Nuts | 6–12 months | 3–6 months |
| Dehydrated fruit | 1 year | 4–6 months |
| Spices | 2–3 years | 1 year |
Non-obvious insight: Oxygen absorbers can be added to jars before vacuum sealing for even longer storage. However, they are not always necessary if you seal jars properly.
Safety Considerations
Vacuum sealing mason jars is safe when done correctly, but there are some risks to know.
- Do not use vacuum sealing for canning wet foods (like soups or vegetables). This does not kill bacteria—use heat-based canning for these foods.
- Always check jars for cracks before sealing. Broken jars can shatter under vacuum.
- Do not use plastic jars or containers. Only glass mason jars with metal lids are airtight.
If you want to learn more about food safety in home preservation, visit the National Center for Home Food Preservation.

Credit: www.amazon.com
Practical Tips For Beginners
- Buy a jar sealer attachment compatible with your jars.
- Practice on small batches first.
- Use clear jars for easy identification.
- Keep a record of what you seal and when.
- Clean jars and lids before each use.
If you have kids or pets, store sealed jars out of reach. Glass jars can break if dropped.
Is Vacuum Sealing Mason Jars Worth It?
Vacuum sealing in mason jars is a simple, effective way to keep food fresh. It’s perfect for dry goods, snacks, and pantry staples. While it requires a small investment in tools, the benefits—longer shelf life, less waste, safer storage—make it worthwhile for most homes.
You don’t need to be an expert or have fancy equipment. With a little practice, anyone can vacuum seal mason jars at home and enjoy fresher food for longer.

Credit: saladinajar.com
Frequently Asked Questions
Can I Vacuum Seal Mason Jars Without A Vacuum Sealer?
Yes, you can use a handheld vacuum pump, but it may not be as strong or reliable as an electric vacuum sealer. DIY methods, like using hot water or manual suction, are not recommended for long-term storage.
What Foods Can I Vacuum Seal In Mason Jars?
You can seal dry foods like beans, rice, pasta, nuts, dehydrated fruits, spices, and coffee. Avoid vacuum sealing wet or liquid foods unless freezing first.
Do I Need New Lids Every Time?
For the best seal, always use new metal lids. Reusing old lids may cause leaks or failed seals.
How Do I Know If The Seal Is Tight?
Check the lid—it should be slightly concave and firmly attached. If it pops off easily or moves, the seal is not tight. Try resealing or replacing the lid.
Is Vacuum Sealing Mason Jars Safe?
Yes, it is safe for dry goods. Do not use vacuum sealing for canning wet foods, as it does not kill bacteria. Always use clean, undamaged jars and new lids.
Vacuum sealing mason jars at home is a practical, effective way to keep your food fresh and organized. With the right tools and a few simple steps, you can enjoy longer-lasting pantry staples and less food waste. If you haven’t tried it yet, now is a great time to start.