Cleaning a meat thermometer may seem simple, but doing it properly is vital for food safety. A dirty thermometer can spread bacteria, affecting not just your meals, but your health. Many people wipe it quickly or rinse it under water, believing that’s enough. However, real cleaning requires more care, the right tools, and a clear process.
In this article, you’ll learn the exact steps to clean your meat thermometer so it’s safe to use every time. Whether you have a digital or dial model, you’ll discover practical techniques, mistakes to avoid, and tips to extend the life of your thermometer.
Why Cleaning Your Meat Thermometer Matters
A meat thermometer touches raw and cooked meat, which means it can pick up harmful bacteria like Salmonella or E. coli. If you don’t clean it well, these bacteria can transfer to other foods or surfaces. The Centers for Disease Control and Prevention (CDC) estimates that foodborne illnesses cause about 48 million cases in the US each year. Many of these come from cross-contamination in the kitchen.
Besides safety, a clean thermometer ensures accurate readings. Grease, residue, or buildup on the probe can block the sensor or make the dial hard to read. If you want your steak perfectly rare or your chicken cooked through, cleaning is not optional—it’s essential.
Types Of Meat Thermometers And Cleaning Needs
Meat thermometers come in several styles. Each type needs slightly different care. Let’s look at the main types:
| Type | Cleaning Difficulty | Special Considerations |
|---|---|---|
| Digital (Instant-read) | Easy | Avoid submerging electronics |
| Dial (Analog) | Medium | Check for water in dial |
| Wireless/Remote | Challenging | Extra care for probes, keep base dry |
Most kitchen thermometers are digital or dial. Wireless models, used by grillers, have probes and cables that need extra attention. Understanding your thermometer’s parts will help you clean it the right way.
Essential Tools And Materials
Cleaning doesn’t require fancy products, but using the right items makes a big difference. Here’s what you need:
- Mild dish soap – Avoid strong chemicals that can damage sensors.
- Warm water – Helps dissolve fats and proteins.
- Soft cloth or sponge – Prevents scratching surfaces.
- Cotton swabs – Good for hard-to-reach areas.
- Alcohol wipes – Kills bacteria; use for final sanitizing.
- Paper towels – For drying after cleaning.
Don’t use abrasive pads or harsh cleaners. They can scratch the probe, making it harder to clean and less accurate.
Step-by-step Guide To Cleaning A Meat Thermometer
Now, let’s walk through the full cleaning process. Whether your thermometer is digital, dial, or wireless, these steps will help you keep it safe and accurate.
1. Unplug Or Remove Batteries
If your thermometer is digital, turn it off and remove batteries if possible. For wireless models, disconnect the probe from the base. This prevents water from damaging electronics.
2. Wipe Off Surface Debris
Before washing, use a dry paper towel to remove visible grease or food particles. This keeps your cleaning water cleaner and prevents smearing.
3. Wash The Probe
Mix a few drops of mild dish soap in warm water. Dip your soft cloth or sponge in the soapy water and gently scrub the probe. Rotate the probe to clean all sides. For stubborn residue, use a cotton swab.
- Don’t submerge the digital display or dial head. Only the metal probe should get wet.
4. Rinse Thoroughly
After scrubbing, rinse the probe with clean, warm water. This removes soap, which can leave behind residue and affect readings.
5. Sanitize
Use an alcohol wipe to sanitize the probe. This kills bacteria that soap and water may miss. If you don’t have wipes, you can dip a cloth in rubbing alcohol and wipe the probe.
- Allow the probe to air-dry for a few seconds after sanitizing.
6. Dry Completely
Use a clean paper towel to dry the probe and handle. Moisture can lead to corrosion, especially inside the probe’s joints.
7. Reassemble And Store
For digital thermometers, reinstall batteries. Store your thermometer in a dry, clean place—never leave it in the sink or near raw meat.

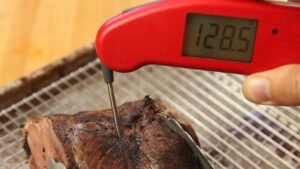
Credit: meater.com
Cleaning Dial And Digital Thermometers: Key Differences
Although the steps above work for most thermometers, some models need special care.
| Feature | Dial Thermometer | Digital Thermometer |
|---|---|---|
| Water Resistance | Low | Medium (probe only) |
| Cleaning Frequency | After each use | After each use |
| Sanitizing | Essential | Essential |
| Common Mistake | Submerging dial head | Getting display wet |
With dial thermometers, never immerse the head in water. Moisture can fog the dial or damage the spring. For digital models, keep water away from the screen and buttons.
How Often Should You Clean Your Meat Thermometer?
You should clean your meat thermometer after every use. Even if you only check one piece of meat, bacteria can survive on the probe. A survey by the Food Safety Consortium found that over 45% of home cooks don’t clean thermometers after each use, increasing the risk of cross-contamination.
If you use your thermometer for different types of meat during the same cooking session, clean it between uses. For example, if you check chicken and then steak, wash and sanitize the probe in between.
Special Tips For Cleaning Wireless Probes
Wireless or remote thermometers are popular for grilling and smoking. These models have cables and probes that touch meat for hours. Here are some extra tips:
- Never submerge the cable. Water inside can cause corrosion or short circuits.
- Clean the probe and cable with a damp cloth, then sanitize with alcohol wipes.
- For sticky residue (like barbecue sauce), use a cotton swab dipped in soapy water.
- Dry cables and probes fully before storing.
Wireless probes can cost over $50, so careful cleaning helps them last longer.
Common Cleaning Mistakes To Avoid
Many people make simple mistakes that damage their thermometer or reduce accuracy. Here are the biggest pitfalls:
- Submerging electronics – Moisture can ruin digital displays or fog dial faces.
- Using strong chemicals – Bleach or harsh cleaners can corrode metal and affect readings.
- Ignoring the handle – Bacteria can hide on handles, especially after touching raw meat.
- Not drying fully – Leaving moisture on the probe can cause rust.
- Skipping sanitizing – Soap cleans, but alcohol kills most bacteria.
Avoid these mistakes, and your thermometer will stay reliable and safe.

Credit: www.cdc.gov
How To Deep Clean A Meat Thermometer
Sometimes, your thermometer needs more than a quick wash. If you notice sticky buildup, discoloration, or strange smells, it’s time for a deep clean.
Deep Cleaning Steps
- Remove batteries or unplug the thermometer.
- Wash the probe with warm, soapy water as before.
- Use a toothbrush for stubborn residue. Scrub gently to avoid scratching.
- Rinse thoroughly with clean water.
- Sanitize with alcohol wipes.
- For dial thermometers, check for moisture inside the dial. If foggy, place the thermometer in a warm, dry spot for 24 hours.
- Dry fully and reassemble.
Deep cleaning helps remove protein buildup and grease, which can affect accuracy and cause odors.
When Should You Replace Your Meat Thermometer?
No matter how well you clean, thermometers do wear out. Here are signs it’s time to replace:
- Probe is rusty or corroded
- Display is unreadable or doesn’t work
- Dial face is foggy or cracked
- Probe is bent or loose
A study by Consumer Reports found that digital thermometers last about 2-3 years with regular use. Keeping them clean can extend their life, but once accuracy drops, it’s best to buy a new one.
Quick Comparison: Cleaning Meat Thermometers Vs. Other Kitchen Tools
To help you understand where thermometer cleaning fits in your kitchen routine, here’s a simple comparison.
| Tool | Cleaning Frequency | Sanitizing Needed? |
|---|---|---|
| Meat Thermometer | After each use | Yes |
| Chef’s Knife | After each use | Recommended |
| Cutting Board | After each use | Yes (especially for meat) |
| Spatula | After each use | No |
Meat thermometers and cutting boards used for raw meat are top priorities for cleaning and sanitizing.
Expert Tips For Safe And Effective Cleaning
Here are some tips even experienced cooks might not know:
- Use boiling water for sanitizing: Dip the probe in boiling water for 10 seconds if alcohol wipes aren’t available. This kills most bacteria.
- Check for loose parts: If your thermometer probe wiggles, bacteria can hide in gaps. Tighten or replace parts as needed.
- Store in a protective case: Many thermometers come with cases. Use them to keep dust and moisture away.
- Keep a spare thermometer: If one is dirty or broken, having a backup keeps you cooking safely.
For more food safety guidelines, visit the CDC Food Safety page.

Credit: www.youtube.com
Frequently Asked Questions
How Do I Clean A Meat Thermometer After Measuring Raw Chicken?
Wash the probe with warm, soapy water, rinse well, then sanitize with an alcohol wipe. Dry completely before using again. Always clean after touching raw poultry to avoid spreading bacteria.
Can I Put My Meat Thermometer In The Dishwasher?
Most meat thermometers are not dishwasher safe. The heat and water can damage digital displays and dial faces. Always hand wash and sanitize the probe.
What Should I Do If Water Gets Inside The Dial Or Digital Display?
Dry the thermometer immediately. Place it in a warm, dry spot for 24 hours. If water remains, the thermometer may not work correctly and should be replaced.
Is It Safe To Use Bleach Or Strong Disinfectants?
No, avoid bleach or harsh chemicals. They can corrode the probe and affect accuracy. Mild dish soap and alcohol wipes are best.
How Can I Tell If My Thermometer Is Clean Enough?
A clean thermometer should have no visible residue, smell fresh, and give accurate readings. Sanitize after washing for extra safety, especially when cooking for others.
Cleaning your meat thermometer properly protects your health, improves food safety, and keeps your kitchen running smoothly. With these steps and tips, you’ll avoid common mistakes, save money, and enjoy meals cooked just right. Remember, a few minutes of care after each use can prevent illness and extend the life of your thermometer.