Skip to content
Measuring a kitchen sink might seem simple, but it’s easy to get wrong. When you’re replacing a sink, planning a remodel, or shopping for a new faucet, exact measurements matter. Even a small mistake can lead to a sink that doesn’t fit, leaks, or awkward countertop gaps.
With a few tools and the right steps, you can measure your kitchen sink with confidence—saving time, money, and frustration.
This guide explains how to measure a kitchen sink for any purpose, including replacing, upgrading, or adding accessories. You’ll learn what tools to use, which measurements are most important, and how to avoid common mistakes. If you’re not a DIY expert, don’t worry—these steps are clear and practical for any homeowner.
Why Accurate Sink Measurement Matters
A kitchen sink is more than just a bowl for dishes. It connects to cabinets, countertops, plumbing, and sometimes even appliances. An incorrect measurement can cause a domino effect of problems. For example, a sink that’s too big won’t fit in the cutout, while a smaller one can leave unsightly gaps.
Faucets and drains also need to align perfectly.
If you plan to change your sink style—like moving from a drop-in to an undermount sink—measurements become even more critical. Even if you hire a contractor, providing the right numbers helps them order the right size and avoid delays.
Tools You’ll Need
Before you start, gather these basic tools:
- Tape measure (at least 12 feet)
- Notepad and pencil for notes and sketches
- Flashlight (for under-sink visibility)
- Level (optional, for checking countertop evenness)
- Smartphone or camera (optional, for taking photos)
A regular tape measure works for most sinks, but for deeper or double-bowl sinks, a flexible tape helps measure curves accurately.

Credit: www.modernlivingdirect.co.uk
Measuring Different Sink Types
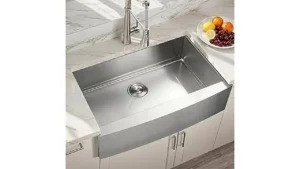
There are several types of kitchen sinks, and each needs slightly different measuring steps. The three most common are top-mount (drop-in), undermount, and farmhouse (apron-front) sinks.
Top-mount (drop-in) Sinks
These are the most common. The rim rests on top of the countertop, and the sink drops into a cutout.
- Width: Measure the sink from left to right at the widest points, edge to edge.
- Length: Measure from front to back, including the rim.
- Bowl Depth: Place your tape inside the sink, from the top edge to the bottom (not the drain).
- Cutout Size: If replacing, measure the hole in the countertop—not just the sink itself. Remove the sink if possible for best accuracy.
Undermount Sinks
These attach below the countertop, with no visible rim.
- Width & Length: Measure the inside edge of the sink (where it meets the countertop).
- Depth: Measure from the countertop surface to the deepest point inside the bowl.
- Cabinet Size: Check the space inside your cabinet. The sink should be at least 2–3 inches narrower than the cabinet for proper installation.
Farmhouse (apron-front) Sinks
These extend past the counter and show a decorative front.
- Apron Height: Measure the exposed front from the top of the counter to the bottom of the apron.
- Sink Width: Measure from left to right, including the apron.
- Bowl Depth: Measure inside the bowl, not including the apron overhang.
- Cabinet Modification: Farmhouse sinks often require cutting or modifying cabinets. Double-check all dimensions.
Step-by-step: How To Measure A Kitchen Sink
To help you stay organized, here’s a simple process to measure your sink accurately.
Step 1: Clear And Clean The Sink Area
Remove any items from the sink and countertop. Wipe the sink dry—water can distort tape measurements, and clutter can hide important edges.
Step 2: Measure The Overall Sink Size
Place the tape measure on the outside edge, not the inside bowl. Record:
- Width (side to side)
- Length (front to back)
If the sink has rounded corners, measure the furthest points.
Step 3: Measure The Bowl Depth
Lay the tape vertically inside the deepest part of the bowl. Record the measurement from the rim to the bottom, not the drain or strainer.
Step 4: Measure The Sink Cutout (if Replacing)
If you’re replacing a sink, the countertop cutout size is more important than the old sink’s size. If you can, remove the sink and measure:
- Cutout width
- Cutout length
If you can’t remove it, measure from underneath, inside the cabinet.
Step 5: Measure Cabinet And Countertop Clearance
Check the space inside the cabinet. Measure:
- Distance from the back wall to the cabinet front
- Cabinet width (from side to side)
- Height from the cabinet floor to the underside of the countertop
This ensures your new sink fits the space and plumbing.
Step 6: Note Faucet And Accessories Placement
Count faucet holes, their spacing, and any accessories (soap dispenser, sprayer). Most sinks have 1 to 4 holes, spaced 4 or 8 inches apart. Write down each position.

Credit: www.kingstonbrass.com
Key Measurements Explained
Some terms can be confusing. Here’s what each measurement means for your project.
- Overall Sink Size: The total outside dimensions, including rims or lips.
- Bowl Size: The usable space inside the sink.
- Cutout Size: The opening in the countertop for the sink to drop into.
- Apron Height: Only for farmhouse sinks; how much of the sink shows on the cabinet front.
- Cabinet Size: The space under the countertop where the sink sits.
Common Mistakes To Avoid
Even experienced DIYers make errors. Here’s what to watch for:
- Measuring only the old sink, not the cutout. The countertop opening can be smaller or larger than the sink.
- Ignoring faucet hole spacing. This can make a new faucet impossible to install.
- Not checking cabinet size. Some sinks fit the counter but not the cabinet below.
- Rounding measurements. Always use exact numbers, down to the nearest 1/16 inch if possible.
- Forgetting about sink style. Undermount and farmhouse sinks need more precise cuts and support.
Comparing Sink Dimensions: Examples
Here’s a look at common sink sizes in the US market:
| Sink Type | Typical Width (inches) | Typical Length (inches) | Typical Bowl Depth (inches) |
|---|---|---|---|
| Single Bowl | 22–33 | 18–22 | 8–10 |
| Double Bowl | 30–36 | 18–22 | 8–10 |
| Farmhouse | 30–36 | 20–24 | 9–12 |
When choosing a replacement, match your current measurements as closely as possible.
Measuring For Replacement Vs. New Installation
It’s important to approach these two situations differently.
Replacing An Old Sink
- Focus on the cutout size and cabinet space. The new sink must fit the existing opening.
- Consider any gaps or overhangs from the old sink.
- If changing from top-mount to undermount, you may need to adjust the cutout and reinforce the countertop.
Installing A New Sink
- Choose the sink style first, then check if your cabinet and countertop can accommodate it.
- For undermount or farmhouse sinks, plan for extra support and possibly professional installation.

Credit: www.angi.com
Measuring For Accessories And Faucets
Not all sinks have the same faucet hole pattern. Measure:
- Hole diameter: Most are 1–1.5 inches.
- Center-to-center spacing: Measure from the center of one hole to the next.
- Number of holes: Count all holes, including for sprayers or soap dispensers.
Some accessories, like cutting boards or drying racks, are custom-fit to the sink. Measure the interior width and length for a good fit.
How To Record And Share Measurements
Drawing a simple sketch helps avoid confusion. Label each measurement clearly and keep it with your purchase records. If you’re ordering online or hiring a contractor, photos with a tape measure in view can prevent costly errors.
For example, write:
- “Overall sink width: 33 inches”
- “Cutout width: 31 7/8 inches”
- “Cabinet width: 36 inches”
- “Faucet holes: 3, 8-inch spacing”
Real-world Tips And Insights
- Double-check your numbers. Even professionals measure twice before buying.
- Consider countertop thickness. A thicker counter can reduce the usable bowl depth, especially for undermount sinks.
- Account for plumbing. Deeper sinks need more space for drains and garbage disposals. Check for clearance under the cabinet.
- Check manufacturer specs. Many brands provide detailed cutout templates—use them if available.
- Think about future needs. If you plan to add a water filter or soap dispenser, make sure you have extra holes.
Example: Measuring For A Double Bowl Sink
Let’s say you want to replace your double bowl sink with a new model. Your current measurements are:
- Width: 33 inches
- Length: 22 inches
- Bowl depth: 9 inches
- Cutout size: 31 3/4 x 20 7/8 inches
- Cabinet width: 36 inches
You find a new sink with similar overall dimensions. Before buying, compare the cutout size and ensure the cabinet can support the new weight, especially if switching materials (e. g. , from stainless steel to cast iron).
Here’s a comparison of two popular double bowl sinks:
| Model | Overall Size (inches) | Cutout Size (inches) | Bowl Depth (inches) |
|---|---|---|---|
| Model A | 33 x 22 | 31.25 x 20.5 | 9 |
| Model B | 33 x 22 | 31.75 x 21 | 10 |
Even with the same overall size, the cutout and bowl depth can differ. Pick the model that matches your cutout most closely to avoid countertop modification.
Measuring For Farmhouse Sinks: A Special Note
Farmhouse sinks are trendy but require extra care when measuring. These sinks often extend past the cabinet and need special support. Some cabinets are not designed for apron-front sinks and must be altered. Always check the apron height and cabinet depth.
Here’s a quick comparison:
| Feature | Standard Sink | Farmhouse Sink |
|---|---|---|
| Cabinet Modification | Rarely needed | Often required |
| Apron Height | Not applicable | 7–10 inches |
| Install Complexity | Low | High |
If you’re unsure, bring your measurements to a kitchen specialist or consult an official installation guide.
When To Call A Professional
Some situations need expert help:
- If your sink size is non-standard or the cutout is irregular
- For heavy sinks (like cast iron or fireclay)
- When switching between sink styles (e.g., top-mount to undermount)
- If plumbing or countertop modifications are needed
Professionals can ensure a leak-free fit and proper support, especially with expensive materials.
Useful Online Resources
For more details on sink types and installation, see the Wikipedia: Kitchen Sink article. This resource explains different sink materials, installation methods, and maintenance tips.
Frequently Asked Questions
How Do I Measure My Kitchen Sink For A New Countertop?
Measure the overall width and length of your current sink, then the cutout size (the opening in the countertop). If possible, remove the sink and measure the opening directly. Give these numbers to your countertop installer—they’ll cut a new hole to fit your sink.
Can I Install A Larger Sink In My Existing Countertop?
Only if your cabinet and countertop have enough space. Measure the cabinet’s internal width and the current cutout. If the new sink’s cutout is larger, you may need to modify or replace the countertop.
What’s The Standard Kitchen Sink Size?
Most kitchen sinks are 30 to 33 inches wide and 18 to 22 inches front to back. Bowl depth usually ranges from 8 to 10 inches. Always check your own measurements, as sizes vary by brand and style.
How Do I Measure For An Undermount Sink?
Measure the inside edge of the sink (where it meets the counter) for width and length. Measure from the countertop to the deepest part of the bowl for depth. Also, check cabinet size—undermount sinks often need extra support and a slightly smaller cutout.
What If My Sink Has Rounded Corners?
Measure to the furthest points, not just the straight edges. For the cutout, you may need to trace the opening on paper or cardboard. This helps when ordering a new sink or making a template for installation.
A well-measured kitchen sink is the foundation of a smooth installation and years of trouble-free use. Take your time, write down every number, and double-check before buying. With careful planning, your kitchen upgrade will look and work great for years.