If your KitchenAid mixer stops spinning, makes strange noises, or the motor runs but the beaters don’t move, the worm gear may be broken. This small but important part protects the motor by breaking if your mixer jams, like when dough is too thick. Replacing it can save money and restore your mixer’s power. Many people are nervous about opening their appliance, but with some guidance, you can do it safely—even if you’re not a repair expert.
This article will guide you step by step, using clear language and practical advice. You’ll learn how to identify worm gear problems, prepare for the repair, replace the gear, and avoid common mistakes. We’ll also compare DIY repair costs with professional service, and help you decide if you’re ready to tackle it yourself.
Understanding The Worm Gear In Kitchenaid Mixers
The worm gear is at the heart of your mixer’s drive system. It connects the motor to the rotating parts, helping transfer power smoothly. If your mixer suddenly stops mixing but the motor still works, the worm gear is likely damaged.
Why Does The Worm Gear Fail?
KitchenAid designed the worm gear as a “sacrificial” part. If the mixer jams or overloads—like kneading heavy dough—the gear breaks instead of damaging the motor. This protects the expensive internal parts.
Signs Of A Broken Worm Gear
- The motor runs but beaters don’t turn.
- Grinding or clicking noises from inside.
- Burnt smell or unusual vibration.
- Mixer suddenly stops while mixing thick dough.
Not every symptom means a broken worm gear, but these are common. If you notice these signs, it’s time to check inside.
Tools And Parts Needed For Replacement
Before you start, gather the right tools and parts. Using the wrong tools can damage your mixer or make the repair harder.
Required Tools
- Screwdrivers: Both Phillips and flat-head
- Needle-nose pliers: For removing clips and wires
- Rubber mallet: To gently tap parts loose
- Putty knife: Helps open the mixer housing
- Grease: KitchenAid food-safe gear grease
- Towel or tray: To hold screws and parts
Replacement Parts
- KitchenAid worm gear kit: Includes the gear and sometimes grease and clips
Buying genuine KitchenAid parts is smart. Generic gears may not fit or last as long. Expect the gear kit to cost $10–$20, while professional repair can cost $75–$150.
Preparing Your Mixer For Gear Replacement
Safety is important. Always unplug your mixer before starting.
- Place the mixer on a clean, flat surface. Lay a towel under it to catch screws.
- Take photos at each stage. This helps you remember where parts go.
- Keep small parts in a tray or bowl. Losing screws is a common mistake.
Removing The Mixer Housing
Most KitchenAid mixers have screws at the back and underneath. Remove these to open the housing. Use gentle force—prying too hard can crack the plastic or metal.
Step-by-step Guide To Replacing The Worm Gear
Follow these steps carefully. If you feel unsure at any stage, review your photos or look for guides online.
1. Remove The Mixer Accessories
Detach the mixing bowl and any beaters or attachments. Wipe away crumbs or grease.
2. Open The Mixer Housing
- Unscrew the back plate and base.
- Use the putty knife to gently separate the housing halves.
- Lift the top cover off, exposing the motor and gears.
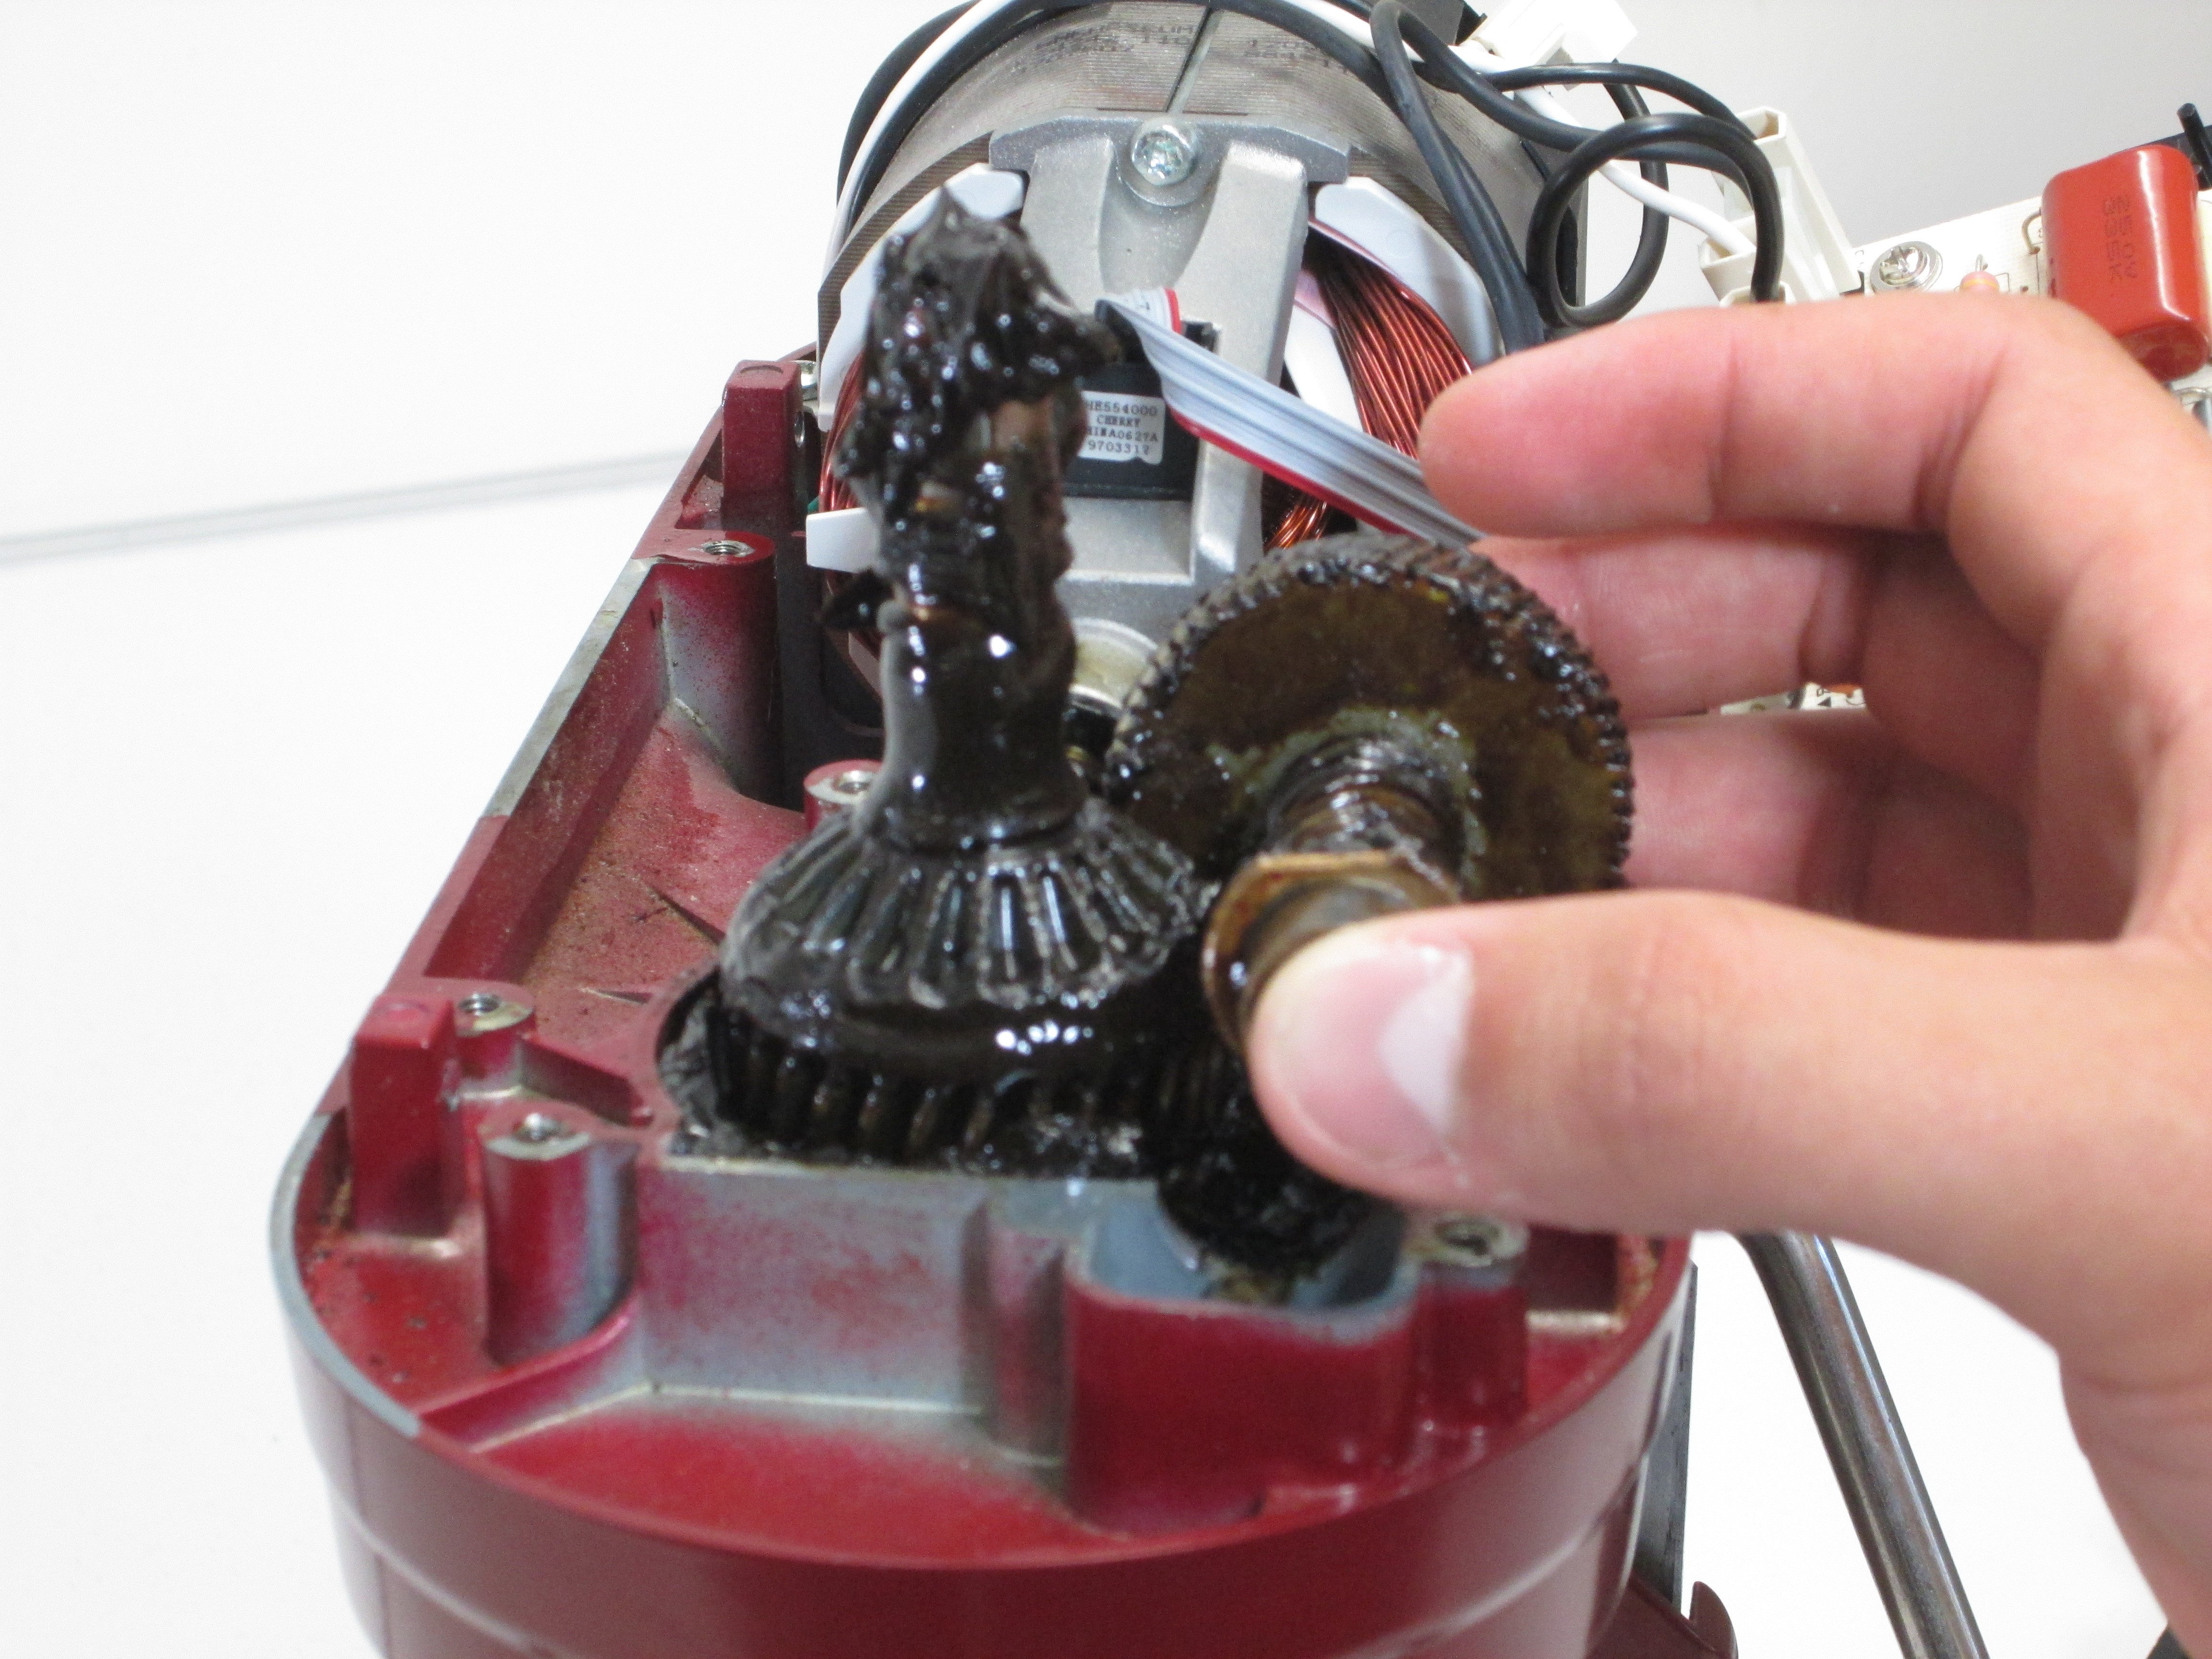
3. Locate The Worm Gear
The worm gear is usually near the center, next to the motor. It looks like a white or off-white plastic gear.
4. Remove The Old Gear
- Use pliers to take out any clips or washers holding the gear.
- Gently pull the gear out. If it’s stuck, tap lightly with a rubber mallet.
Tip: Don’t force the gear. If it doesn’t move, check for hidden clips or screws.
5. Clean The Gear Area
Remove old grease and broken gear pieces. Wipe the area with a cloth. Apply new grease to the gears; this reduces wear and noise.
6. Install The New Worm Gear
- Slide the new gear in place.
- Secure it with any clips or washers.
- Double-check alignment. If the gear isn’t straight, the mixer won’t work.
7. Reassemble The Mixer
- Replace the housing cover.
- Screw all plates back on tightly.
- Reattach the bowl and beaters.
8. Test The Mixer
Plug in and run on low speed first. Listen for odd noises. If all sounds normal, increase speed and check mixing action.

Credit: www.reddit.com
Practical Tips For A Smooth Repair
- Photograph each step. This is the best way to avoid confusion during reassembly.
- Use food-safe grease. Regular grease can contaminate your food.
- Don’t over-tighten screws. This can crack the housing.
- Check for leftover parts. If you have extra screws or clips, recheck your photos.
Comparing Diy And Professional Repair
Many people wonder if DIY is worth it. Here is a comparison:
| Repair Method | Cost | Time | Difficulty | Warranty |
|---|---|---|---|---|
| DIY Replacement | $10–$25 | 1–2 hours | Moderate | No |
| Professional Service | $75–$150 | 1–2 weeks | Easy | Yes |
DIY is cheaper and faster, but only if you are comfortable with basic repairs. Professionals offer a warranty, which is helpful if your mixer is still under guarantee.
Credit: www.ifixit.com
Common Mistakes And How To Avoid Them
Replacing a worm gear is not very hard, but some mistakes can cause trouble.
1. Forgetting To Unplug The Mixer
This is the most dangerous mistake. Always unplug before opening.
2. Losing Small Parts
Clips and screws are easy to drop. Use a tray and check your workspace after finishing.
3. Using Wrong Grease
KitchenAid mixers require food-safe gear grease. Using regular grease risks contamination and can damage the mixer.
4. Misaligning The Gear
If the gear is not aligned, the mixer will make noise or not work. Double-check before closing the housing.
5. Over-tightening Screws
Too much force can crack plastic or damage threads. Tighten until secure, not until they won’t move.
Kitchenaid Mixer Models And Worm Gear Compatibility
Not every worm gear fits every mixer. Here’s a quick comparison of common models:
| Model | Gear Type | Replacement Kit Needed | Difficulty |
|---|---|---|---|
| Artisan Series | Plastic | Standard Worm Gear Kit | Moderate |
| Classic Series | Plastic | Standard Worm Gear Kit | Moderate |
| Professional 600 | Metal | Heavy-Duty Gear Kit | Hard |
| Commercial Series | Metal | Heavy-Duty Gear Kit | Hard |
Always check your mixer’s model number before buying the gear. Mixing up kits is a common beginner error.
How Long Does A Worm Gear Last?
A worm gear can last 5–10 years, depending on use. Mixing heavy dough often, or using the mixer for long periods, can shorten its life. Replacing the gear doesn’t make your mixer new, but it restores function.
Safety And Maintenance Advice
After replacing the worm gear, follow these maintenance tips:
- Avoid overloads: Don’t mix dough that is too thick or heavy.
- Clean your mixer often: Remove crumbs and wipe grease.
- Use correct attachments: Some mixers aren’t made for heavy tasks.
Regular care can extend the life of your new gear. If your mixer jams again, stop right away to prevent more damage.

Credit: www.amazon.com
When To Call A Professional
If you notice burnt smells, see melted parts, or can’t identify the broken gear, it’s best to contact KitchenAid service. Some repairs need special tools or skills. Also, if your mixer is under warranty, professional repair is safer.
You can find official repair guides and support at KitchenAid Service and Support.
Frequently Asked Questions
How Do I Know If My Worm Gear Is Broken?
If your mixer’s motor runs but the beaters don’t turn, or you hear grinding noises, the worm gear is likely broken. Opening the mixer and seeing missing or damaged gear teeth confirms the problem.
Can I Use Any Grease For The Gears?
No, only food-safe gear grease is recommended. Regular grease can contaminate food and harm the mixer’s parts.
Is Replacing The Worm Gear Difficult?
For most models, it’s a moderate task. If you follow step-by-step instructions and take photos, it’s manageable. Some commercial mixers are harder and may need expert help.
How Long Does A Replacement Take?
Most people finish in 1–2 hours. If you are careful and organized, the process is faster. Professional repair can take up to two weeks, including shipping and handling.
Will Replacing The Worm Gear Void My Warranty?
If your mixer is under warranty, DIY repairs may void it. Check KitchenAid’s official policy before starting. If unsure, use professional service.
Repairing your KitchenAid mixer worm gear is possible for many home users. With careful planning, patience, and the right tools, you can save money and restore your mixer’s power. Don’t rush—take photos, keep parts organized, and use proper grease. If you’re still unsure, professional help is available. With these tips, your mixer will be ready for many more batches of cookies, bread, and cakes.