A well-seasoned cast iron Dutch oven is one of the most versatile tools in any kitchen. It can go from stovetop to oven, handle high heat, and last for generations if cared for properly. But to enjoy its best performance—whether you’re baking bread, simmering stews, or frying chicken—your Dutch oven needs a good layer of seasoning.
Many beginners think seasoning is complicated or only for skillets, but the process is simple and essential for Dutch ovens too. If you’ve just bought a new cast iron Dutch oven or want to restore an old one, learning how to season it the right way will help you cook with confidence and keep your cookware in top shape.
Why Seasoning Matters For Cast Iron Dutch Ovens
Seasoning is not just about making your Dutch oven look shiny. It’s a protective layer that prevents rust, creates a natural nonstick surface, and adds flavor to your cooking over time. When you season cast iron, you bake a thin layer of oil onto the metal, turning it into a hard, glass-like surface called polymerization. Without this layer, cast iron is rough and easily damaged by moisture and acidic foods.
Many new Dutch ovens come with a “pre-seasoned” label, but this coating is often thin. Home seasoning builds up a stronger, smoother surface. If your Dutch oven is old or rusty, re-seasoning restores its function and beauty.
What You Need To Season A Cast Iron Dutch Oven
Before starting, gather these items:
- Cast iron Dutch oven (clean and dry)
- Cooking oil with a high smoke point (see table below)
- Paper towels or a clean cloth
- Aluminum foil (for catching drips)
- Oven (for even heating)
- Rubber gloves (optional, for handling hot cookware)
Choosing the right oil is important. Not all oils work equally well for seasoning. Here’s a quick comparison:
| Oil Type | Smoke Point (°F) | Seasoning Quality | Common Use |
|---|---|---|---|
| Flaxseed Oil | 225 | Excellent (hard, smooth layer) | Professional seasoning |
| Grapeseed Oil | 420 | Very Good | General cooking |
| Canola Oil | 400 | Good | Most kitchens |
| Vegetable Oil | 400 | Good | Most kitchens |
| Crisco (Shortening) | 360 | Good | Traditional seasoning |
Non-obvious tip: Flaxseed oil creates a very hard coating, but it can flake if applied too thickly. For most home cooks, grapeseed or canola oil offers a great balance of performance and availability.
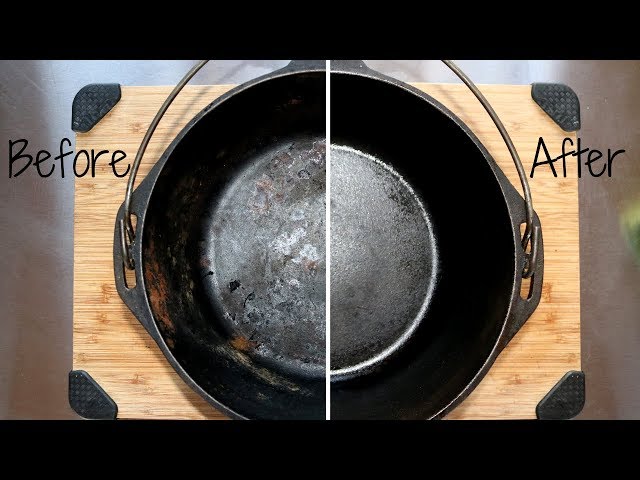
Credit: www.youtube.com
Step-by-step Guide: How To Season Your Cast Iron Dutch Oven
The process is simple, but each step matters. Here’s how to do it right:
1. Clean The Dutch Oven Thoroughly
If your Dutch oven is new, wash off any factory residue with mild soap and warm water. For rusty or old pans, use a scrubber or steel wool to remove rust and old seasoning. Dry completely—water can cause rust.
2. Apply A Thin Layer Of Oil
Pour a small amount of your chosen oil onto a paper towel. Wipe the entire surface—inside, outside, and the lid. Make sure to cover handles and edges. The layer should be thin enough that the pan looks almost dry, not greasy.
Extra oil leads to a sticky finish.
3. Bake In The Oven
Preheat your oven to 450–500°F (230–260°C). Place a sheet of aluminum foil on the lower rack to catch drips. Put the Dutch oven (upside down) and its lid in the oven. Bake for 1 hour.
4. Cool Slowly
Turn off the oven and let the Dutch oven cool inside. This helps the seasoning harden and prevents warping.
5. Repeat For Best Results
For a strong, nonstick surface, repeat steps 2–4 two or three times. Each layer makes the seasoning tougher.
Example: Seasoning A 5-quart Dutch Oven
Let’s say you’re seasoning a new 5-quart Dutch oven. You choose canola oil. After washing, you dry it on the stove over low heat for 5 minutes. You wipe a tablespoon of oil all over, making sure there are no puddles.
You bake it at 475°F for 1 hour, cool, and repeat twice. The surface now looks smooth and slightly glossy.
Tips For Maintaining Seasoning
A well-seasoned Dutch oven gets better with age, but you need to maintain it. Here’s how:
- Avoid soaking in water. Wash quickly and dry right away.
- Use minimal soap. Mild soap is okay, but harsh detergents strip seasoning.
- Dry with heat. After washing, place the Dutch oven on a burner for a few minutes to ensure all moisture is gone.
- Re-oil lightly. After each use, wipe a thin layer of oil on the surface.
- Store with the lid ajar. This prevents moisture buildup and rust.
Non-obvious insight: If you notice dull spots or rust, don’t panic. Just scrub the area, dry, and re-season. Seasoning is not permanent—it’s a living layer that you can always repair.

Credit: www.youtube.com
Common Mistakes To Avoid
Many beginners make small errors that lead to sticky, uneven, or flaking seasoning. Watch out for these pitfalls:
1. Using Too Much Oil
Thick layers turn sticky or flaky. Always wipe off excess oil.
2. Skipping The Lid
The lid also needs seasoning, especially if it’s cast iron.
3. Not Using High Enough Heat
Seasoning only forms above 400°F. Lower temperatures don’t polymerize the oil fully.
4. Washing With Harsh Cleaners
Avoid strong dish soaps and never use a dishwasher.
5. Storing In Damp Places
Moisture is the enemy of seasoning. Store your Dutch oven in a dry spot.
Comparing Enameled Vs. Traditional Cast Iron Dutch Ovens
Not every Dutch oven needs seasoning. Enameled cast iron is a popular alternative. Here’s how they differ:
| Feature | Traditional Cast Iron | Enameled Cast Iron |
|---|---|---|
| Seasoning Needed | Yes | No |
| Rust Risk | Yes | No (unless enamel chips) |
| Nonstick Surface | Develops over time | Depends on enamel quality |
| High Heat Tolerance | Excellent | Very good |
| Care Level | Moderate | Low |
A traditional cast iron Dutch oven, once well-seasoned, can outperform enameled versions for searing and frying. But enameled ovens are easier for acidic dishes (like tomato sauce) because they don’t react with acids.

Credit: www.wikihow.com
When To Re-season Your Dutch Oven
Even with good care, you may need to re-season:
- Rust appears
- Food sticks more than usual
- Surface looks dull or gray
- You stripped the seasoning for deep cleaning
Re-seasoning follows the same process as the initial seasoning. Some people strip old seasoning with oven cleaner or by baking at high heat, but this is rarely needed unless the Dutch oven is heavily rusted.
How Seasoning Improves With Use
A key benefit of cast iron is that seasoning improves with cooking. Each time you cook with oil or fat at high heat, a new micro-layer forms. Over time, your Dutch oven’s surface becomes slicker and more nonstick.
Experienced users notice that bread releases more easily, eggs slide off the surface, and cleaning becomes almost effortless after months of use. The best Dutch ovens have a patina—a deep, black shine—that only comes from years of proper seasoning and cooking.
Troubleshooting: Fixing Sticky Or Uneven Seasoning
Sometimes, the seasoning doesn’t turn out perfect. Here’s how to fix common problems:
- Sticky Surface: This usually means too much oil was used. Scrub gently with coarse salt and re-bake at 450°F for 1 hour with a thinner oil layer.
- Uneven Patches: Often caused by not spreading oil evenly. Clean and repeat seasoning steps on the patchy areas.
- Flaking Seasoning: Usually from too thick an oil layer or not enough heat. Strip loose pieces and re-season.
- Persistent Rust: Scrub with steel wool, rinse, dry, and re-season immediately.
Benefits Of Properly Seasoned Cast Iron Dutch Ovens
A well-seasoned Dutch oven is more than just nonstick. Here’s what you gain:
- Longer lifespan: Protected from rust, your Dutch oven can last a lifetime.
- Better food flavor: Seasoning adds subtle flavor to foods and prevents metallic tastes.
- Easier cleaning: A smooth surface means less scrubbing and no stuck-on food.
- Versatility: You can use it for baking, frying, roasting, and even open-fire cooking.
It’s no exaggeration: with proper seasoning, a cast iron Dutch oven becomes a family heirloom.
Frequently Asked Questions
How Often Should I Season My Cast Iron Dutch Oven?
For most home cooks, seasoning your Dutch oven two or three times when new, then once or twice a year, is enough. If you cook acidic foods often, or notice rust or sticking, re-season as needed.
Can I Use Olive Oil To Season My Dutch Oven?
While olive oil works, it has a low smoke point and can become sticky or break down. It’s better to use oils like canola, grapeseed, or flaxseed for seasoning. Olive oil is best for cooking, not for building seasoning layers.
What Should I Do If My Dutch Oven Gets Rusty?
Don’t worry—rust is fixable. Scrub off the rust with steel wool, wash, dry, and re-season using the steps above. Even heavily rusted Dutch ovens can be restored.
Can I Season My Dutch Oven On The Stovetop Instead Of The Oven?
While it’s possible, the oven gives even heat and better results, especially for the lid and sides. Stovetop seasoning works in a pinch, but watch for uneven coating and hot spots.
Do I Need To Season An Enameled Cast Iron Dutch Oven?
No. Enameled Dutch ovens have a glass-like coating that doesn’t need seasoning. However, if the enamel chips and exposes bare iron, you’ll need to season that spot to prevent rust.
For more detailed information about cast iron care, see this Lodge Cast Iron guide.
A well-seasoned cast iron Dutch oven is a joy to use. With proper care and occasional seasoning, your Dutch oven will reward you with decades of reliable service and delicious meals. Whether you’re a beginner or a seasoned cook, these steps will help you get the most from this classic piece of cookware.