Skip to content
Making waffles at home is a small joy that can brighten any morning. If you’ve just bought your first waffle maker or never tried using one, you may wonder where to start. Waffle makers look simple, but using them well is about more than just pouring batter and waiting.
With a bit of guidance, you can avoid common mistakes and make perfect, crispy waffles that taste like they came from a café. Let’s walk through everything you need to know to use a waffle maker confidently, even if you’re a complete beginner.
What Is A Waffle Maker?
A waffle maker is a kitchen appliance that cooks batter between two patterned plates, creating waffles with a crispy outside and soft inside. Some are electric, plugging into a wall, while others are stovetop types that you heat on a burner. Most home cooks use electric models because they’re easier and safer for everyday use.
Types Of Waffle Makers
Understanding the difference between types can help you choose the right one or use yours better. Here’s a quick comparison:
| Type | Features | Best For |
|---|---|---|
| Belgian Waffle Maker | Deep grids, thick waffles | Fluffy, airy waffles |
| Classic Waffle Maker | Shallow grids, thinner waffles | Light, crisp waffles |
| Stovetop Waffle Iron | No electricity needed | Camping, old-style cooking |
If you’re a beginner, an electric Belgian or classic waffle maker is usually the easiest and most forgiving option.
What You Need Before Starting
Before you make your first batch of waffles, you’ll need a few things ready.
- Waffle maker (clean and dry)
- Waffle batter (homemade or store-bought mix)
- Cooking spray or oil (unless your plates are truly nonstick)
- Measuring cups or a ladle
- Mixing bowl and whisk
- Plate and fork for serving
If you use a homemade batter, have your recipe ready. Store-bought mixes are fine for beginners—they usually just need water or milk.

Credit: bydash.com
How To Prepare Your Waffle Batter
Your batter is the base of great waffles. Here’s a simple recipe for beginners (makes about 4 Belgian waffles):
- 2 cups all-purpose flour
- 2 tablespoons sugar
- 2 teaspoons baking powder
- ½ teaspoon salt
- 2 large eggs
- 1¾ cups milk
- ½ cup melted butter or oil
- 1 teaspoon vanilla extract
- In a large bowl, whisk together the flour, sugar, baking powder, and salt.
- In another bowl, beat eggs, then add milk, melted butter, and vanilla.
- Pour the wet ingredients into the dry and mix until just combined. Do not overmix—lumps are okay.
Tip: Let your batter rest for 5–10 minutes before cooking. This helps the waffles become fluffier.
Step-by-step: How To Use A Waffle Maker
Let’s break down the process into easy steps. Each detail matters, especially for your first time.
1. Preheat Your Waffle Maker
Most electric waffle makers have an indicator light. Plug it in, close the lid, and wait for the ready light (usually 3–5 minutes). A properly heated machine is key to crispy waffles.
2. Grease The Plates
Even if your machine is nonstick, a thin coat of cooking spray or oil helps prevent sticking. Use a paper towel to spread a little oil if you don’t have spray. Don’t use too much—extra oil can make waffles soggy.
3. Pour The Batter
Use a measuring cup or ladle to pour batter into the center of the bottom plate. The amount depends on your model, but ½ to ⅔ cup is common. The batter should spread almost to the edges but not overflow.
Beginner mistake: Overfilling leads to batter spilling out and a mess. Start with less and add more next time if needed.
4. Close The Lid And Cook
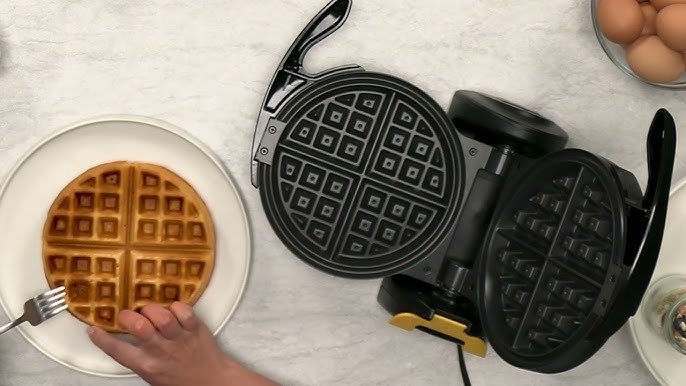
Gently close the lid. Do not press hard—let the lid settle on the batter. Most waffle makers cook in 3–5 minutes. The indicator light may tell you when it’s done, but these can be unreliable. Watch for steam: when it stops or slows down, your waffle is likely ready.
5. Remove The Waffle
Open the lid carefully (steam is hot). Use a plastic or silicone spatula to lift the waffle out—never metal, which can scratch the plates. If the waffle sticks, let it cook another 30 seconds.
6. Repeat
Re-grease the plates every couple of waffles if needed. Continue until all batter is used.
Credit: www.youtube.com
How To Know When Your Waffle Is Done
Every waffle maker is different, but these signs help:
- Steam slows or stops: Waffles release steam as they cook. Less steam means the moisture is mostly gone.
- Golden brown color: Open the lid a little and peek at the color.
- Crispy edges: The waffle should feel firm and crispy on the outside.
If it’s too pale or soft, close the lid and cook another minute.
Waffle Maker Settings And Adjustments
Some waffle makers have a browning dial or settings for light, medium, or dark. Start with medium if unsure. Lighter settings give softer, paler waffles; darker settings make crispier, deeper brown waffles.
| Setting | Result | Best For |
|---|---|---|
| Light | Pale, soft waffles | Kids, soft texture lovers |
| Medium | Golden, balanced crispness | Most people |
| Dark | Deep brown, extra crispy | Fans of crunchy waffles |
Non-obvious insight: Waffle makers take a few batches to “break in.” The first waffle may stick or look odd, but later ones cook more evenly.
Cleaning And Caring For Your Waffle Maker
Good cleaning makes your machine last longer and keeps waffles tasting great.
- Unplug and cool: Always unplug before cleaning. Let it cool down but not get cold—warm plates are easier to wipe.
- Wipe with a damp cloth: Use a soft, damp towel to wipe away crumbs and oil. Never use metal scrubbers.
- Remove stuck bits: For stubborn crumbs, use a soft brush or a toothpick.
- Never immerse in water: Electric waffle makers can’t be washed in water. Only wipe the outside with a damp cloth.
Tip: If you spill batter, clean it right away (while warm) for less scrubbing later.
Troubleshooting Common Problems
Waffles Stick To The Plates
- Not enough oil—add a bit more next time.
- Waffle undercooked—let it cook longer.
- Too much sugar in the batter—sugar burns and sticks easily.
Waffles Are Soggy
- Waffle maker not hot enough—preheat fully.
- Batter too wet—reduce liquid next time.
- Stacking hot waffles—steam trapped between waffles makes them soggy. Place cooked waffles on a wire rack, not a plate.
Batter Overflows
- Using too much batter—use less.
- Batter too runny—thicken with a little extra flour.
Practical tip: The learning curve is short. After your first two waffles, you’ll understand your machine and batter much better.
Creative Ways To Use Your Waffle Maker
Waffle makers aren’t just for breakfast. You can cook other foods for fun and variety.
- Hash browns: Shredded potatoes pressed in the waffle maker cook up extra crispy.
- Brownies: Use thick brownie batter for quick, chewy treats.
- Quesadillas: Warm and crisp tortillas with cheese inside for a crunchy snack.
- Omelets: Pour beaten eggs with vegetables for a quick, fluffy breakfast.
Experiment, but always grease the plates well and avoid overfilling.
Safety Tips For Beginners
- Always keep the waffle maker on a heatproof surface.
- Never touch hot plates with bare hands.
- Watch for steam—it can cause burns.
- Unplug when done, even if it has an auto-off feature.
- Keep away from children while cooking.
How To Store Leftover Waffles
If you have extra waffles, don’t waste them. Here’s how to keep them tasty:
- Let them cool completely on a rack.
- Store in a zip-top bag or airtight container in the fridge for up to 3 days.
- For longer storage, freeze waffles in single layers with wax paper between them.
To reheat, toast in a toaster or oven for best crispness. Microwaving makes them soggy.
How To Choose A Waffle Maker For Beginners
If you’re still shopping, here are some factors to think about:
- Size: Compact models are easier to store but make smaller waffles.
- Nonstick plates: These make cleaning easier and reduce sticking.
- Indicator lights: Helpful for knowing when to add batter or remove waffles.
- Adjustable temperature: More control over browning.
- Price: Good beginner models cost $20–$50.
Here’s a quick comparison of key features:
| Feature | Why It Matters |
|---|---|
| Nonstick Surface | Easier release, simple cleaning |
| Removable Plates | Simplifies washing |
| Timer/Indicator Lights | Reduces guesswork |
| Size | Fits your kitchen space |
Non-obvious insight: Some waffle makers work better with thicker batters, while others handle thin batters well. Read your model’s manual or check reviews for best results.
For more details on different models and their features, visit the Waffle Iron Wikipedia page.

Credit: www.wikihow.com
Frequently Asked Questions
Why Do My Waffles Stick Even Though I Use Oil?
Even with oil, waffles may stick if the plates are not fully heated or if the batter has too much sugar. Try preheating longer and using less sugar. Also, the first waffle often sticks more—later ones release better.
Can I Use Pancake Batter In A Waffle Maker?
You can, but waffle batter usually has more fat for crispiness. Pancake batter works, but your waffles may be softer. Add a tablespoon of oil or melted butter to pancake mix for better results.
How Do I Make Waffles Crispier?
Use less liquid in your batter, cook on a higher setting, and serve waffles immediately. Letting them sit on a rack instead of a plate keeps them from steaming and getting soggy.
Is It Safe To Open The Lid While Cooking?
Opening the lid too early can split your waffle or make it stick. Wait until steam slows down or the indicator light says it’s ready before checking.
How Do I Clean Stuck-on Batter?
Let the plates cool slightly, then wipe with a damp towel. For stubborn bits, use a soft brush or wooden toothpick. Never use metal tools or put the appliance in water.
Making waffles at home is simple once you know the basics. Start with a clean, hot waffle maker, use a balanced batter, and don’t worry if your first try isn’t perfect. With every batch, you’ll get better and more creative.
Soon, making waffles will be an easy, delicious way to brighten your mornings or surprise your friends and family.