Learning how to use a milk frother on an espresso machine isn’t just about making hot milk. It’s a physical skill. Your steam wand can produce café-quality microfoam.
But only if you know what to look for and what to listen for. Most home baristas give up too soon because the learning curve feels steep at first.
The Specialty Coffee Association sets clear standards for milk texturing. Properly steamed milk should reach between 135°F and 155°F with a glossy, paint-like consistency. As of 2026, home espresso machines have better steam pressure than ever before.
Even entry-level models can create latte art worthy foam. You just need the right technique and a willingness to practice.
Quick Answer
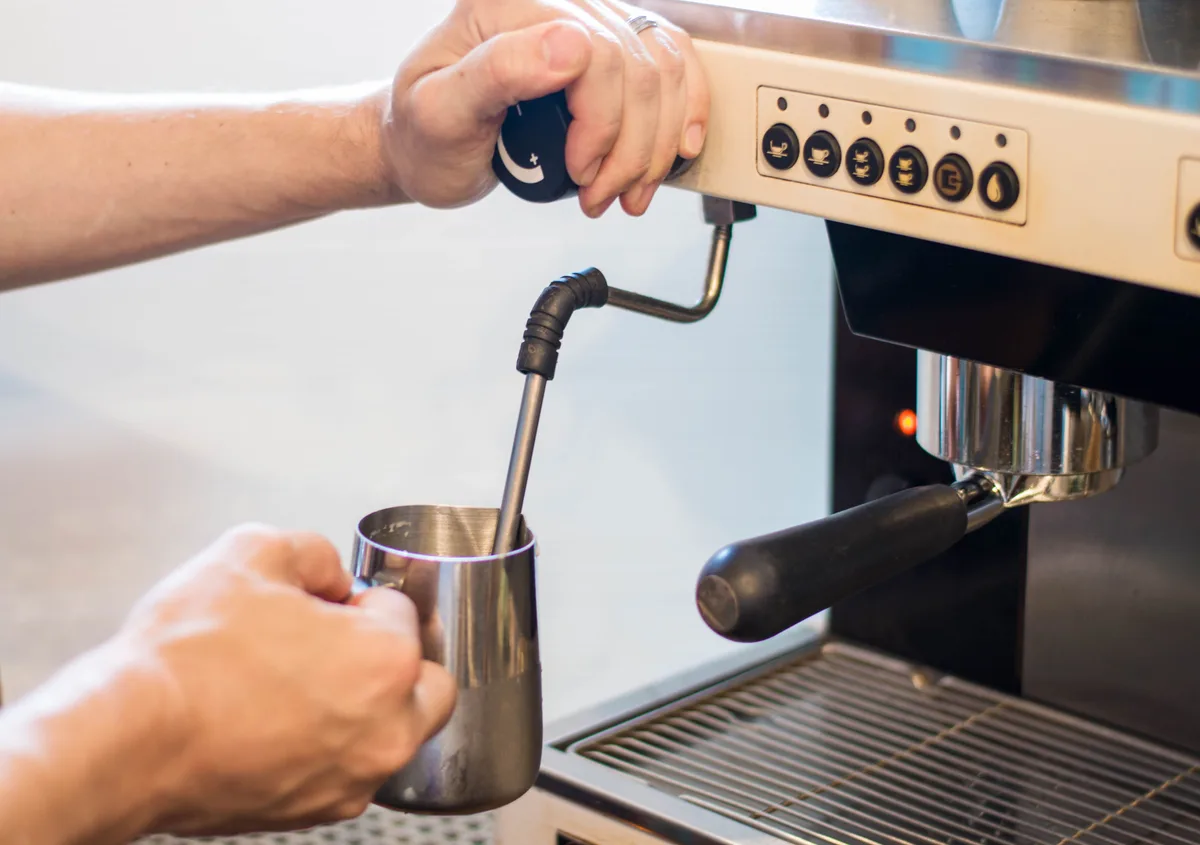
To use a milk frother on an espresso machine, start by purging the steam wand. Fill your pitcher one-third full with cold milk. Position the wand tip just below the surface.
Stretch the milk for about 5 seconds. You’ll hear a gentle kissing sound. Then submerge the tip deeper to create a whirlpool.
Stop when the pitcher feels too hot to touch. Tap and swirl before pouring.
Can You Use a Separate Milk Frother With an Espresso Machine?
Yes. You can use a separate milk frother with an espresso machine. Pull your espresso shot as usual, froth the milk separately, then pour it into the espresso.
A handheld or automatic frother is convenient if your machine has no steam wand or you want an easier option. But the result can be different. Many separate frothers create thicker foam with more visible bubbles rather than the silky microfoam you want for latte art.
If your espresso machine has a steam wand, learning to use it gives you more control over how much air enters the milk and how the final texture feels. That’s the method we’ll focus on here.
If your machine uses a Pannarello attachment, don’t worry. We’ll cover how that type of wand behaves too.
The Skill Your Espresso Machine’s Steam Wand Demands
Steaming milk with an espresso machine is different from using a handheld frother. The steam wand heats the milk while adding and incorporating air to create smooth microfoam.
The key is learning to control the wand rather than simply turning on the steam. The wand’s position, the sound it makes, and the movement of the milk all tell you whether you’re adding too much or too little air.
For beginners, start with cold whole milk. Its higher fat content makes it more forgiving while you’re learning. Once you can create smooth microfoam consistently, you can adjust your technique for oat, almond, or skim milk.
A stainless steel pitcher also helps because you can feel the milk’s temperature through the pitcher wall. The right technique matters more than having expensive equipment.
What You’ll See (and Hear) Before You Even Start
The Steam Wand and Tip: 1-Hole, Multi-Hole, and Pannarello Attachments
Your steam wand tip determines how air enters the milk. Single-hole tips are common on commercial machines and higher-end home models. They push steam through one focused opening.
That gives you precise control but demands good technique. Multi-hole tips like 2-hole or 4-hole designs distribute steam more evenly. They create a gentler whirlpool with less effort.
Most home baristas find multi-hole tips easier to learn on.
Then there’s the Pannarello wand. This is the plastic-sheathed attachment found on entry-level machines like the De’Longhi Dedica. It has a built-in air intake hole that automatically sucks in air.
The result is thick, frothy foam with almost no skill required. But it’s nearly impossible to get true microfoam from a Pannarello. The bubbles come out larger and drier.
If you want to pour latte art, you’ll eventually need to remove the Pannarello sheath and use the bare metal tip underneath. Some machines let you do this easily. Others require a small modification.
The Milk Pitcher: Spout Shape, Size, and Why Stainless Steel Wins
Stainless steel is the standard for a reason. It conducts heat efficiently so you can judge temperature by touch on the pitcher wall. Glass and ceramic pitchers don’t give you that feedback.
The spout shape matters too. Sharp, narrow spouts give you better control for latte art pours. Rounded spouts work fine for basic texturing but make detailed patterns harder.
Pitcher size is often overlooked. Use a 12-ounce pitcher for a single drink. A 20-ounce pitcher handles two drinks comfortably.
The rule is simple. Fill your pitcher no more than one-third full with cold milk. Milk roughly doubles in volume during proper frothing.
If you overfill, you’ll have milk splashing out before you reach temperature. If you underfill, the whirlpool won’t form properly and you’ll struggle to incorporate air evenly.
Purging, Pitcher Fill Level, and Chilling the Milk
Always purge the steam wand before inserting it into milk. Open the steam valve for a second or two. You’ll see a burst of water spit out first.
That’s condensation sitting in the wand. If you skip this step, you’re adding water to your milk. Watery milk won’t froth properly and tastes thin.
Cold milk is non-negotiable. Start with milk straight from the refrigerator. Around 38°F to 40°F is ideal.
Cold milk gives you more time to stretch before it hits the target temperature. If you start with room-temperature milk, it’ll overheat before you’ve built enough foam. Some baristas even chill their pitchers in the freezer for a few minutes before starting.
It’s a small trick that buys you precious extra seconds of stretching time.
The Two-Phase Technique: Stretching Then Texturizing
Every successful steaming session follows two distinct phases. Skipping either one ruins the result. Phase one is stretching.
That’s where you inject air into the milk. Phase two is texturizing. That’s where you break those air bubbles into microscopic foam and incorporate everything evenly.
The transition between phases is subtle but critical. Miss it and you’ll get either thin, watery milk or thick, dry froth.
Phase 1: The Kissing Sound and Surface Ripple (Stretching)
Stretching begins the moment you open the steam valve. The wand tip should sit just barely below the milk’s surface. We’re talking a few millimeters.
Not half an inch. Just below. The visual cue is a slight rippling or dimpling on the surface.
You’ll see the milk’s surface gently churning right around the tip.
The audio cue is unmistakable. You should hear a soft, intermittent “chirping” or “kissing” sound. Some describe it as paper tearing gently.
It’s not a roar. It’s not a scream. If you hear a loud screeching noise, the tip is too shallow.
Air is blasting across the surface instead of being drawn in. That creates big, irregular bubbles that won’t incorporate. If you hear nothing at all, the tip is too deep.
You’re just heating milk without adding any air.
Stretching typically lasts 3 to 8 seconds depending on your drink. A cappuccino needs more foam, so stretch longer. A flat white or latte needs less, so keep it brief.
The milk volume will visibly expand during this phase. You’ll see the level in the pitcher rise as air gets folded in. When you’ve added enough air, it’s time to transition.
Phase 2: The Silent Whirlpool and Milk Roll (Texturizing)
To transition, raise the pitcher slightly. This submerges the wand tip deeper into the milk. About half an inch to an inch below the surface.
The chirping sound stops immediately. Now you’re in the texturizing phase. The goal here is to create a vigorous, silent whirlpool.
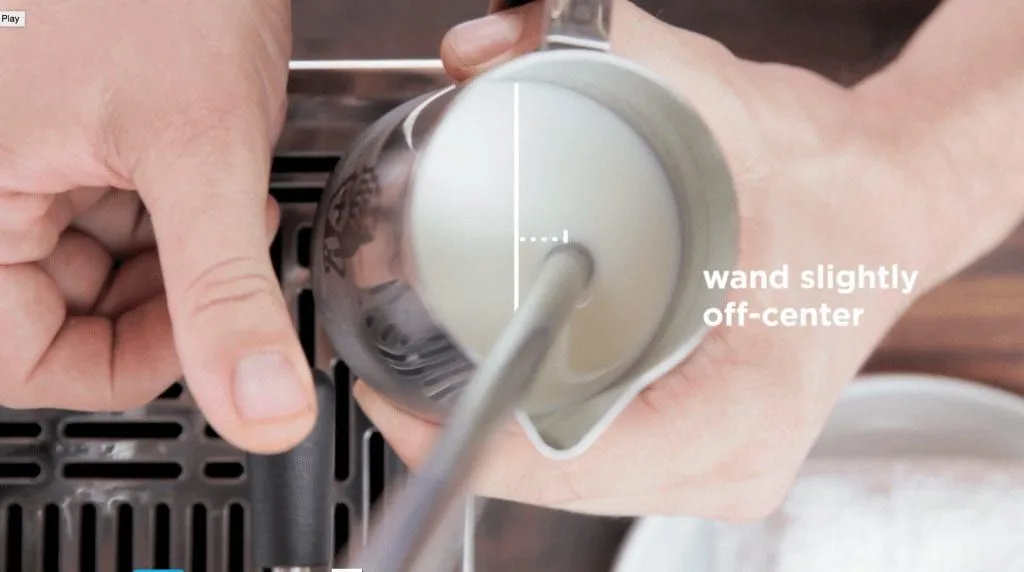
Position the wand tip off-center in the pitcher. Not dead center. An off-center position creates a spinning vortex that rolls the milk continuously.
This rolling action is what breaks down those larger bubbles from the stretching phase. It shears them into microfoam so fine you can’t see individual bubbles. The milk should be spinning fast enough that you see a clear whirlpool shape.
But not so fast that it splashes out.
The texturizing phase continues until the milk reaches temperature. Your free hand stays on the pitcher wall the entire time. When the metal becomes too hot to comfortably hold for more than a second or two, you’re at roughly 140°F.
That’s your stop point. Shut off the steam before removing the wand from the milk. Never pull the wand out while steam is still flowing.
It’ll blast a crater in your finished milk and send hot droplets flying.
How to Create the Perfect Whirlpool Vortex: Every Single Time
The whirlpool is the engine of good milk texturing. Without it, you’re just heating milk with some bubbles on top. The vortex pulls air bubbles down from the surface and cycles them through the high-shear zone near the wand tip.
That’s where the real work happens. Each bubble gets torn apart and refined until it’s microscopic.
Finding the right wand position takes experimentation. Start with the tip about halfway between the center of the pitcher and the side wall. Angle the wand slightly so the steam flow pushes the milk in a circular motion.
You’re aiming for a smooth, fast spin. Not a chaotic churn. If the milk is sloshing violently, adjust the angle.
If it’s barely moving, move the wand closer to the edge or tilt it more aggressively.
The pitcher’s position matters too. Hold it steady. Don’t chase the whirlpool by moving the pitcher around.
Let the steam do the work. Keep the wand tip at a consistent depth. As the milk volume expands during stretching, you’ll need to lower the pitcher slightly to maintain that just-below-surface position.
This is the hardest part for beginners. It requires coordinated movement between your two hands. One hand controls the steam knob.
The other adjusts pitcher height. Like any physical skill, it becomes automatic with practice.
Different steam tip configurations change the whirlpool behavior. A single-hole tip creates a more focused, intense jet. You’ll need to be precise with placement.
A 4-hole tip disperses steam more broadly. It’s more forgiving and creates a gentler whirlpool with less effort. If your machine has a 4-hole tip and you’re getting a weak vortex, your steam pressure might be low.
Give the boiler more time to recover between drinks. On a single-boiler machine, steam pressure drops as you use it. Waiting 30 to 60 seconds between drinks lets the boiler rebuild pressure for better performance.
What Perfect Microfoam Actually Looks and Moves Like
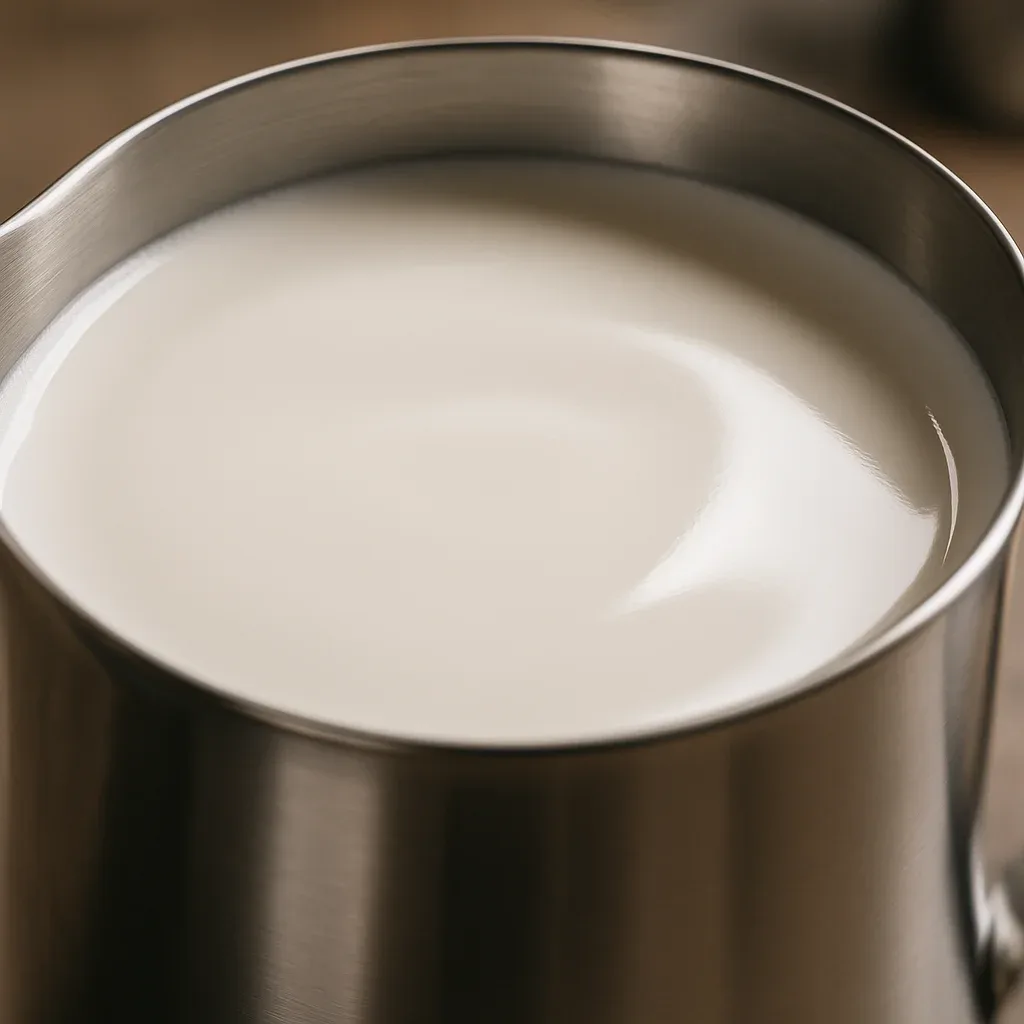
You’ll know you’ve nailed it before you even pour. The visual cues are unmistakable once you’ve seen them. Perfect microfoam looks like wet paint.
It has a uniform, glossy surface with zero visible bubbles. When you swirl the pitcher, the milk moves as one cohesive body. There’s no separation between liquid milk and a foam cap.
It’s all integrated.
The Wet-Paint Gloss and No Visible Bubbles
Swirl the pitcher immediately after steaming. Keep swirling for 5 to 10 seconds. This motion reincorporates any foam that might be starting to separate at the surface.
The milk should coat the inside of the pitcher with a smooth, even film. If you see any bubbles larger than a pinhead, you didn’t texturize long enough. Or your stretching phase was too aggressive.
The surface should reflect light evenly. Think of the way fresh paint looks when it’s still wet. That glossy, mirror-like finish.
If the surface looks matte or has a meringue-like texture, you’ve made dry foam. That’s fine for a traditional cappuccino but useless for latte art. Dry foam sits on top of the drink like a dollop of whipped cream.
Microfoam integrates with the espresso.
Pouring a Rosetta or Heart: What the Base and Flow Should Look Like
When you start pouring, the first stream of milk should dive through the crema and disappear. This is the base pour. It establishes the canvas.
After a few seconds, the milk should start to leave a white trail on the surface. That’s your cue to begin the pattern. Lower the spout closer to the crema.
The milk should flow out smoothly and sit on top rather than sinking.
If the milk pours out in a thick blob, your foam is too stiff. You stretched too long or didn’t texturize enough. If the milk leaves no white trail at all and just looks like thinned coffee, your foam is too thin.
You didn’t stretch enough or the milk separated while sitting. A well-steamed pitcher of milk is stable for about 30 to 60 seconds before it begins to separate. That’s why you should always pull your espresso shot and steam your milk as close together as possible.
Freshly steamed milk waits for nobody.
For those getting a consistent grind at home, the espresso base matters just as much as the milk. A shot with good crema supports the milk pattern. Thin, watery espresso won’t hold latte art no matter how perfect your foam is.
The same principle applies to weighing your coffee dose accurately. Consistency in one area amplifies gains in another.
Judging Milk Temperature by Sight, Touch, and the “Stop Point”
Your hand is the most reliable thermometer you own. Keep your palm flat against the lower half of the pitcher wall. When the metal becomes too hot to hold comfortably for more than a second, you’re at roughly 140°F.
That’s the sweet spot.
Milk scalds around 180°F. At that point the proteins denature and the milk tastes burnt. The visual cue is a wrinkled skin forming on the surface.
There’s a distinct cooked smell too. Stop well before then.
A clip-on thermometer helps while you’re learning. The Specialty Coffee Association recommends stopping between 135°F and 155°F. Shut off the steam as the needle climbs through 135°F.
The milk will carry over a few more degrees after the steam stops. That gets you right into the ideal window.
The Biggest Visual Mistakes That Wreck Your Froth
Screeching, Big Bubbles, and Splattering
A loud screech means the wand tip is too shallow. Air blasts across the surface instead of folding in. The result is a cap of large, soapy bubbles that pop within seconds.
Lower the pitcher until the sound softens to a gentle kiss.
Thin, Foamless Milk and Why the Wand Dove Too Deep
No sound at all means the tip is fully submerged. You’re heating milk, not frothing it. The liquid will be hot and thin with zero texture.
Raise the pitcher until you hear that chirping start. The tip needs to sit right at the boundary between air and milk.
Burnt, Skin-Forming Milk and the Tattletale Smell
Overheated milk smells unmistakably of cooked dairy. A wrinkled skin forms on the surface. The sweetness is gone.
There’s no fixing this. Dump it and start over. Keep your hand on the pitcher.
Never steam by time alone.
Steaming Across Milk Types: Whole, Oat, Almond, and the Splitting Problem
Whole milk is the most forgiving. The fat content cushions the proteins and builds a stable foam. Learn on whole milk first.
Non-dairy milks are trickier. Oat milk froths the closest to whole milk. Barista editions contain added stabilizers and fat.
Almond milk tends to separate or “split” when heated too fast. Steam it gently and stop at a lower temperature, around 130°F. Soy milk can produce excellent microfoam but overheats quickly.
The key with any milk alternative is to stretch less and texturize more. Non-dairy proteins are less robust. Over-stretching creates a brittle foam that collapses.
If you’re using filtered water in your kettle, the same principle helps your espresso machine. Clean water means less scale buildup in the steam boiler and better pressure over time.
Cleaning and Unblocking Your Steam Wand: The 30-Second Post-Use Ritual
Wipe the wand immediately after every use. Milk dries fast and hardens like cement. A damp cloth does the job.
Purge the wand again after wiping. A quick blast of steam clears any milk that gotsucked up inside the tip. Skip this step and you’ll have a clogged wand within days.
A blocked steam tip means weak steam pressure and uneven frothing. If the holes look crusted over, soak the tip in hot water for ten minutes. Use a pin or a dedicated steam wand cleaning needle to clear each hole.
Most manufacturer manuals include a maintenance section with exact cleaning intervals. Follow them. A kitchen scale that works properly relies on clean sensors.
Your steam wand relies on clean holes. Same principle.
Expert Visual Workflow for Low-Pressure Home Machines
Entry-level machines with small boilers need a different approach. Steam pressure drops quickly. You can’t muscle through with raw power.
You have to be more deliberate.
Start steaming before the ready light clicks off. On single-boiler machines, the heating element stays on while you steam if you catch it at the right moment. Open the steam valve just as the light turns on.
The element keeps heating and maintains pressure longer. This buys you an extra 10 to 15 seconds of usable steam.
Purge thoroughly before starting. Low-pressure machines accumulate more condensation in the wand. A longer purge clears it out.
Position the tip with extra care. At 0.5 bar of pressure, you don’t have the force to correct a bad angle. The whirlpool must be dialed in from the first second.
Stretch fast. You have less total steaming time with weak pressure. Get the air in during the first 3 to 5 seconds.
Then focus entirely on the whirlpool. Keep the vortex spinning as fast as the pressure allows. The milk might take 40 to 50 seconds to reach temperature instead of the usual 25.
That’s fine. Let it take the time it needs.
Pro Tips for Transitioning from Pannarello Wand to Bare Steam Tip
Removing the Pannarello sheath changes everything. The auto-frothing sleeve did all the work before. Now you’re in control.
The first few tries will be messy. That’s normal.
The bare tip is smaller than you expect. It sits deeper in the milk. You’ll need to hold the pitcher at a steeper angle to find the right surface position.
Start with the wand angled toward the side of the pitcher. The steam jet from a bare tip is more focused. It creates a tighter, faster whirlpool.
Expect splashing at first. The bare tip is less forgiving of sloppy positioning. Keep the pitcher on a solid surface if hand-holding feels unstable.
Some home baristas rest the pitcher on the drip tray for stability while learning. Once you’ve mastered grinding fresh beans and steaming milk manually, your home coffee setup rivals most cafés. The two skills feed each other.

Latte Art Pouring Cues: Pitcher Height and Milk Flow
Once your milk is properly textured, pour it into the espresso right away. Start about 3 inches above the cup so the milk flows through the crema and blends into the espresso.
When the cup is about half full, lower the pitcher close to the surface. Pour steadily in one spot to create a simple white circle, then lift the pitcher and draw a thin stream through the center to form a heart.
If the milk sits on top as a thick blob, your foam is too stiff. Stretch the milk less next time. If the pattern disappears into the espresso, the foam is too thin and needs slightly more air.
The goal isn’t perfect latte art. It’s learning how your milk texture behaves when you pour.
Frequently Asked Questions
How long should I steam milk with an espresso machine wand?
Most home machines take 20 to 35 seconds to steam 6 to 8 ounces of milk to 140°F. Low-pressure machines may need 40 to 50 seconds. The exact time depends on your steam boiler power and the starting temperature of your milk.
Always use touch as your guide, not a timer.
Why is my steam wand making a loud screeching noise?
The wand tip is too close to the surface. Air is escaping around the tip instead of being drawn into the milk. Lower the pitcher slightly.
The sound should soften to a gentle chirping. A screech means big bubbles are forming. Those won’t incorporate into microfoam.
Can I froth milk with a Pannarello wand attachment?
Yes, but with limits. The Pannarello produces thick, dry foam suitable for cappuccinos. True microfoam for latte art is difficult to achieve.
Removing the outer plastic sheath exposes the bare metal tip underneath on many models. That gives you the control needed for silky microfoam.
What temperature should milk be for a latte?
Shoot for 135°F to 140°F. The Specialty Coffee Association recommends a final temperature below 155°F. Milk tastes naturally sweetest around 135°F.
Above 155°F, the sugars break down and the texture thins. Above 180°F, the milk scalds and develops a burnt taste.
Why does my oat milk separate when I steam it?
Oat milk proteins are less stable than dairy proteins. Overheating or stretching too aggressively causes separation. Use barista-formulated oat milk with added stabilizers.
Steam gently. Stop at a lower temperature, around 130°F. Texturize thoroughly but don’t over-stretch.
How do I clean a clogged steam wand tip?
Soak the tip in hot water for 10 minutes. Use a pin or a steam wand cleaning needle to clear each hole. Purge the wand after cleaning.
Wipe and purge after every use to prevent clogs from forming. A clean kettle produces better-tasting water. A clean steam wand produces better foam.